Showing posts with label summer. Show all posts

Tuesday, September 2, 2014

Blueberry Crumb Bars

Blueberry Crumb Bars

For those freshly picked berries just waiting to be poshed!

Can you think of a better way to end summer vacation than with a family BBQ, complete with smoked brisket, ribs, beans, homemade sides, and delectable blueberry crumb bars? My cousin was nice enough to surprise us with pounds (and I mean pounds) of freshly picked blueberries. I realize there's a ton of recipes one can make with blueberries (and trust me, we have enough berries to try plenty!), yet something about classic blueberry crumb bars...I couldn't resist!

Recipe from Brown Eyed Baker

Juicy blueberries, layered between flaky, buttery dough... it's no wonder they were such a hit! I found the recipe on Pinterest (big surprise, right?) and you can find it by clicking here or visiting www.browneyedbaker.com/blueberry-crumb-bars-recipe/. The ingredients are simple, no-fuss required! And combined, they make this wonderful dessert! (or snack, or breakfast? There's berries in them, after all!)

The recipe was also wicked easy.  As a note, I lined my 13x9" pan with parchment paper. This way, the entire batch could easily slide out of the pan and be cut. Parchment paper works great for baking any type of bars, fudge, cookies, you name it! (That's my pitch for parchment paper, by the way.) 
Line the pan with parchment paper for easy removal
How could this recipe be poshed? (Although the recipe on it's own is pretty dang delicious!) But if you feel like being creative, try using a raspberry filling, or spread a can of lemon pie filling on the bottom layer of dough before topping it with the blueberries and crumb. Another option: make the bottom dough thicker by using all the batter, then sprinkle an oat-crumb topping over the blueberries. You could even make individual crumb pies! Let the kitchen move you, and your taste be your guide. I'm sure it will be delicious!

Posh Update:

Now, you may have noticed my little 'blurb' under the "Posh Cuisine" logo. I am back at school, getting ready for another exciting year! I will keep posting, for I have lots to share! Plus, I care about helping you find and develop your posh in the kitchen (while having some fun!) Posh is not something one just 'perfects' in a summer. It takes time, practice, and dedication (plus a stocked pantry and big appetite never hurt). It may take more time in between posts and recipes, that's all! 

Try out this recipe (as I highly recommend you do), or browse through the many I've posted this summer. And keep checking in for updates, posts, and more! 
With love (for food),
Ellen
--A dash of posh can make all the difference in your next dish!--

Saturday, August 9, 2014

Crisp Chocolate Chip Cookies

A Posh Cuisine Update & Cookie Jar Favorite

UPDATE: First, I have to say I'm so sorry for not posting a lot! This past week has been super busy and while I know that's no excuse, you need to know how much I think of you, my readers! And I'd love to show you what I've been doing...


This was my first wedding cake attempt because...my uncle is getting married on Saturday! And I'm making the cake!! (Eeeep! Are you as excited as me!?) I know I should have told you sooner, but with all the baking and recipe testing going on this summer, it's been crazy!  I've been doing so much research towards making a wedding cake, in addition to finding the pans and equipment (there's a lot to it!). And since I was going to a family BBQ today, I thought it'd be a great time to put my research to the test and make a smaller version of the cake. (With a theme to match this summer party, of course!)

Wedding Cake #1
It was such a huge hit! I don't even know where to begin! The flavor, texture, frosting - everything! This is no cardboard cake with frosting. If Posh Cuisine is going to make a cake, it's gotta be pretty and delicious! (That's how true posh is measured.) And this cake has got some posh, let me tell you!

But now, let's get back on topic. What's this about a "cookie jar favorite" in the title?
Click here for the recipe!
Want a chocolate chip cookie which melts in your mouth? Doesn't get hard-as-a-rock in the cookie jar? Holds up to freezer storage and still tastes fresh? Then look no further! The recipe I am about to share is a favorite of mine (and I'm pretty picky when it comes to cookies). It's always a huge hit with the family, at parties, as gifts, with my friends at school - you name it! So thank you again Taste of Home, because this recipe for Crisp Chocolate Chip Cookies is fantastic! And I must warn you - not only will these cookies remain airy and melt in your mouth, they're addicting, too!

I follow the recipe on this one, yet I always use crisp rice cereal (never cornflakes) and quick-cooking oats (never regular). I also always use Hershey's Special Dark chocolate chips in nearly all my cookie recipes. They're wonderful chips for both melting and baking (and snacking...). As seen in the image above, I always flatten these cookies just a tad before baking for a smoother-topped cookie. The recipe yields about 6 dozen (using a large cookie scoop), so I highly recommend freezing some!


I actually prefer them frozen...they're just wonderful! Store them in plastic freezer bags for months - they'll stay tasting fresh and delicious! This is the only chocolate chip cookie recipe I like to make now, and trust me, I've made it a lot! For some reason, they just don't last long in my house (or at school with my friends). This recipe is amazing and I just know you'll love them! Click here or visit www.tasteofhome.com/recipes/crisp-chocolate-chip-cookies for the recipe. And keep it posh, people!

With love (for food),
Ellen
-A dash of posh can make all the difference in your next dish!--

Friday, August 1, 2014

Cobb Salad

Cobb (Posh) Salad

Not Your Ordinary Salad!


I'm a salad girl. I confess! As much as I'd love to tell you I'm your solid, meat-and-potatoes girl with a heart for cheesy side dishes, my heart yearns for that fresh crunch of lettuce under a sweet vinaigrette. Don't get me wrong though! I love a good chicken pot pie or fall-off-the-bone ribs. Yet, every now and then, I want a meal to freshen up my palate, as I step back from all the heavy cooking. So, I give you this Cobb Salad, with tons of posh and so many ways you can make it your own! In fact, I'm calling it Cobb (Posh) Salad. Give it a chance! (You might just like this whole 'salad' thing!)

There are so many ways you can make Cobb Salad (or most salads, for that matter). This is how I did it. You do it the way you want! I customized each plate for each person (all three of us - Mom, Dad, and me!) Extra tomatoes on one, bacon on two, avocado on all three, you get the idea! But talk about fun to make! It's like an entire plate of posh! How you arrange the veggies, what type of dressing, chilling the plates, serving the eggs warm, grilling the corn etc etc etc! We should really just omit the "Cobb" and call it "Posh Salad."

Each topping can be poshed as well. For example, the corn (the only thing not individually pictured below, of course) was from a partial bag of frozen corn. I defrosted it in the microwave, and threw it in a cast iron skillet. Then, cook until it browns, season with garlic powder and pepper, and viola! Perfectly poshed corn to top this Cobb (Posh) Salad. Think of all the creative ways you can posh the other toppings!


The dressing is another very important salad component. I love this brand called Annie's. (Check out annies.com to see all the great products!) It's natural, organic, and delicious! This was the the first time I tried the Annie's brand salad dressing and it was amazing! A good Cobb (Posh) Salad needs a dressing which will allow the flavors of the toppings to really shine, just like this Fat Free Raspberry Balsamic Vinaigrette. It wasn't too sweet and had just enough tang to lightly flavor the entire dish.

So what are you waiting for!? Posh up some fun in the kitchen and impress your dinner guests with customized Cobb (Posh) Salads! 
With love (for food),
Ellen
--A dash of posh can make all the difference in your next dish!--


Tuesday, July 29, 2014

Lemon Blueberry Bread

Great recipe alert!! 

Prepare yourself for the flavors of the season with this Lemon Blueberry Bread!


After picking a couple pints of fresh blueberries, some just had to be made into lemon blueberry bread! (But not just any lemon blueberry bread. This recipe, found here, is fantastic!)


The bread took less than 30 minutes to whip together (Just don't really whip it! It's very important to gently fold the dry ingredients into the wet and use great care when adding the blueberries. This way the bread stays light and airy.) Also, since the recipe only calls for a little lemon, I'd recommend adding some extra zest and freshly squeezed juice for that burst of lemon flavor! (Don't be afraid to add a bit of posh right into the batter!)

The recipe also calls for a glaze, yet I found with some extra blueberries and a sprinkle of sugar on top (more posh!) it was just enough! (The extra lemon juice in the batter really helps, too.)

So, if you're up for a quick and easy bread, with fresh summer flavors - this is the one! It stays moist, light, and delicious. It's great for brunch or even dessert! (Or both...like with whipped cream and extra blueberries on the side...) And you can add the icing, or sprinkle your own posh on top. Maybe you want to try it with raspberries in place of the blueberries? This bread would be excellent paired with a cream cheese filling or frosting, too. There are so many ways you can make this your own! Grab your apron and try it for yourself!

'Posh' is Spreading...

Also, quick update! Last night my dad was in charge of dinner, and since I wasn't allowed to snoop around the kitchen or guess what he was making, I was left only with the beautiful aroma drifting through the house of this homemade beef stroganoff. With its white wine and fresh mushrooms, topped with nonfat Greek yogurt (no, not sour cream!) and dried parsley flakes, each plate was a masterpiece and tasted delicious! He really put the 'posh' on this dish and it was amazing! So well done, Dad!


With love (for food),
Ellen
--A dash of posh can make all the difference in your next dish!--

Tuesday, July 8, 2014

Best Sugar Cookie Recipe EVER!

World's Best Sugar Cookies

(And I mean the "best")

I have found the most amazing recipe for sugar cookies WITH royal icing! Look no further for a sugar cookie which melts in your mouth, yet stands the test of rolling, cutting, and being iced. Even without the icing, and merely baked up as a drop cookie - these. are. the. best. They're not too sweet. They have just enough lemon flavor. And they're wonderful. So thank you to Butter, with a Side of Bread for this amazing recipe and step by step instructions!

These cookies were such a big hit, my family is still raving about them! To quote my dear grandmother (who doesn't really eat sugar cookies as rule), these were "absolutely the best I've ever had." Along with that, I heard her say they were "so light!" and "the world's best sugar cookies!" (Now you know they're good!) I was touched. It was such an honor! I really put myself into these cookies, and took the time to roll, cut, bake, frost, and decorate each one. And trust me, these cookies certainly took time, but were totally worth every sweet, lemony bite. 

Plus, this recipe was super easy to follow. I made the cookies up one day (the hottest and most humid day of the week, of course). The next day I made the royal icing (a great recipe, too - I used the meringue powder version) and put it into small squeeze bottles with caps. This site does a great job explaining how to frost the cookies, and above I showed my step-by-step process. (As a note, don't be afraid to add a little water to the icing if it becomes too thick. Adding a couple drops at a time and stirring well can make a huge difference.) 


In total, I spent about 4 hours frosting, and there were a lot of cookies! So, this would be a great recipe to make with friends or family. Click here to see the recipe (and visit an awesome site). Plus, there's so many ways you can make this recipe your own by adding some posh! Choose your colors, shapes, decorations, perhaps a theme, or roll the cookies into balls, dip in sugar, and bake as classic sugar cookies. Whatever you choose, they will be delicious - I just know it. And your family, too, will fall in love with these light, soft, hint-of-lemon sugar cookies! (Mine did!)
With love (for food),
Ellen
--A dash of posh can make all the difference in your next dish!--

Friday, June 27, 2014

Rhubarb-Lemon Coffee Cake

Coffee cake just got even more delicious!

It's rhubarb season!! This beautiful green and red stalk with a mix of sweet and bitter makes for delectable dishes, such as in pies, jams, sauces, and this coffee cake. This cake, a recipe by Taste of Home, is fantastic!! (I'm just gonna go ahead and say it's the best coffee cake I've ever had. Period.)

It was perfect for a mid-morning brunch on our porch, as we enjoyed the beautiful weather and time with family. Making it was also a breeze! Honestly, the most time consuming part was peeling and chopping the rhubarb nice and small (peeling it isn't necessary, but it will ensure the rhubarb becomes soft and tender as the cake bakes).

Variation Ideas: 
Don't have any rhubarb? No worries! The lemon coffee cake itself, even without the filling was so moist and wonderful! Plus, I'm sure it'd be great filled with lemon pie filling, or any fruit of your choice. Just layer it in where the rhubarb would go!

As another variation - using your favorite crumb topping (say, with oats or granola) would also be delicious! There are many ways you can make this delicious coffee cake your own!


Good News:
Wanna know the best part (besides the taste)? It's healthy! (What!?) I know, that "H" word really packs a lot in today's society - but it's true! I got this recipe from my healthy cookbook by Taste of Home. Now, that doesn't mean you should just devour the entire cake, (although that's what we did...) but you can rest easy knowing your serving is not loaded with a ton of fat and bad calories. (Phew!)


You. Need. To. Try. It! What more can I say?! Even the leftovers (if there are any, that is) stay wonderful - I definitely know I'll be making it again soon! (Maybe even in individual cupcake or mini-loaf pans, just for fun...)

I'm serious. You will love the refreshing lemon and sweet rhubarb flavor in every bite - it's like summer in cake form! And there's so many ways you can posh this! Mix up the filling, use an oat or granola topping, maybe sprinkle extra lemon zest on top, or whatever! Find the recipe here and make it yours.


With love (for food),
Ellen

 --A dash of posh can make all the difference in your next dish!--


Tuesday, June 24, 2014

Campfire Baked Potato

Posh Cuisine: Outdoor Style!

Mid-70s during the day, in the '40s at night - now that's good camping weather! Yes, I was a little chilly at times... (it can be in the '80s and I'll be cold.) However, with a roaring campfire, and these campfire baked potatoes (and a bag of marshmallows, of course), my Daddy-Daughter camping trip this past weekend was wonderful! Not only did I learn some valuable camping skills, manage to keep my feet dry as I crossed flowing rivers and brooks, and catch up on some valuable bonding time with my favorite Daddy - I was also able to bring the posh outdoors! And with some planning ahead, you too can put the posh in campfire cooking!

Now, when it comes to outdoor cooking, my Daddy is a pro. If you can make it indoors, he can make it outdoors. (Needless to say, I ate very well during this camping trip.) And we were really roughing it, too. I made pancakes with no spatula for Saturday's breakfast and ate my dinner that night right out of the pan! (Tough times, I'll tell ya.)

Now, let me tell you about these potatoes! We used Yukon Gold potatoes (they have an awesome buttery taste and make delicious mashed potatoes). We also planned and prepared our meals in advance (a great suggestion for you future campers) and stored everything in a cooler. And, by making this dish in the foil so it was all ready to go, dinner was one less thing to worry about as we hiked, gathered wood, and enjoyed the fresh mountain air.

Now, where's the posh? Adding posh is no challenge when planning ahead. Below you'll see how we set up this potato dish and ways to incorporate your own special posh before heading into the wilderness.

This is where the dish can become whatever you want! We kept it simple by adding a dash of Tuscan seasoning mix, and wrapped it up. *Note: Wrap it in foil twice! The outer foil can get charred and blackened during the baking process, while the potato and first layer of foil stay clean and wonderful!


Once it's all 'poshed' up to your liking and you're ready to eat, it's time to make the fire! That means gathering firewood... When you think you have enough wood - go get more. THEN it should be enough. Next, (carefully) make the fire and once it's going strong, just tuck the foiled potatoes onto the side of the flame. You don't want them directly in the fire (unless you want burned-to-a-crisp baked potato). The potatoes should be perfectly cooked after about 40 minutes (we left ours in a little longer and they were so soft and delicious). Now, what if you didn't pack any tongs/pickups!? How will you ever get them out of the fire!? This is where handmade tongs made out of a tree branch become very useful (bottom center picture). Now that's posh!

See? With some simple planning ahead and preparation, you too can bring the posh outdoors! And may I say, it is delicious and such a comfort at the end of a busy, camping-packed day! What would you add to your campfire baked potato dish?? How would you 'posh' it up???

With love (for food),
Ellen
--A dash of posh can make all the difference in your next dish!--

Wednesday, June 18, 2014

Thai Salad - As Seen on TV!

Ty's Thai Salad

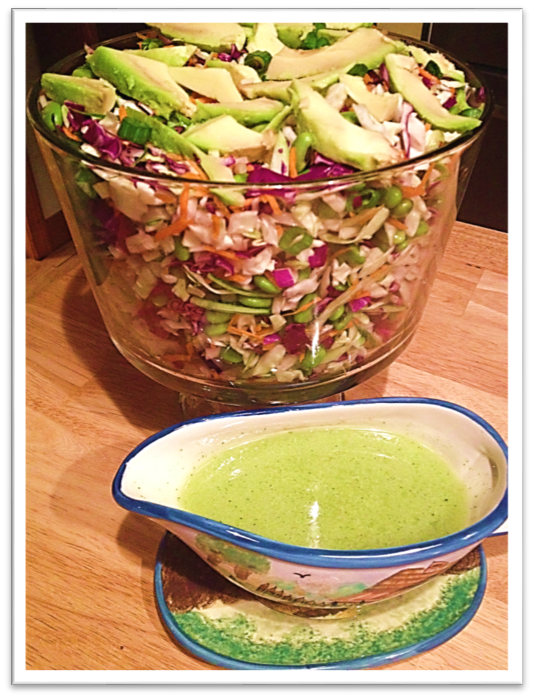
This salad, an original from "Trisha's Southern Cooking" show on Food Network, is amazing! I made it for dinner the other night, and it was such a hit - I had to share! Now, this recipe makes a huge batch! (I even cut it in half and we're still eating leftovers!) That being said, it would make a great addition to a BBQ this summer, or even a potluck. (Or dinner with plenty of leftovers for the week.) The crunch of the cabbage and edamame, plus the sweet lime-cilantro dressing make this salad like no other!
Ty's Thai Salad (With Posh!)
Plus, you can posh it up however you like! I piled plenty of avocado on top, along with some chives. This salad would also look beautiful layered, or with a sliced lime garnish. Whichever way you choose, it will be delicious, zesty, and refreshing. (Don't be surprised if you find yourself making this dressing for other salads, too - it's that good!) People will just eat it up (literally!) once they experience the sweet lime flavor with this crunchy, fresh salad. So thank you Trisha Yearwood! (Find the recipe here.) Enjoy!
With love (for food),
Ellen
--A dash of posh can make all the difference in your next dish!--

Saturday, June 14, 2014

Peanut Butter Cup Ice Cream...Yum!

Happy Birthday, Brother! Now, my brother LOVES peanut butter - except "love" doesn't even come close! Speaking with him last week, he told me his breakfast usually consists of a bowl of vegetables and a spoonful of peanut butter (but not together, don't worry). So, for his birthday - what better gift than peanut butter cup ice cream!? I used homemade peanut butter ice cream as the base, then added in peanut butter cup pieces and a chocolate-peanut butter fudge swirl. How was it, you may ask? In my brother's words, it was "exquisite!" (Which actually translates to "Wonderful! Best ever! Loved every bite! You're the best little sister in the whole world!" - Although the latter part sometimes gets jumbled in translation.) All the same, I was touched. So, happy birthday big brother! (Not that he reads this...his girlfriend usually gives him the "highlights")

Making it was a blast - my first ice cream in my ice cream maker! Plus, it was pretty easy. I started by finding a recipe for peanut butter ice cream (on Pinterest, of course), found here. In this recipe, I used regular sugar, 1/2 cup of creamy peanut butter (can you really have too much peanut butter in peanut butter ice cream?), and regular heavy cream. See my ingredients below. Also, can we take a moment to appreciate the Market Basket theme here?? I love Market Basket... I could spend hours in there! (And I have...)


Then, I cooked it! (kinda sorta) I started by combining everything in a pot on the stove except the eggs. (In the words of Bill Cosby, "you have to be careful with eggs...") After letting the sugar dissolve over low heat, I added a little of the warmed mixture to the egg yolks, then added the egg yolks to the mixture. (This way I wouldn't have scrambled egg-peanut butter ice cream, yummy.) I chilled this mixture overnight in the fridge and poured it in the ice cream maker the next morning.

When it was almost done in the ice cream maker (about 20 minutes later), I added some chopped up peanut butter cups and folded in the chocolate peanut butter swirl. To make this swirl, combine about 1 tablespoon of unsweetened cocoa powder with about 1/4 - 1/3 cup of creamy peanut butter. Microwave for about 30 seconds, or until it's warm and melty. Then, fold it into the ice cream to create a nice swirl effect. Once completed, I stored it in a clean yogurt container wrapped up nicely, and hid it in the freezer! That evening, (after a delicious BBQ turkey dinner), I surprised him with the container, plus 2 peanut butter cups for his presentation (posh), and a new bowl! He was responsible for sending me a picture of the finished product (below).

(I'm digging his posh!) And I'm so glad he enjoyed it! (The spoonful I had scraped from the bottom of the ice cream maker bowl was pretty dang good, too! Very smooth and creamy). Try it for yourself with whatever add-ins, or swirls, or posh you like! And for all you peanut butter lovers out there, (yes, you have some competition once you meet my brother), go crazy! And have fun! :) 
With love (for food),
Ellen
--A dash of posh can make all the difference in your next dish!--

Tuesday, June 10, 2014

(Make Your Own) Pasta Salad


Pasta Salad - YOUR way!

It's finally hot outside! (and humid...let's not forget that.) All the same, I'm loving every warm, sunny day! Now, during a hard (hot) day of baking and yard work, I was in the mood for a colorful, cold pasta salad - but oh what kind do I make!? How much dressing? How many veggies? How much pasta!? Well, lucky for you, I have already fretted over these questions, and after much estimating (and Pinterest pasta salad recipe searching), I've got a great base recipe for pasta salad! I'll show you how I made my pasta salad, with what was in my "fridge-of-goodies," and explain how you can transform this to make your own pasta salad!


First thing's first - you must assess your ingredients! Use whatever veggies you have on hand, any pasta you find in the pantry - even dare to make it a twist on leftovers! (Plus, there's no need to go out and buy an entire pack of bell peppers if you're only going to use 1/2 cup, or a zucchini if you only need half. See what's hiding in that vegetable drawer, first!) Below are the ingredients I had on hand, cut up and ready to go!

With pasta salad, practically anything goes! It's a canvas for true creativity and posh. For example, you could go vegetarian and substitute beans or eggs for the tuna. Perhaps you have leftover ham or turkey in the fridge? Chop it up and toss it in! You could even try adding fresh dill and cucumbers! (My mind is racing with ideas before my fingers can type now...) If you find your salad is too dry, whip up some more dressing or simply drizzle the salad with a bit more olive oil, garlic salt, and pepper. *I usually use garlic salt in cooking because it tends to add a great hint of flavor. Of course, this does not apply to baking (Yum.. garlic-y chocolate chip cookies - no thanks!)


*As a tip, do not rinse the pasta with cold water to 'chill' it faster for the salad. Doing so could prevent the dressing from properly sticking to the pasta. (No one wants slippery, unflavored pasta, right?) I'd recommend making this salad in advance and keeping it in the fridge until serving (overnight would be ideal, plus then the flavors have time to become better acquainted...) Of course, making it up for that day's lunch may require some quick 'freezing' an hour or so beforehand.


Can we also take a moment to appreciate how colorful and healthy this pasta salad is? Full of veggies, grains, a small bit of healthy fats (from the dressing), those beautiful herbs... (and all topped with a bit of 'posh!' - what more could you possibly ask of a simple salad like this!?) So, next time it's hot and humid, and you're in the mood for a refreshing lunch (or even a side dish to dinner), see what you have for leftovers and create! Make your own pasta salad, and don't forget the posh!
With love (for food),
Ellen
--A dash of posh can make all the difference in your next dish!--

Tuesday, May 27, 2014

First Ice Cream Maker Creation!

Strawberry Lemon Cake Batter Frozen Yogurt

I FINALLY got to use my new ice cream maker!! (You may be wondering: the first thing I make is frozen yogurt..?) That's right! After browsing on Pinterest, (a favorite site of mine!) I found a recipe for Strawberry Lemon Cake Batter Frozen Yogurt - and I had to make it! I love light, refreshing desserts, and lemon-anything is always a big hit in my family! (Don't get me wrong though, I'm always in the mood for warm brownies or a hot fudge sundae, too! Pile on the whipped cream!) At the same time, this frozen yogurt was the perfect finish to a busy day of gardening and yard work! Find the recipe here (at iheartnaptime.net). With 3 simple ingredients and a bit of patience, it was fantastic!! 
3 Simple Ingredients
After whisking these together, I covered the bowl with plastic wrap and put it in the fridge to chill, so I could get the ice cream maker all set. Of course before that could happen, I managed to get into a fight with the plastic wrap box...and I lost.

A nurse's work is never done
Me vs. Plastic Wrap: All day I had been thinking to myself how miserable plastic wrap was, and how much I despised it.. all day! And then it attacks me!? I just wanted one piece to cover the batter, and it had to be the difficult piece. So, after the bleeding stopped and my mom (thank goodness she's a nurse!) bandaged me up, I continued with dessert!

The ice cream maker was SO EASY. I inserted the frozen bowl, poured in the batter, slid in the paddle, covered it, and viola! (Well, I plugged it in too, that helps). Within 30 minutes, I had beautiful, pink soft-serve frozen yogurt!


Fortunately, I made this up before dinner, rather than during - so I had enough time to put it in the freezer and let it get to a more 'scoop-able' consistency. (As a note, I think next time I'll make it up in the morning, so it has more time to 'chill out' (aha, get it?) in the freezer.) By dessert, it had reached a semi-soft-serve state, and was easy to serve!
For some added "posh," I sprinkled extra lemon cake batter mix over the top, and placed a fanned strawberry on each. (Mini chocolate chips were added later, amazing!) *To fan a strawberry, carefully slice towards the top, stopping about 1/4 inch from the green cap. Spread, or "fan," out the layers and it's done!*

A little posh on top!
Wasn't this recipe super easy!? I have so many ideas/plans for my ice cream maker this summer! At some point I will make traditional ice cream, yet for now I'm loving this yogurt lifestyle! There are tons of recipes out there, and I aim to find them! (And then add my own splash of 'posh!') Pinterest, here I come! And thank you Jamielyn at "i heart nap time" for this recipe!

With love (for food),
Ellen
--A dash of posh can make all the difference in your next dish!--

Monday, May 19, 2014

Sunday Dinner - Salad and Cupcakes

This was not your "traditional" Sunday dinner.. Tonight's dinner was my family's twist on tradition. Celebrating the end of finals (for both my brother and myself), Mother's Day (missed because of finals), and my grandmother's return to NH for the summer, we had the family gathered around a smoked beef brisket, smoked beans, grilled vegetables, warm rolls, summer salad, and ice cream filled cupcakes. These latter two were my department - I mean, what better way to kick off the summer (and summer break!) than fresh greens topped with berries and treats, and finish with a cool, indulgent dessert? Allow me to share...

Let's start with the salad!
While Daddy was tending to the smoker and the juicy, tender brisket being gently cooked by maple infused smoke, I was in the kitchen with Mom, beginning to create..
This salad is very basic, and has many variations! I was introduced to the 'simple salad' concept at my grandmother's house when she tossed lettuce, pears, and some nuts together as a side with dinner. The fruit made it wonderful and to a vinaigrette-lover like myself, it needed none! The fresh pears gave it the perfect amount of sweetness and juice. Ever since then, I have been creating simple side salads with seasonal fruits, arranged atop beds of freshly torn lettuce. For this salad, below, if you still like a little bit of extra 'tang' and dressing, I recommend Ken's Light Option Raspberry Walnut vinaigrette - it pairs very well!

Now for the cupcakes... A few extra steps are totally worth this decadent kick on the average ice cream & cake!

Straight from my book
First, let's begin with the chocolate cupcake part. I'm sure you could use a box mix.. but something about homemade chocolate cupcakes (made with real buttermilk) is so much more fun! I used a Taste of Home recipe from my "Bakeshop Favorites" cookbook (I LOVE Taste of Home - and I highly recommend their recipes, website, books, cooking shows, everything! You'll be seeing many more of their recipes here....) I made this recipe through the first step, and rather than heat up the oven and wait 12-15 minutes per batch, I used my Babycakes Cupcake maker. It makes a dozen regular sized cupcakes (and muffins) right on your counter top in about 10 minutes!  

I just plugged it in while I was making the batter - and it was ready to go!This recipe made 19 cupcakes (all with nice, puffed up tops - no wimpy flat cakes here). Of course, another fun part of this recipe is tasting the batter... 

Me: (takes beaters out, dripping with cake batter) Mom, I have a very important question for you...
Mom: YES! YES! Please!
Me: Is that your answer!? I didn't even ask!
Mom: (takes beater) Yumm...

Is it me or have the roles been reversed here..? Mom gets the beater (and the bowl) now!?
Even so, I can't blame her! This batter is delicious! Within 10 minutes, after putting the first dozen in the cupcake maker, the house smelled like a chocolate-infused dream! 


Once cooled, it was time to core them (using the little green thingy in the center of the picture below) and fill them with ice cream. I used plain vanilla ice cream (what we had in the freezer - feel free to use whatever flavor you'd like! I think a vanilla with chocolate swirl or small brownie bits would be awesome, too) I microwaved the carton for about 30 seconds, then whipped it up with a spoon so it'd be easier to scoop into the cupcakes. (Note: Once you start to fill them, be sure to act fast so the ice cream doesn't melt everywhere!)
*I left a couple cupcakes whole and saved the insides to use for mini chocolate cake trifles later this week.* Next, I stuck them in the freezer and waited until dessert...and waited... and I kept waiting....And after a great meal, it was time! This is where true 'posh' arrives. I started by chopping up two squares of dark chocolate and sliced a few leftover strawberries from the salad earlier as my 'decoration.' After arranging the frozen solid cupcakes on a cake platter, I went a little crazy with the whipped cream... and then gently sprinkled the chocolate bits all over them! As a final touch, I wedged a strawberry slice into the whipped cream on each one - and served! 
Let's just say, they were a huge hit and a great finish to our Sunday Dinner! (My brother was still talking about them the next day..) I hope you enjoy these recipes as much as my family and I did! And add your own creative twists! Find fruits you like for the salad, or use our favorite ice cream and cupcake flavors in the dessert! Also, whereas this is my first 'food' post, comment and let me know what you think, any ideas/changes you may have, or anything! I'd love to hear from you! 

With love (for food),
Ellen
--A dash of posh can make all the difference in your next dish!--