Showing posts with label breakfast. Show all posts

Tuesday, March 17, 2015

Cinnamon Crunch Bagels

I realize this will be my third bagel post... but they're just so much fun to make!! I blame my loving brother for getting me hooked on a similar type of cinnamon bagel from a local bagel shop at my school...

Now, there's just something about shaping, boiling, baking, and toasting for that perfect crunch and chewy center... every step in this recipe is well worth it! And this recipe was super easy to follow - and don't even get me started on the taste!! With cinnamon both in the dough, and cinnamon sugar on top, you'll see why they're called cinnamon CRUNCH bagels! So a big thank you to "Buns in my Oven" for this terrific recipe, found here!


Now, if this is your first time making bagels and you're thinking it's too much work, or it seems practically impossible...well...frankly, you're wrong. (Sorry.) But these bagels are super easy and so worth it!

Be sure to check out my other bagel posts (here and here) for further step-by-step instructions and tips for making bagels, or read on to see how I made these adorable cuties! (Yes, I made them mini bagel size because I think mini food is the cutest.)

I also took quite a few pictures... so hopefully that helps! I know you can do it! And let's be real, isn't that first bite into a crunchy cinnamon-y bagel smeared with cream cheese totally worth it? (The answer is YES.)


Be sure your water is warm when activating your yeast - and be patient! Give the dough the time it needs to kneed and rise.


Once risen, the dough is wicked easy to shape, and keeps its shape as you drop it into your boiling sugar water. These steps are also all repeated in the recipe, found here. (Posh tip: Line your baking sheet with parchment paper for easy clean-up and no stuck-on cinnamon sugar!)


The cinnamon sugar topping was my favorite part... (I love cinnamon if you haven't noticed from some of my previous posts...) Plus, you can save any extra topping for use on toast, pies, cakes, or oatmeal! We always seem to have cinnamon sugar at the ready in my house...


I also love the "homemade" shape look to them...I mean, they don't need to be perfectly round. They're homemade after all!


Thanks again to "Buns in my Oven" for this terrific recipe! If you love a crunchy cinnamon bagel as much as me, I hope you enjoy these! (Also, please be careful when removing these from a toaster... the sugar is very hot! - Trust me on this one.) Next time I make these, I might even throw in some raisins or sprinkle chopped walnuts on top... or maybe toast and serve with caramel sauce! The list of posh is endless!! 

With love (for food),
Ellen
-- A dash of posh can make all the difference in your next dish! --


Sunday, March 15, 2015

Cinnamon Rolls

Ciao!

My spring semester is going well, but man is it busy! Between classes, homework, exams, meetings...let's just say I'm on a well-needed spring break! So, here's a little poem to kick off the season!


 Next up, we get to the food!  

I have to share this amazing recipe for cinnamon rolls!! A favorite in my house, they're often requested for Thanksgiving, Christmas brunch (perhaps again at New Years), or whenever the mood strikes! (Let's just say I've made these quite a lot...) Yes, they require a sleepover in the fridge, but the dough is so pleasant to work with in the morning, you'll be jumping outta bed just to make them! Find the recipe here at
 http://www.tasteofhome.com/recipes/overnight-cinnamon-rolls and see for yourself!


I'm not even kidding - these are amazing! The dough rises beautifully overnight, and the second rise (after filling, rolling, and cutting them) is such a transformation! Mine are practically jumping out of the baking pan! Now, make sure they are fully baked before removing them from the oven. Since they're so tightly packed in the pan, they might take longer than 25 minutes - so use ye'ole toothpick trick and make sure there's no gooey centers! Then, once removed from the oven, drizzle with wonderful icing and serve! (This recipe makes a lot, and leftovers are great! Even if they don't last long in my house...)

I'll always love Taste of Home. Their recipes are simple, delicious, and can be poshed in so many ways! This recipe, for instance, even includes a couple variations, like a dark chocolate or orange-spice filling. The dough is also so versatile - you could fill these with anything you'd like! Other posh ideas include smearing the dough with your favorite spread (I love pumpkin butter) before rolling it up, or layering thinly sliced apples, raisins, and pecans atop the cinnamon sugar. Poof! There's your posh! Pleasepleaseplease try these cinnamon and let me know how much you love them!! (And how you poshed them!)

With love (for food),
Ellen
-- A dash of posh can make all the difference in your next dish! --

Wednesday, August 27, 2014

Sour Cream Coffee Cake

Classic Coffee Cake

Just Add Posh!


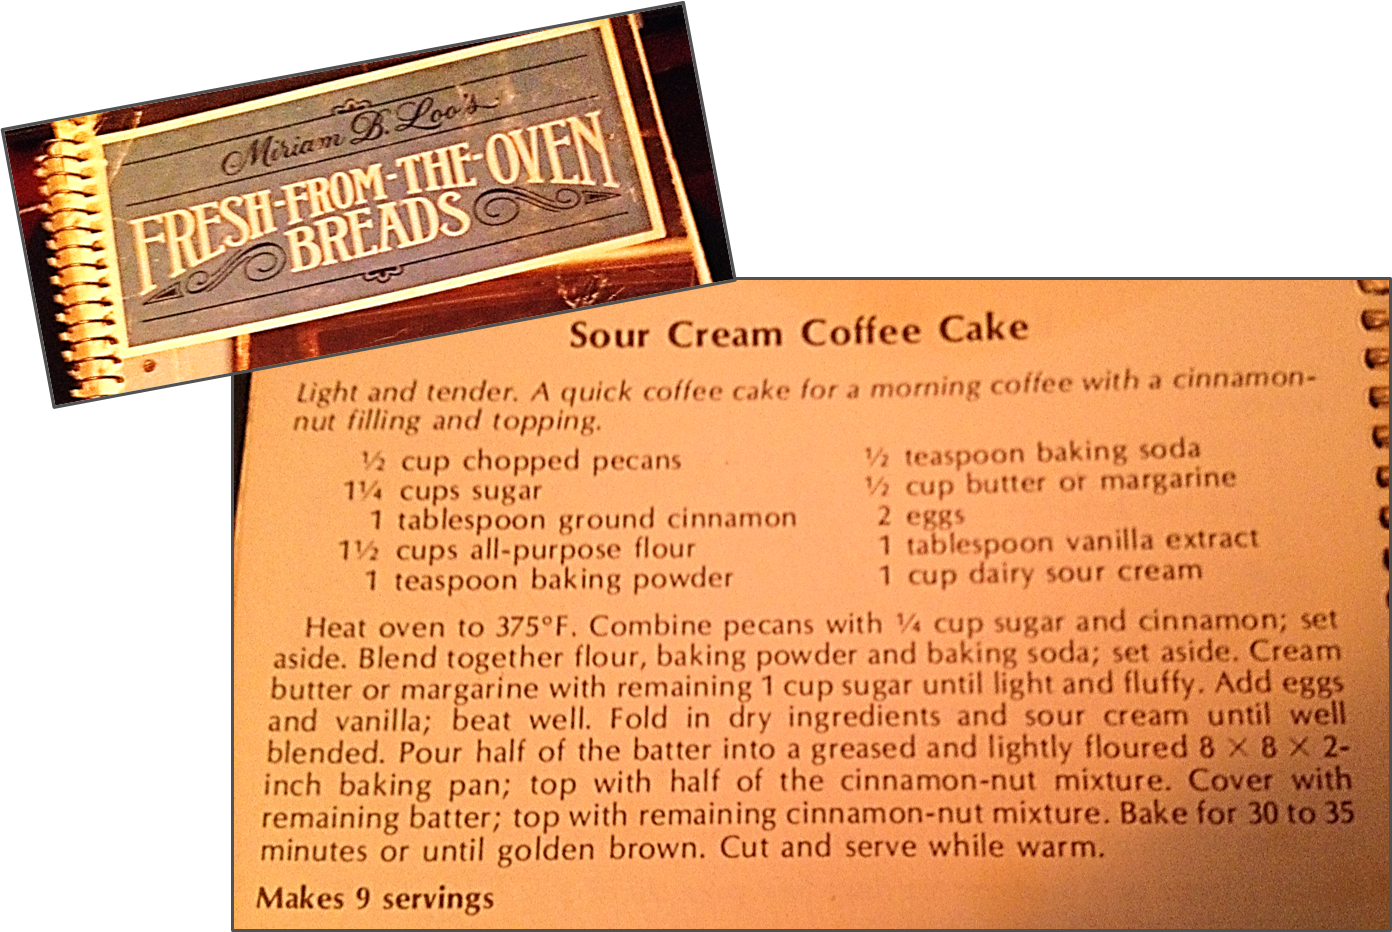
I thought after making (and eating) so much wedding cake lately, the last thing I'd be making is another cake! However, this one is a bit different... (I know, I know. Cake it cake. But this cake! This one!) This is a classic sour cream coffee cake, from a classic recipe book, and it's sure to fit in your collection!

Sour Cream Coffee Cake (Pecans & Cinnamon Sugar on top!)

Sometimes we all need to go back to the basics when it comes to recipes like this. Too often we see the already "poshed-up" versions. (Like the Rhubarb-Lemon Coffee Cake I made back in June. Click here to see because it's delicious! Talk about the perfect summer brunch!) Anyways, this recipe came from "Mariam B. Loo's Fresh from the Oven Breads" cookbook - a well used and loved staple in our kitchen!


This recipe is a terrific base for any type of coffee cake. "Base?" you may ask... With this simple recipe and its elegant taste, the cake lends itself to all sorts of posh! I made it just as the recipe directed (sometimes nothing beats a classic), and I encourage you to try it this way as well. Then take it to the next level! (Do note, the butter should be softened before creaming it with the sugar - just a tip!) Feel free to be creative by adding a fruit layer in the middle, or making coffee cake cupcakes, or even using your favorite crumb and icing topping! Don't like pecans? Try walnuts, or even no nuts!

1/2 the batter, then a layer of 'posh' and repeat!
With this simple recipe, you can really test your posh skills and make it your own. Impress your brunch mates with a new, all-you, recipe! This cake, even with no added posh, is a favorite in my house. Imagine what a difference a little posh can make!

As a fair warning, any leftovers of this cake don't last long... It's just too easy to cut off another piece, or have "one more bite." Make it in your home and see what I mean!

With love (for food),
Ellen
--A dash of posh can make all the difference in your next dish!--

Tuesday, July 29, 2014

Lemon Blueberry Bread

Great recipe alert!! 

Prepare yourself for the flavors of the season with this Lemon Blueberry Bread!


After picking a couple pints of fresh blueberries, some just had to be made into lemon blueberry bread! (But not just any lemon blueberry bread. This recipe, found here, is fantastic!)


The bread took less than 30 minutes to whip together (Just don't really whip it! It's very important to gently fold the dry ingredients into the wet and use great care when adding the blueberries. This way the bread stays light and airy.) Also, since the recipe only calls for a little lemon, I'd recommend adding some extra zest and freshly squeezed juice for that burst of lemon flavor! (Don't be afraid to add a bit of posh right into the batter!)

The recipe also calls for a glaze, yet I found with some extra blueberries and a sprinkle of sugar on top (more posh!) it was just enough! (The extra lemon juice in the batter really helps, too.)

So, if you're up for a quick and easy bread, with fresh summer flavors - this is the one! It stays moist, light, and delicious. It's great for brunch or even dessert! (Or both...like with whipped cream and extra blueberries on the side...) And you can add the icing, or sprinkle your own posh on top. Maybe you want to try it with raspberries in place of the blueberries? This bread would be excellent paired with a cream cheese filling or frosting, too. There are so many ways you can make this your own! Grab your apron and try it for yourself!

'Posh' is Spreading...

Also, quick update! Last night my dad was in charge of dinner, and since I wasn't allowed to snoop around the kitchen or guess what he was making, I was left only with the beautiful aroma drifting through the house of this homemade beef stroganoff. With its white wine and fresh mushrooms, topped with nonfat Greek yogurt (no, not sour cream!) and dried parsley flakes, each plate was a masterpiece and tasted delicious! He really put the 'posh' on this dish and it was amazing! So well done, Dad!


With love (for food),
Ellen
--A dash of posh can make all the difference in your next dish!--

Friday, July 18, 2014

"Everything-is-better-with-posh" Bagels

Posh...on a bagel?

Bagels. You may think of cream cheese, peanut butter, or maybe even salmon, but posh? Posh on a bagel, too?

Let's talk about posh for a minute. What is 'posh' exactly? I toss around the term a lot, and it's become a major part of my life. I try to put a little bit of 'posh' in everything I do, make, even the way I dress! It's fun! But, what exactly is it?

In short, it's a lot of things. So, here's ONE type of 'posh,' or at least one way of looking at it.

I'll put it into a food reference so we can all understand it a little better. Recall one of my first posts "Bagels - A beautiful and delicious transformation" (don't remember? click here for a refresher!). Well, the other day I found myself in a creative mood (and craving bagels). So, I decided to test my bagel making and posh skills with this wonderful recipe for Honey Whole Wheat Bagels, "everything" style!

I have to ask - why take the time to make something, following a recipe, and merely leave it at that? Why not be a little creative and add a little posh? Posh, in this case, is the creative spin you can put on your dish. Whether it's a topping, a sprinkle or garnish, or an entirely new ingredient - posh makes recipes special. It's a way to put yourself into each dish!                                                                                                                                       For example, I could have made this bagel recipe as I've done before, and leave them as delicious honey whole wheat bagels. OR I could make an "everything" topping and put a creative spin on this treat. (I chose the latter.) And it turned out fantastic! Never be afraid to try something new, or show a little of yourself in your dish. Sure, I've had recipes and ideas which don't work (like using raisins as a topping and not realizing they burn in a 450 degree oven, then tasting them...tastes like burned sugar.) But that's part of the fun! You'll never know if you don't try. And who knows? Maybe you'll find something you really like by adding that extra pinch, or sprinkle on top.

I definitely recommend taking the time to make these bagels. They're super fun, and really easy! Enjoy each moment as you shape the dough, let it rise, and add the posh. (Then toast and smear them with cream cheese as soon as possible, even if it means you're having bagels for dinner!) Take a creative spin on your next dish and let me know how it works! (And trust me, this won't be the last time you hear about this 'posh' business from me!)
With love (for food),
Ellen
--A dash of posh can make all the difference in your next dish!--

Sunday, July 13, 2014

Peanut Butter Banana (Chocolate Chip) Muffins

Muffins - Bakery Style (and healthy!)

I was in the mood for muffins...but not just any muffins! You see, I love muffins and muffin-shaped foods - I could eat muffins every day and love it! Yet, sometimes my muffin recipes end up with flat tops, or they're too heavy, and it breaks my heart. So, I've been doing some research...

In searching for how bakeries get that big, puffy, delicious muffin top, I began to notice how some recipes called for a baking temperature of 425 degrees, before lowering it to 350 degrees to continue baking. Intrigued, I had to try it. And viola! This recipe, from Sally's Baking Addiction, tested just that and was a huge success!


Almost full 
I found the recipe on Pinterest (where else?) and within minutes I was in the kitchen. And my grandmother's "Ellen is baking something" sensation must have been tingling because she stopped by the house just in time to try one! (And may I say, they totally passed inspection.)

Baking the muffins at 425 degrees for the first 5 minutes made such a difference, for it gave them a chance to puff up on the top, then continue baking after lowering the oven to 350 degrees. I also followed the instructions when filling the muffin pan, and put the batter nearly to the top of each liner (this recipe made 12 wonderful sized muffins.)
Now, for the taste - delicious! The chocolate chips are optional, but something about peanut butter, honey, and chocolate just makes a girl happy. I added a handful of mini dark chocolate chips into the batter, and sprinkled some on top before baking. (That's what I call posh!) Not to mention, these muffins are healthy! Healthy with everyday items! I'm all for good-for-you meals/snacks and these were perfect! Made with whole wheat flour, Greek yogurt, no butter, no oil - it's a muffin good enough for breakfast or a mid-day snack! (or both...and maybe lunch, too) I know you'll just love them! So, click here for the recipe, preheat your ovens to 425, get your ingredients out, and let your posh shine!

With love (for food),
Ellen

--A dash of posh can make all the difference in your next dish!--

Friday, June 27, 2014

Rhubarb-Lemon Coffee Cake

Coffee cake just got even more delicious!

It's rhubarb season!! This beautiful green and red stalk with a mix of sweet and bitter makes for delectable dishes, such as in pies, jams, sauces, and this coffee cake. This cake, a recipe by Taste of Home, is fantastic!! (I'm just gonna go ahead and say it's the best coffee cake I've ever had. Period.)

It was perfect for a mid-morning brunch on our porch, as we enjoyed the beautiful weather and time with family. Making it was also a breeze! Honestly, the most time consuming part was peeling and chopping the rhubarb nice and small (peeling it isn't necessary, but it will ensure the rhubarb becomes soft and tender as the cake bakes).

Variation Ideas: 
Don't have any rhubarb? No worries! The lemon coffee cake itself, even without the filling was so moist and wonderful! Plus, I'm sure it'd be great filled with lemon pie filling, or any fruit of your choice. Just layer it in where the rhubarb would go!

As another variation - using your favorite crumb topping (say, with oats or granola) would also be delicious! There are many ways you can make this delicious coffee cake your own!


Good News:
Wanna know the best part (besides the taste)? It's healthy! (What!?) I know, that "H" word really packs a lot in today's society - but it's true! I got this recipe from my healthy cookbook by Taste of Home. Now, that doesn't mean you should just devour the entire cake, (although that's what we did...) but you can rest easy knowing your serving is not loaded with a ton of fat and bad calories. (Phew!)


You. Need. To. Try. It! What more can I say?! Even the leftovers (if there are any, that is) stay wonderful - I definitely know I'll be making it again soon! (Maybe even in individual cupcake or mini-loaf pans, just for fun...)

I'm serious. You will love the refreshing lemon and sweet rhubarb flavor in every bite - it's like summer in cake form! And there's so many ways you can posh this! Mix up the filling, use an oat or granola topping, maybe sprinkle extra lemon zest on top, or whatever! Find the recipe here and make it yours.


With love (for food),
Ellen

 --A dash of posh can make all the difference in your next dish!--


Sunday, June 1, 2014

AMAZING Whole Wheat Banana Bread

BANANA BREAD - Whole Wheat & Wonderful!

There are SO MANY recipes out there for banana bread...trust me. I've looked! And then I found this one...You see, these browning bananas in my kitchen have been watching me for a couple days, and I knew I just had to take care of them. No banana looks at me that way and doesn't get made into a recipe! Meanwhile, I had been looking for a banana bread recipe which could be considered a "bread"  (meaning we could slice it, toast it, peanut butter it up, etc) rather than a cake or 'treat.' PLUS I wanted it to be made with whole wheat flour and act as a good, solid foundation for breakfast. This bread, below, this one simple recipe - made all these wishes come true. (But be careful what you wish for... or else you, too, could end up with 2 loaves of absolutely delicious banana bread and no self control to eat just one slice for breakfast.)
By searching on Pinterest (and after gawking at all the mouthwatering pictures), I found several recipes, most of which called for applesauce, or honey, or didn't lend themselves to becoming whole wheat. First, we didn't have any applesauce (so I planned on using plain nonfat Greek Yogurt, instead). Second, my honey stash was running low. Thirdly, I wanted this to be a breakfast type of bread, so the 'healthier,' the better. Finally, I settled upon the recipe found here, with a couple modifications of my own... 


This recipe was so easy, too! Mix the wet, add the dry, pour into the prepared pans, and bake! (Then stare at it until it cools enough to eat it.)

And finally, slice it up and eat it!! Its amazing!! It totally keeps it's "bread" shape (not too crumbly or cake-like), it's fantastic with peanut butter (and the extra crunchy honey peanut butter my daddy picked up...great find!), and toasted... words can't even describe it.  
So, search for that perfect whole wheat banana bread goodness no longer - and try this one! Eat it for breakfast, make it a snack, do it up sandwich-style, anything goes! (And then let me know how you like it!) And see how you can make it your own. Add that 'posh' and see what happens :)

With love (for food),
Ellen
--A dash of posh can make all the difference in your next dish!--

Tuesday, May 20, 2014

Bagels - A beautiful (and delicious) transformation

A few months ago, I made my first attempt at homemade pumpkin bagels (from a Taste of Home recipe, of course). They were terrific! I love complicated, muti-step bread recipes - and these bagels became my 'precious' as I kneaded the dough, let them rest, shaped, boiled, and baked them. With this in mind, I wanted to keep myself occupied during my first summer vacation "weekday," as my parents returned to work. I was (innocently) searching the web for a whole wheat bagel recipe when I stumbled upon a blog called "Simple Bites." On it, was a recipe for none other than honey whole wheat bagels! I read through the author's background story on the bagels, how she'd make them with her sister on Friday nights to sell the next morning, and how good she claimed they were - and I had to make them. Plain and simple. So, Monday morning, that's exactly what I did!
First, thank you to Aimee at Simple Bites! This recipe was terrific and so much fun to make!
Second, the bagels! Bagels are... magical. A complete transformation! What begins as a bowl of goupy dough made of flour, salt, honey, yeast, and water, becomes a crunchy, warm, delicious bagel!? It's magic I tell you! Hopefully you, too, can see this transformation...

After letting the warm water and yeast mingle for about 10 minutes, I added it to the whole wheat flour-honey-salt mixture. At this point, I had given up on trying to find our dough hook attachment for the mixer...so I settled for the paddle attachment (I'm so ashamed - what kind of bagel maker uses a paddle attachment when the recipe calls for a dough hook!?) It seemed to work okay though, the bagels still came out delicious! So, I continued with the recipe (and my paddle attachment) and added the bread flour, then kneaded it for 8 minutes using a spoon, because the paddle thought it'd be cool to pick up all the dough and whip it around the bowl rather than knead it.. The photo below on the left is how it looked BEFORE covering it to let it rise..
And the photo above on the right is how much it rose during that hour! Let's take a moment to appreciate this transformation. In a little over an hour, a bowl of just a few ingredients became a beautiful dough, puffed up and ready to be formed into bagels!
Well, first it was rolled into balls. Using a sharp knife, I (carefully) cut the dough into quarters, then cut those each in half, and so forth. And somehow.. I ended up with 17...(obviously simple division was never my strong point). After letting these cute little balls of whole wheat goodness rest for a couple minutes, I shaped them into bagels!
(as if one picture weren't enough, here's 3)
Look at the transformation now! And we're not even done yet!! Next, these precious little delicacies had to be covered and left to rest for about 10 minutes. Meanwhile, the pans were prepared, I brought the water (with 1 TBS of sugar) to a boil, and the egg wash and toppings were ready.
Then I finally got to bake them!! 20 minutes in the oven later.. and they had completed their final transformation! Wasn't that amazing!? Let's just take a few everyday ingredients, mix 'em together, knead a little, etc and boosh! Bagels - what!?

Some of them were shaped a bit funky.. but I'm gonna call that artistic flair! (Just a splash of posh, on my end.) My brother was the first to try them - and they earned his stamp of approval, so you know they must be good! They have just enough settle sweetness, and toasted the next day, they are delicious! I sliced mine, toasted it, and topped it with almond butter for breakfast... AMAZING! Little Cooper thought so too.. (he's my cute puppy, below).

I highly recommend you try them! It may seem like a lot of steps for a 'bagel,' but I'm telling you - it's totally worth it! Plus, you know everything in it, (it's fun!), there's no added 'stuff,' and as always, you can put your own creative twist on it! 

Find the recipe and Aimee's story at http://www.simplebites.net/honey-whole-wheat-bagels-and-this-bakers-early-beginnings/ (Thanks again, Aimee!)

With love (for food),
Ellen
--A dash of posh can make all the difference in your next dish!--