Friday, April 3, 2015

Giant Monster Cookies

Monster Cookies

Full of peanut butter, oats, chocolate chips - and no flour!

Let me start off by saying, these are absolutely MONSTER cookies! Toss aside that cookie scoop and grab a measuring cup because cookie-making time just got serious.

These Giant Monster Cookies (recipe here) will definetly become a favorite! And that's no mistake in the title. There is no flour in this recipe! Instead, you get an oat-packed, peanut butter-loaded, chocolate delight, good for any time of the day! Whether you're making them to refill the cookie jar or you're craving warm, fresh-out-of-the-oven oats, peanut butter, and chocolate - these cookies are a winner! Not to mention, they freeze well and make excellent gifts! (Of course, if you freeze them, I suggest popping them in the microwave right before devouring, so the chocolate can get all melty and warm...)

I followed this recipe as instructed, merely using mini m&ms and an entire bag of dark chocolate chips... who can blame me? And trust me, this recipe makes a LOT! And they're HUGE! Feel free to make them as big or as small as you'd like (mini monsters!). Oh! I also pressed mine slightly before baking (or rather, before staring into the oven, waiting for them to be finished...).  Now, posh these up however you like! (Coconut, walnuts, Reese's Pieces, chocolate chunks, chocolate peanut butter - the posh is endless!)
For a quick, easy recipe full of the stuff you love and sure to squash any hunger - here you are! Thank you again Taste of Home, for making the house smell great and the family happy with another terrific recipe

With love (for food),
Ellen

-- A dash of posh can make all the difference in your next dish! --

http://www.tasteofhome.com/recipes/giant-monster-cookies


Thursday, March 19, 2015

Homemade Ravioli

Homemade Ravioli

~ Lasagna Style ~


For those of you who may know me personally...you'll know I love anything Italian - the culture, language, people, food - you name it and I'm there! So, naturally, I love making pasta and I've been dying to make homemade ravioli!!
So, I planned a Grammy-Granddaughter day and that's exactly what we did. With Grammy as my sous chef (keeping the kitchen nice and clean as I constantly produced a mess), we made homemade ravioli! And the best part (besides eating it)? It was so easy!!

Now, there are tons of recipes in this internet-world of ours for homemade pasta dough, cheese fillings, sauces - I say just find one you like and go for it! I used a Taste of Home recipe, found here (or at the bottom of this post), for the dough part. That being said, 6 cups of flour, 6 eggs, 3/4 cups of water, 2 teaspoons of olive oil, and 8-10 minutes of kneading later, (and quite a work-out, let me tell you!) and we had perfect dough! I realize some dough recipes can be kneaded in the mixer, or made and rolled through special attachments/devices. I, however, wanted to get right to the roots of this Italian dish and do it by hand! (But you, my dears, can choose whichever method you prefer.)

Making the dough

Working with this dough was so nice!! As a note, I cut the dough into eighths before rolling it, so I could get nice, thin sheets to cut with my ravioli cutter. (Yes, I used a pastry/ravioli cutter and not a stamp or press. I feared dough sticking to a press and wanted to break out my new cutter.)

As for my filling, I did not follow a recipe. Instead, I let the 'Posh' be my guide, as I combined part-skim ricotta cheese with spinach, a handful of shredded mozzarella cheese, a few shakes of grated Parmesan, and a whole mess of Italian seasonings (plus garlic salt and pepper). A few taste tests later and it was ready to go!


So, onto a lightly dampened square of dough goes a heaping teaspoonful of filling, before being sandwiched by another damp square. Press the edges of the two squares together and viola! 

Ravioli!
Okay, I know I'm making it seem way too easy here...This is where it's nice to have a second pair of hands (thank you Grammy!) because this recipe makes a lot of ravioli. (I want to say we ended up with 46...) And it is a bit messy. You see, I have a slight tendency to overfill things, and when it comes to sealing the edges... let's just say perfection is for machines! I like the look of cheesy goodness oozing from the sides - it means there's actually more to the ravioli than just pasta with a little dollop of cheese! (At least that's my reason and I'm sticking to it.)

So, 46 ravioli and another mess in the kitchen later, and they were ready for boiling! I boiled about 6 at a time for two minutes (or until they floated to the top of the water) and it couldn't have been any easier! Even the few which may not have been sealed the best because of an excess of filling (hehe) boiled perfectly, totally keeping their shape! Now, you can stop here and serve with sauce, bake/fry them, devour as is - the choice is yours! Seeing as this Grammy-Granddaughter day should end with a nice, complete dinner, I layered the ravioli into a 13x9 pan and made them into ravioli - lasagna style!
If you think making lasagna is easy (and even if you don't and think it's the most time consuming thing in the world) - ravioli lasagna is WICKED EASY! I'm not even kidding! There's no sticky lasagna noodles, no smearing of the ricotta mixture, no forgetting a layer, and serving is a breeze! Being 3 layers deep, each serving held 3 perfect ravioli! (Leaving plenty of room for seconds and thirds, of course.)


Also, each ravioli fit across the pan perfectly, and as for the sauce - the recipes are endless. There is a recipe for sauce, located here, or you can use your own. Perhaps you want to keep it easy and buy a jar of sauce? Do whatever works for you! I made my own sauce, again letting the 'Posh' be my guide, as I guessed on the measurements and seasonings, and it came out great! Unless you're my mom and want the recipe...

Mom:   "Wow! This is the best sauce I've ever had! You have to give me your recipe!"
Me:       "Uh...my recipe... about a handful of this, a scoop of that... maybe some more of this..."
Mom:   "Yeah. Thanks."


Needless to say, the ravioli was a big hit! (No one leaves this house hungry, that's for sure!) Served with a fresh green salad and homemade rolls, our Italian dinner, and a fantastic Grammy-Granddaughter day, was complete! 

So, if you have the time, because this recipe does take a bit of time, or you want to try your hand at homemade pasta - this is a great place to start! The recipe for this dreamy, easy to work-with dough can be found again here, and poshed in so many ways! Next, I'd like to try a butternut squash filling in a creamy white sauce, or serve the ravioli baked, with marinara sauce on the side! 

Or, perhaps you'd like to try this 'ravioli lasagna-style' with your favorite fresh/frozen ravioli from the store, some sauce and cheese. It makes for an easy, Italian dish I'm sure you'll love! Keep it posh, my friends! 

With love (for food),
Ellen
-- A dash of posh can make all the difference in your next dish! --

http://www.tasteofhome.com/recipes/homemade-ravioli?keycode=ZPIN0314

Tuesday, March 17, 2015

Cinnamon Crunch Bagels

I realize this will be my third bagel post... but they're just so much fun to make!! I blame my loving brother for getting me hooked on a similar type of cinnamon bagel from a local bagel shop at my school...

Now, there's just something about shaping, boiling, baking, and toasting for that perfect crunch and chewy center... every step in this recipe is well worth it! And this recipe was super easy to follow - and don't even get me started on the taste!! With cinnamon both in the dough, and cinnamon sugar on top, you'll see why they're called cinnamon CRUNCH bagels! So a big thank you to "Buns in my Oven" for this terrific recipe, found here!


Now, if this is your first time making bagels and you're thinking it's too much work, or it seems practically impossible...well...frankly, you're wrong. (Sorry.) But these bagels are super easy and so worth it!

Be sure to check out my other bagel posts (here and here) for further step-by-step instructions and tips for making bagels, or read on to see how I made these adorable cuties! (Yes, I made them mini bagel size because I think mini food is the cutest.)

I also took quite a few pictures... so hopefully that helps! I know you can do it! And let's be real, isn't that first bite into a crunchy cinnamon-y bagel smeared with cream cheese totally worth it? (The answer is YES.)


Be sure your water is warm when activating your yeast - and be patient! Give the dough the time it needs to kneed and rise.


Once risen, the dough is wicked easy to shape, and keeps its shape as you drop it into your boiling sugar water. These steps are also all repeated in the recipe, found here. (Posh tip: Line your baking sheet with parchment paper for easy clean-up and no stuck-on cinnamon sugar!)


The cinnamon sugar topping was my favorite part... (I love cinnamon if you haven't noticed from some of my previous posts...) Plus, you can save any extra topping for use on toast, pies, cakes, or oatmeal! We always seem to have cinnamon sugar at the ready in my house...


I also love the "homemade" shape look to them...I mean, they don't need to be perfectly round. They're homemade after all!


Thanks again to "Buns in my Oven" for this terrific recipe! If you love a crunchy cinnamon bagel as much as me, I hope you enjoy these! (Also, please be careful when removing these from a toaster... the sugar is very hot! - Trust me on this one.) Next time I make these, I might even throw in some raisins or sprinkle chopped walnuts on top... or maybe toast and serve with caramel sauce! The list of posh is endless!! 

With love (for food),
Ellen
-- A dash of posh can make all the difference in your next dish! --


Sunday, March 15, 2015

Cinnamon Rolls

Ciao!

My spring semester is going well, but man is it busy! Between classes, homework, exams, meetings...let's just say I'm on a well-needed spring break! So, here's a little poem to kick off the season!


 Next up, we get to the food!  

I have to share this amazing recipe for cinnamon rolls!! A favorite in my house, they're often requested for Thanksgiving, Christmas brunch (perhaps again at New Years), or whenever the mood strikes! (Let's just say I've made these quite a lot...) Yes, they require a sleepover in the fridge, but the dough is so pleasant to work with in the morning, you'll be jumping outta bed just to make them! Find the recipe here at
 http://www.tasteofhome.com/recipes/overnight-cinnamon-rolls and see for yourself!


I'm not even kidding - these are amazing! The dough rises beautifully overnight, and the second rise (after filling, rolling, and cutting them) is such a transformation! Mine are practically jumping out of the baking pan! Now, make sure they are fully baked before removing them from the oven. Since they're so tightly packed in the pan, they might take longer than 25 minutes - so use ye'ole toothpick trick and make sure there's no gooey centers! Then, once removed from the oven, drizzle with wonderful icing and serve! (This recipe makes a lot, and leftovers are great! Even if they don't last long in my house...)

I'll always love Taste of Home. Their recipes are simple, delicious, and can be poshed in so many ways! This recipe, for instance, even includes a couple variations, like a dark chocolate or orange-spice filling. The dough is also so versatile - you could fill these with anything you'd like! Other posh ideas include smearing the dough with your favorite spread (I love pumpkin butter) before rolling it up, or layering thinly sliced apples, raisins, and pecans atop the cinnamon sugar. Poof! There's your posh! Pleasepleaseplease try these cinnamon and let me know how much you love them!! (And how you poshed them!)

With love (for food),
Ellen
-- A dash of posh can make all the difference in your next dish! --

Wednesday, January 7, 2015

Meringue Kisses

I can't believe my last post was in October...That's so last year! And let me tell you, quite a lot has happened. Sometimes life catches up with you and before you know it, it's already 2015! Rest assured, school is going well and, being the nerd I am, I loved my classes this past semester! But I won't bore you with details. Let me just say I absolutely missed you all and I apologize for not posting in such a long time!!

Now, onto far more important things - let's get to the food! And the posh! To start off, I have a fantastic recipe for light, melt-in-your-mouth Meringue Kisses. Find the original recipe I used here. Each bite literally melts in your mouth, leaving behind the fresh, crisp taste of almond. It's one of those "can't have just one" type of treats - which is fine because once you see what's in them (or not in them), you won't mind eating the entire batch! I certainly didn't mind...


Egg whites. Sugar. Cream of tarter. Flavoring. Food coloring (optional). Can you get any more guilt free!? I found this recipe on Pinterest (where else?) and was immediately intrigued. I made my first batch as the meringue trees with sugar sprinkled on top, yet finding it only made one tray and some were left a little chewy -despite the four hours in the oven -I opted to try making mini kisses - I had a winner.

Really, you can make any shape/size/color/flavor you like. I just happen to love food in cute, mini form... hence these kisses were born! And don't be intimidated by the long time in the oven. They're really super easy to make! (Plus you get to lick the bowl when you're done...totally worth it if you ask me!) As a note, making them as small as I did filled three trays - so it makes plenty! Which is perfect because they don't last long in my house...

The recipe, again found here, calls for gel food coloring and certain sprinkles. Honestly, use what you have! I added a few drops of liquid food coloring and used decorative sugar crystals - so make them your own! (Isn't there a word for 'making something special and adding your own unique twist?' I think it starts with a "P...")

Finally, don't just take my word on these little bites of pure bliss. They were such a huge it at Christmas - I don't even know how many batches I've made since! The almond flavor is exquisite and perfect for the holidays. But once you try them with lemon extract and yellow food coloring... just trust me and try it. It's amazing.

With only a couple ingredients and an oven with no plans, these delectable and not-so-guilty treats can be melting in your mouth in no time! (Okay, at least four hours, but you get the point.) So what are you waiting for!? You have to try these Meringue Kisses!!

With love (for food),
Ellen
-- A dash of posh can make all the difference in your next dish! --

Friday, October 10, 2014

Apple Pumpkin Bundt Cake


Apples + Pumpkin + Cake

(Can you say delicious!?) 


It's been far too long since I last posted and I apologize! Who knew college would get this busy so quickly!? And no, I don't mean busy with naps, television, and the occasional exam or two. (Although a couple of naps have found their way into my schedule...). I'm the type of person who enjoys having plans and events. Yet, I was able to squeak in a weekend home for a very special occassion (and this very special cake!)  In searching for the perfect dessert for my grandmother's birthday, I found this recipe for Apple Pumpkin Bundt Cake and I had to make it! It was love at first site when I read the recipe...and love at first bite when I made it! Find the recipe here to try it for yourself: http://juliasalbum.com/2013/11/apple-pumpkin-bundt-cake/

Look at all that hot caramel poured on top!!
Words can't even begin to describe how moist and delicious this cake was, and making it was so easy! Plus, using only one cup of pumpkin puree gives the cake a settle orange color, while the apple and cinnamon flavors can still really shine. Drizzle some hot caramel on top and you've practically got yourself a caramel-dipped apple in cake form! (Not to mention you've got one poshed-up, delectable cake ready for any fall occasion!)

You can even see the chunks of delicious baked apples!
And fortunately, it was a huge hit for my grandmother's birthday!! Served next to a scoop of vanilla frozen yogurt... it was hard to resist licking the plate and going back for more! (I mean, we have seconds during dinner...why not dessert?)

I just had to share this recipe with you all and let you know I'm still here! I'm always thinking of Posh Cuisine...dreaming of the kitchen...my apron, rubber spatula, and measuring cups at the ready. College is going well, though, and I'm thoroughly enjoying my classes. (I won't bore you with the details, but rest assured I'm keeping it posh here at school, too!)

So, this season (my favorite season), don't be afraid to experiment with fall flavors and make them your own! Bring on the apples, pumpkins, squash, and seasonings! Sprinkle a little cinnamon sugar on your pumpkin pie, or cook up some homemade applesauce. Add a little posh to every dish! And try this cake!! (You'll LOVE it!!)

With love (for food),
Ellen
--A dash of posh can make all the difference in your next dish!--

Tuesday, September 2, 2014

Blueberry Crumb Bars

Blueberry Crumb Bars

For those freshly picked berries just waiting to be poshed!

Can you think of a better way to end summer vacation than with a family BBQ, complete with smoked brisket, ribs, beans, homemade sides, and delectable blueberry crumb bars? My cousin was nice enough to surprise us with pounds (and I mean pounds) of freshly picked blueberries. I realize there's a ton of recipes one can make with blueberries (and trust me, we have enough berries to try plenty!), yet something about classic blueberry crumb bars...I couldn't resist!

Recipe from Brown Eyed Baker

Juicy blueberries, layered between flaky, buttery dough... it's no wonder they were such a hit! I found the recipe on Pinterest (big surprise, right?) and you can find it by clicking here or visiting www.browneyedbaker.com/blueberry-crumb-bars-recipe/. The ingredients are simple, no-fuss required! And combined, they make this wonderful dessert! (or snack, or breakfast? There's berries in them, after all!)

The recipe was also wicked easy.  As a note, I lined my 13x9" pan with parchment paper. This way, the entire batch could easily slide out of the pan and be cut. Parchment paper works great for baking any type of bars, fudge, cookies, you name it! (That's my pitch for parchment paper, by the way.) 
Line the pan with parchment paper for easy removal
How could this recipe be poshed? (Although the recipe on it's own is pretty dang delicious!) But if you feel like being creative, try using a raspberry filling, or spread a can of lemon pie filling on the bottom layer of dough before topping it with the blueberries and crumb. Another option: make the bottom dough thicker by using all the batter, then sprinkle an oat-crumb topping over the blueberries. You could even make individual crumb pies! Let the kitchen move you, and your taste be your guide. I'm sure it will be delicious!

Posh Update:

Now, you may have noticed my little 'blurb' under the "Posh Cuisine" logo. I am back at school, getting ready for another exciting year! I will keep posting, for I have lots to share! Plus, I care about helping you find and develop your posh in the kitchen (while having some fun!) Posh is not something one just 'perfects' in a summer. It takes time, practice, and dedication (plus a stocked pantry and big appetite never hurt). It may take more time in between posts and recipes, that's all! 

Try out this recipe (as I highly recommend you do), or browse through the many I've posted this summer. And keep checking in for updates, posts, and more! 
With love (for food),
Ellen
--A dash of posh can make all the difference in your next dish!--

Wednesday, August 27, 2014

Sour Cream Coffee Cake

Classic Coffee Cake

Just Add Posh!


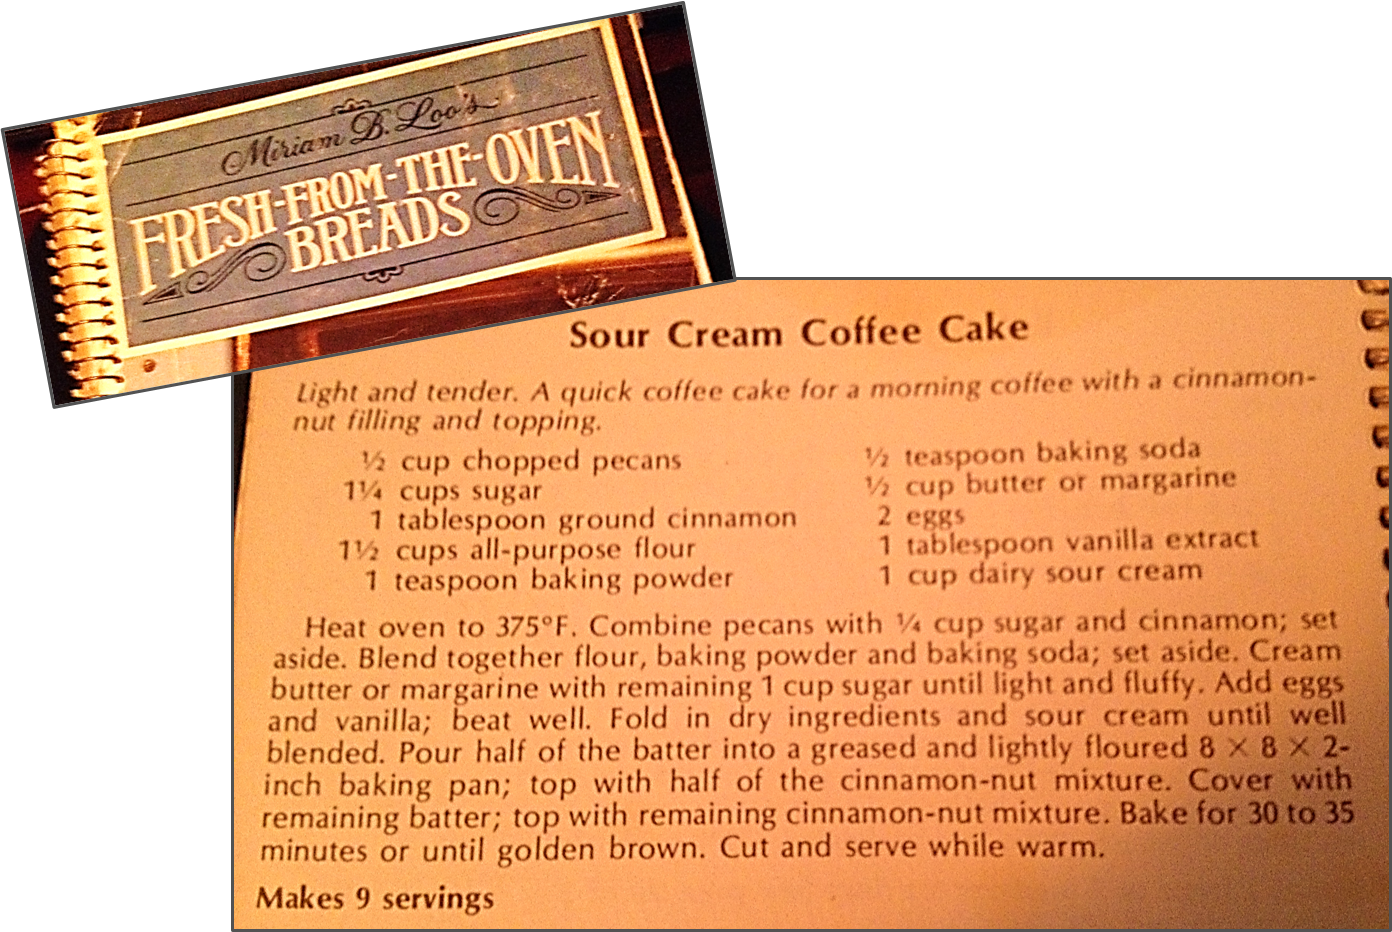
I thought after making (and eating) so much wedding cake lately, the last thing I'd be making is another cake! However, this one is a bit different... (I know, I know. Cake it cake. But this cake! This one!) This is a classic sour cream coffee cake, from a classic recipe book, and it's sure to fit in your collection!

Sour Cream Coffee Cake (Pecans & Cinnamon Sugar on top!)

Sometimes we all need to go back to the basics when it comes to recipes like this. Too often we see the already "poshed-up" versions. (Like the Rhubarb-Lemon Coffee Cake I made back in June. Click here to see because it's delicious! Talk about the perfect summer brunch!) Anyways, this recipe came from "Mariam B. Loo's Fresh from the Oven Breads" cookbook - a well used and loved staple in our kitchen!


This recipe is a terrific base for any type of coffee cake. "Base?" you may ask... With this simple recipe and its elegant taste, the cake lends itself to all sorts of posh! I made it just as the recipe directed (sometimes nothing beats a classic), and I encourage you to try it this way as well. Then take it to the next level! (Do note, the butter should be softened before creaming it with the sugar - just a tip!) Feel free to be creative by adding a fruit layer in the middle, or making coffee cake cupcakes, or even using your favorite crumb and icing topping! Don't like pecans? Try walnuts, or even no nuts!

1/2 the batter, then a layer of 'posh' and repeat!
With this simple recipe, you can really test your posh skills and make it your own. Impress your brunch mates with a new, all-you, recipe! This cake, even with no added posh, is a favorite in my house. Imagine what a difference a little posh can make!

As a fair warning, any leftovers of this cake don't last long... It's just too easy to cut off another piece, or have "one more bite." Make it in your home and see what I mean!

With love (for food),
Ellen
--A dash of posh can make all the difference in your next dish!--

Monday, August 18, 2014

Wedding Cake

I am so pleased to announce Posh Cuisine's first wedding cake was a success! After months of planning, weeks of preparation, last weekend's trial run (well worth the effort), and crunch-time decorating, this wedding cake was a huge hit at my uncle's wedding!


This cake was no easy feat, let me tell you. But I just love weddings!! Everything about them! I really wanted this cake to be special, so I made sure to do my research. There's a lot to making a wedding cake! I held my breath up until it was not only delivered, but sitting on the table in the reception hall. I was so nervous!

All this work was totally worth it. Both the ceremony and the reception were beautiful - wonderfully done! And I'm so happy to welcome my new aunt and cousins into the family! So, with this cake as my gift to my uncle and (new) aunt, may your marriage be filled with happiness and love. And let there be cake!

With love (for food),
Ellen
--A dash of posh can make all the difference in your next dish!--

Saturday, August 9, 2014

Crisp Chocolate Chip Cookies

A Posh Cuisine Update & Cookie Jar Favorite

UPDATE: First, I have to say I'm so sorry for not posting a lot! This past week has been super busy and while I know that's no excuse, you need to know how much I think of you, my readers! And I'd love to show you what I've been doing...


This was my first wedding cake attempt because...my uncle is getting married on Saturday! And I'm making the cake!! (Eeeep! Are you as excited as me!?) I know I should have told you sooner, but with all the baking and recipe testing going on this summer, it's been crazy!  I've been doing so much research towards making a wedding cake, in addition to finding the pans and equipment (there's a lot to it!). And since I was going to a family BBQ today, I thought it'd be a great time to put my research to the test and make a smaller version of the cake. (With a theme to match this summer party, of course!)

Wedding Cake #1
It was such a huge hit! I don't even know where to begin! The flavor, texture, frosting - everything! This is no cardboard cake with frosting. If Posh Cuisine is going to make a cake, it's gotta be pretty and delicious! (That's how true posh is measured.) And this cake has got some posh, let me tell you!

But now, let's get back on topic. What's this about a "cookie jar favorite" in the title?
Click here for the recipe!
Want a chocolate chip cookie which melts in your mouth? Doesn't get hard-as-a-rock in the cookie jar? Holds up to freezer storage and still tastes fresh? Then look no further! The recipe I am about to share is a favorite of mine (and I'm pretty picky when it comes to cookies). It's always a huge hit with the family, at parties, as gifts, with my friends at school - you name it! So thank you again Taste of Home, because this recipe for Crisp Chocolate Chip Cookies is fantastic! And I must warn you - not only will these cookies remain airy and melt in your mouth, they're addicting, too!

I follow the recipe on this one, yet I always use crisp rice cereal (never cornflakes) and quick-cooking oats (never regular). I also always use Hershey's Special Dark chocolate chips in nearly all my cookie recipes. They're wonderful chips for both melting and baking (and snacking...). As seen in the image above, I always flatten these cookies just a tad before baking for a smoother-topped cookie. The recipe yields about 6 dozen (using a large cookie scoop), so I highly recommend freezing some!


I actually prefer them frozen...they're just wonderful! Store them in plastic freezer bags for months - they'll stay tasting fresh and delicious! This is the only chocolate chip cookie recipe I like to make now, and trust me, I've made it a lot! For some reason, they just don't last long in my house (or at school with my friends). This recipe is amazing and I just know you'll love them! Click here or visit www.tasteofhome.com/recipes/crisp-chocolate-chip-cookies for the recipe. And keep it posh, people!

With love (for food),
Ellen
-A dash of posh can make all the difference in your next dish!--

Friday, August 1, 2014

Cobb Salad

Cobb (Posh) Salad

Not Your Ordinary Salad!


I'm a salad girl. I confess! As much as I'd love to tell you I'm your solid, meat-and-potatoes girl with a heart for cheesy side dishes, my heart yearns for that fresh crunch of lettuce under a sweet vinaigrette. Don't get me wrong though! I love a good chicken pot pie or fall-off-the-bone ribs. Yet, every now and then, I want a meal to freshen up my palate, as I step back from all the heavy cooking. So, I give you this Cobb Salad, with tons of posh and so many ways you can make it your own! In fact, I'm calling it Cobb (Posh) Salad. Give it a chance! (You might just like this whole 'salad' thing!)

There are so many ways you can make Cobb Salad (or most salads, for that matter). This is how I did it. You do it the way you want! I customized each plate for each person (all three of us - Mom, Dad, and me!) Extra tomatoes on one, bacon on two, avocado on all three, you get the idea! But talk about fun to make! It's like an entire plate of posh! How you arrange the veggies, what type of dressing, chilling the plates, serving the eggs warm, grilling the corn etc etc etc! We should really just omit the "Cobb" and call it "Posh Salad."

Each topping can be poshed as well. For example, the corn (the only thing not individually pictured below, of course) was from a partial bag of frozen corn. I defrosted it in the microwave, and threw it in a cast iron skillet. Then, cook until it browns, season with garlic powder and pepper, and viola! Perfectly poshed corn to top this Cobb (Posh) Salad. Think of all the creative ways you can posh the other toppings!


The dressing is another very important salad component. I love this brand called Annie's. (Check out annies.com to see all the great products!) It's natural, organic, and delicious! This was the the first time I tried the Annie's brand salad dressing and it was amazing! A good Cobb (Posh) Salad needs a dressing which will allow the flavors of the toppings to really shine, just like this Fat Free Raspberry Balsamic Vinaigrette. It wasn't too sweet and had just enough tang to lightly flavor the entire dish.

So what are you waiting for!? Posh up some fun in the kitchen and impress your dinner guests with customized Cobb (Posh) Salads! 
With love (for food),
Ellen
--A dash of posh can make all the difference in your next dish!--


Tuesday, July 29, 2014

Lemon Blueberry Bread

Great recipe alert!! 

Prepare yourself for the flavors of the season with this Lemon Blueberry Bread!


After picking a couple pints of fresh blueberries, some just had to be made into lemon blueberry bread! (But not just any lemon blueberry bread. This recipe, found here, is fantastic!)


The bread took less than 30 minutes to whip together (Just don't really whip it! It's very important to gently fold the dry ingredients into the wet and use great care when adding the blueberries. This way the bread stays light and airy.) Also, since the recipe only calls for a little lemon, I'd recommend adding some extra zest and freshly squeezed juice for that burst of lemon flavor! (Don't be afraid to add a bit of posh right into the batter!)

The recipe also calls for a glaze, yet I found with some extra blueberries and a sprinkle of sugar on top (more posh!) it was just enough! (The extra lemon juice in the batter really helps, too.)

So, if you're up for a quick and easy bread, with fresh summer flavors - this is the one! It stays moist, light, and delicious. It's great for brunch or even dessert! (Or both...like with whipped cream and extra blueberries on the side...) And you can add the icing, or sprinkle your own posh on top. Maybe you want to try it with raspberries in place of the blueberries? This bread would be excellent paired with a cream cheese filling or frosting, too. There are so many ways you can make this your own! Grab your apron and try it for yourself!

'Posh' is Spreading...

Also, quick update! Last night my dad was in charge of dinner, and since I wasn't allowed to snoop around the kitchen or guess what he was making, I was left only with the beautiful aroma drifting through the house of this homemade beef stroganoff. With its white wine and fresh mushrooms, topped with nonfat Greek yogurt (no, not sour cream!) and dried parsley flakes, each plate was a masterpiece and tasted delicious! He really put the 'posh' on this dish and it was amazing! So well done, Dad!


With love (for food),
Ellen
--A dash of posh can make all the difference in your next dish!--