Showing posts with label holiday. Show all posts

Sunday, March 15, 2015

Cinnamon Rolls

Ciao!

My spring semester is going well, but man is it busy! Between classes, homework, exams, meetings...let's just say I'm on a well-needed spring break! So, here's a little poem to kick off the season!


 Next up, we get to the food!  

I have to share this amazing recipe for cinnamon rolls!! A favorite in my house, they're often requested for Thanksgiving, Christmas brunch (perhaps again at New Years), or whenever the mood strikes! (Let's just say I've made these quite a lot...) Yes, they require a sleepover in the fridge, but the dough is so pleasant to work with in the morning, you'll be jumping outta bed just to make them! Find the recipe here at
 http://www.tasteofhome.com/recipes/overnight-cinnamon-rolls and see for yourself!


I'm not even kidding - these are amazing! The dough rises beautifully overnight, and the second rise (after filling, rolling, and cutting them) is such a transformation! Mine are practically jumping out of the baking pan! Now, make sure they are fully baked before removing them from the oven. Since they're so tightly packed in the pan, they might take longer than 25 minutes - so use ye'ole toothpick trick and make sure there's no gooey centers! Then, once removed from the oven, drizzle with wonderful icing and serve! (This recipe makes a lot, and leftovers are great! Even if they don't last long in my house...)

I'll always love Taste of Home. Their recipes are simple, delicious, and can be poshed in so many ways! This recipe, for instance, even includes a couple variations, like a dark chocolate or orange-spice filling. The dough is also so versatile - you could fill these with anything you'd like! Other posh ideas include smearing the dough with your favorite spread (I love pumpkin butter) before rolling it up, or layering thinly sliced apples, raisins, and pecans atop the cinnamon sugar. Poof! There's your posh! Pleasepleaseplease try these cinnamon and let me know how much you love them!! (And how you poshed them!)

With love (for food),
Ellen
-- A dash of posh can make all the difference in your next dish! --

Wednesday, January 7, 2015

Meringue Kisses

I can't believe my last post was in October...That's so last year! And let me tell you, quite a lot has happened. Sometimes life catches up with you and before you know it, it's already 2015! Rest assured, school is going well and, being the nerd I am, I loved my classes this past semester! But I won't bore you with details. Let me just say I absolutely missed you all and I apologize for not posting in such a long time!!

Now, onto far more important things - let's get to the food! And the posh! To start off, I have a fantastic recipe for light, melt-in-your-mouth Meringue Kisses. Find the original recipe I used here. Each bite literally melts in your mouth, leaving behind the fresh, crisp taste of almond. It's one of those "can't have just one" type of treats - which is fine because once you see what's in them (or not in them), you won't mind eating the entire batch! I certainly didn't mind...


Egg whites. Sugar. Cream of tarter. Flavoring. Food coloring (optional). Can you get any more guilt free!? I found this recipe on Pinterest (where else?) and was immediately intrigued. I made my first batch as the meringue trees with sugar sprinkled on top, yet finding it only made one tray and some were left a little chewy -despite the four hours in the oven -I opted to try making mini kisses - I had a winner.

Really, you can make any shape/size/color/flavor you like. I just happen to love food in cute, mini form... hence these kisses were born! And don't be intimidated by the long time in the oven. They're really super easy to make! (Plus you get to lick the bowl when you're done...totally worth it if you ask me!) As a note, making them as small as I did filled three trays - so it makes plenty! Which is perfect because they don't last long in my house...

The recipe, again found here, calls for gel food coloring and certain sprinkles. Honestly, use what you have! I added a few drops of liquid food coloring and used decorative sugar crystals - so make them your own! (Isn't there a word for 'making something special and adding your own unique twist?' I think it starts with a "P...")

Finally, don't just take my word on these little bites of pure bliss. They were such a huge it at Christmas - I don't even know how many batches I've made since! The almond flavor is exquisite and perfect for the holidays. But once you try them with lemon extract and yellow food coloring... just trust me and try it. It's amazing.

With only a couple ingredients and an oven with no plans, these delectable and not-so-guilty treats can be melting in your mouth in no time! (Okay, at least four hours, but you get the point.) So what are you waiting for!? You have to try these Meringue Kisses!!

With love (for food),
Ellen
-- A dash of posh can make all the difference in your next dish! --

Friday, June 20, 2014

Cupcake 'Cake' Father's Day Style

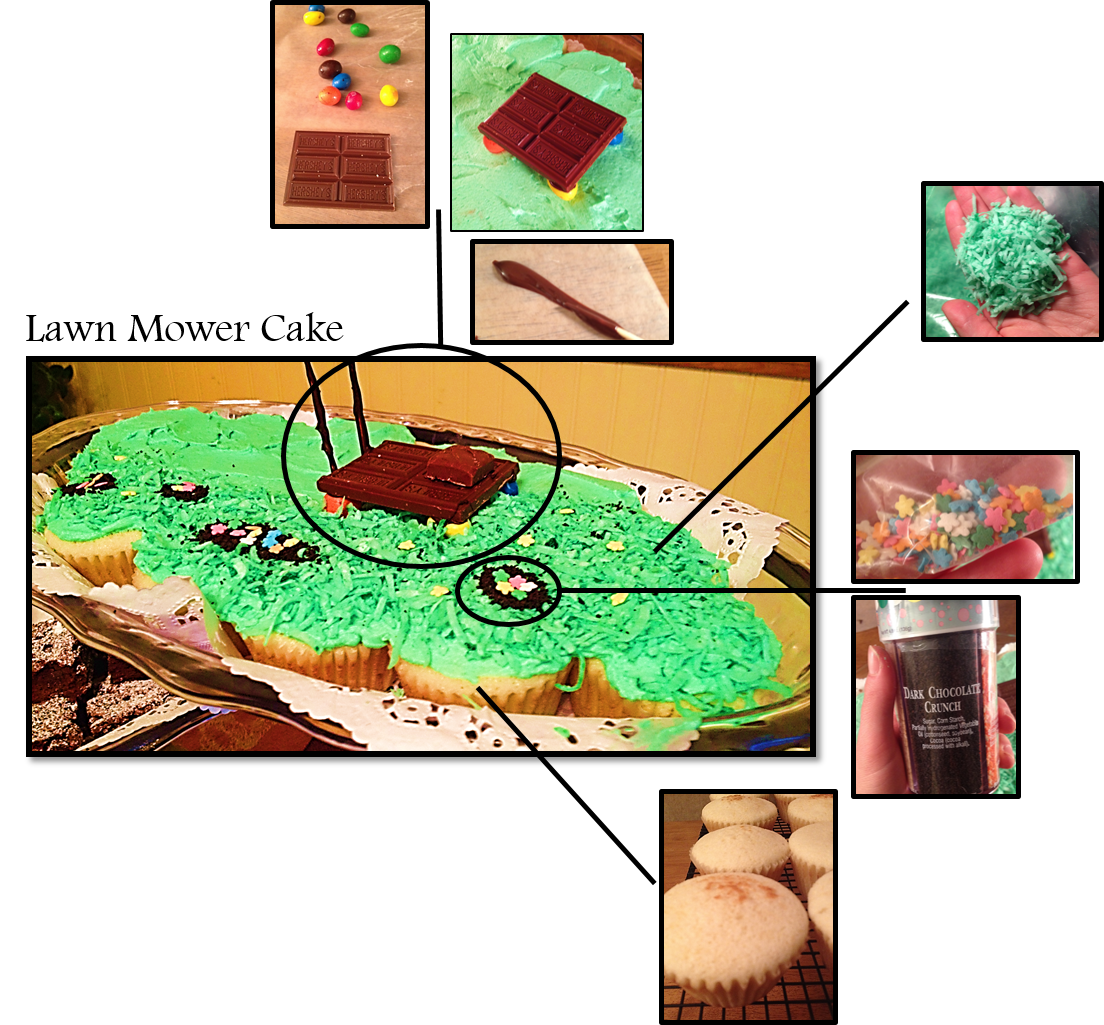
Lawn Mower Cupcake 'Cake'

Let me start by saying, I absolutely LOVE my dad! ("Daddy" to me.) So, what better way to show my love and appreciation for him than a cupcake CAKE with tons of posh on Father's Day!? I had so much fun making this cake, and it was the perfect occasion! Now, I can't wait to show you how I did it!
For starters, this was my first creation in my new 'office!' I transformed part of our basement into a posh work station and this 'cake' was baked, frosted, and poshed in cool comfort. Now, there are so many things you can do with cupcakes - and so much posh potential! Of course, this cake only represents one method. I'll go through this cake step-by-step, but I encourage you to try your own flavors and designs! Also, this 'cake' is a great (and much easier) way to serve cupcakes! (Just saying...)

Cupcake Making
STEP 1: You may be thinking "make the cupcakes, duh," but I recommend starting with a plan. What flavor cupcakes will you make? (Remember, it has to taste just as good as it looks!) What kind of frosting? How will you decorate it? Plan it! This cake was inspired by our yard. My dad was mowing the lawn just that morning, and removed our "dandelion farm" (as my mom calls the pretty yellow weeds). Thus, I knew I had to go with this theme!

STEP 2: Now that you have a plan, you can make the cupcakes! My dad likes yellow cake, and in my refusal to make a boxed cake mix for this occasion, I used a Taste of Home Yellow Layer Cake  recipe. It's a fantastic recipe, too! The cupcakes are so moist, and packed with flavor. This recipe makes 24 normal sized cupcakes (and my 'cake' only needed 15, so viola!) Plus, they baked up in 10 minutes using my Baby Cakes Cupcake Maker (more about this device in my Salad & Cupcakes post).


STEP 3: Once the cupcakes are baked and cooled, it's time to make the frosting and prepare the posh! I made up a simple vanilla butter cream frosting recipe and dyed it green (although you could use whatever frosting recipe you like!) Then, in my serving tray, I packed in the cupcakes so they were nice and snug, and frosted it like one big cake.

Get the cupcakes nice and snug!
STEP 4: The green frosting base represents the "cut grass." Next, I assembled the lawnmower. All I needed was half a chocolate bar, 4 M&Ms, 2 tooth picks, a mini candy bar, and melted chocolate. (Keep in mind, there are many ways to build this with candy, so be creative!) For this method, start by attaching the 'wheels' (M&Ms) to the bottom of the chocolate bar with a little melted chocolate. Once the chocolate has set, place the structure on the cake and attach your 'engine' (mini candy bar) with more melted chocolate to hold it in place. Finally, dip the toothpicks in chocolate and make them the handles. (It's pretty easy, don't worry!)

STEP 5: Next - and my mom had fun with this part - put shredded coconut and green food coloring together in a Ziploc bag, and shake like crazy! Coat the coconut with as much coloring as needed until it reaches a nice 'grass' color. And if you're my mom, keep shaking it and shaking it, try hitting it on the counter a few times, and don't forget to laugh the entire time... Finally, once the coconut is green, dizzy and definitely dead, sprinkle it on half of the cake to represent the uncut grass. 

STEP 6: Using dark chocolate crumbs and flower sprinkles, I made small flower beds in the uncut grass, and sprinkled the yellow flowers as dandelions. That's all there is to it! See it broken down, below.

Each step, and every creative touch is well worth it for this cake! The average cupcake is practically a blank canvas just waiting to be poshed! Still wondering exactly what 'posh' is? Well, in this case, it's the extra effort put into making this cake special. It's taking the time to really put yourself into the dish, as well. It's having fun and being creative! (Never forget the flavor, though. Make your posh match the wonderful flavor in each dish!) And I have to say, every ounce of effort was well worth it for my daddy. For all the things he does for me, this was the least I could do to show him how much I love him! This one's for you, Daddy!

With love (for food),
Ellen
--A dash of posh can make all the difference in your next dish!--