Showing posts with label candy. Show all posts

Friday, June 20, 2014

Cupcake 'Cake' Father's Day Style

Lawn Mower Cupcake 'Cake'

Let me start by saying, I absolutely LOVE my dad! ("Daddy" to me.) So, what better way to show my love and appreciation for him than a cupcake CAKE with tons of posh on Father's Day!? I had so much fun making this cake, and it was the perfect occasion! Now, I can't wait to show you how I did it!
For starters, this was my first creation in my new 'office!' I transformed part of our basement into a posh work station and this 'cake' was baked, frosted, and poshed in cool comfort. Now, there are so many things you can do with cupcakes - and so much posh potential! Of course, this cake only represents one method. I'll go through this cake step-by-step, but I encourage you to try your own flavors and designs! Also, this 'cake' is a great (and much easier) way to serve cupcakes! (Just saying...)

Cupcake Making
STEP 1: You may be thinking "make the cupcakes, duh," but I recommend starting with a plan. What flavor cupcakes will you make? (Remember, it has to taste just as good as it looks!) What kind of frosting? How will you decorate it? Plan it! This cake was inspired by our yard. My dad was mowing the lawn just that morning, and removed our "dandelion farm" (as my mom calls the pretty yellow weeds). Thus, I knew I had to go with this theme!

STEP 2: Now that you have a plan, you can make the cupcakes! My dad likes yellow cake, and in my refusal to make a boxed cake mix for this occasion, I used a Taste of Home Yellow Layer Cake  recipe. It's a fantastic recipe, too! The cupcakes are so moist, and packed with flavor. This recipe makes 24 normal sized cupcakes (and my 'cake' only needed 15, so viola!) Plus, they baked up in 10 minutes using my Baby Cakes Cupcake Maker (more about this device in my Salad & Cupcakes post).


STEP 3: Once the cupcakes are baked and cooled, it's time to make the frosting and prepare the posh! I made up a simple vanilla butter cream frosting recipe and dyed it green (although you could use whatever frosting recipe you like!) Then, in my serving tray, I packed in the cupcakes so they were nice and snug, and frosted it like one big cake.

Get the cupcakes nice and snug!
STEP 4: The green frosting base represents the "cut grass." Next, I assembled the lawnmower. All I needed was half a chocolate bar, 4 M&Ms, 2 tooth picks, a mini candy bar, and melted chocolate. (Keep in mind, there are many ways to build this with candy, so be creative!) For this method, start by attaching the 'wheels' (M&Ms) to the bottom of the chocolate bar with a little melted chocolate. Once the chocolate has set, place the structure on the cake and attach your 'engine' (mini candy bar) with more melted chocolate to hold it in place. Finally, dip the toothpicks in chocolate and make them the handles. (It's pretty easy, don't worry!)

STEP 5: Next - and my mom had fun with this part - put shredded coconut and green food coloring together in a Ziploc bag, and shake like crazy! Coat the coconut with as much coloring as needed until it reaches a nice 'grass' color. And if you're my mom, keep shaking it and shaking it, try hitting it on the counter a few times, and don't forget to laugh the entire time... Finally, once the coconut is green, dizzy and definitely dead, sprinkle it on half of the cake to represent the uncut grass. 

STEP 6: Using dark chocolate crumbs and flower sprinkles, I made small flower beds in the uncut grass, and sprinkled the yellow flowers as dandelions. That's all there is to it! See it broken down, below.
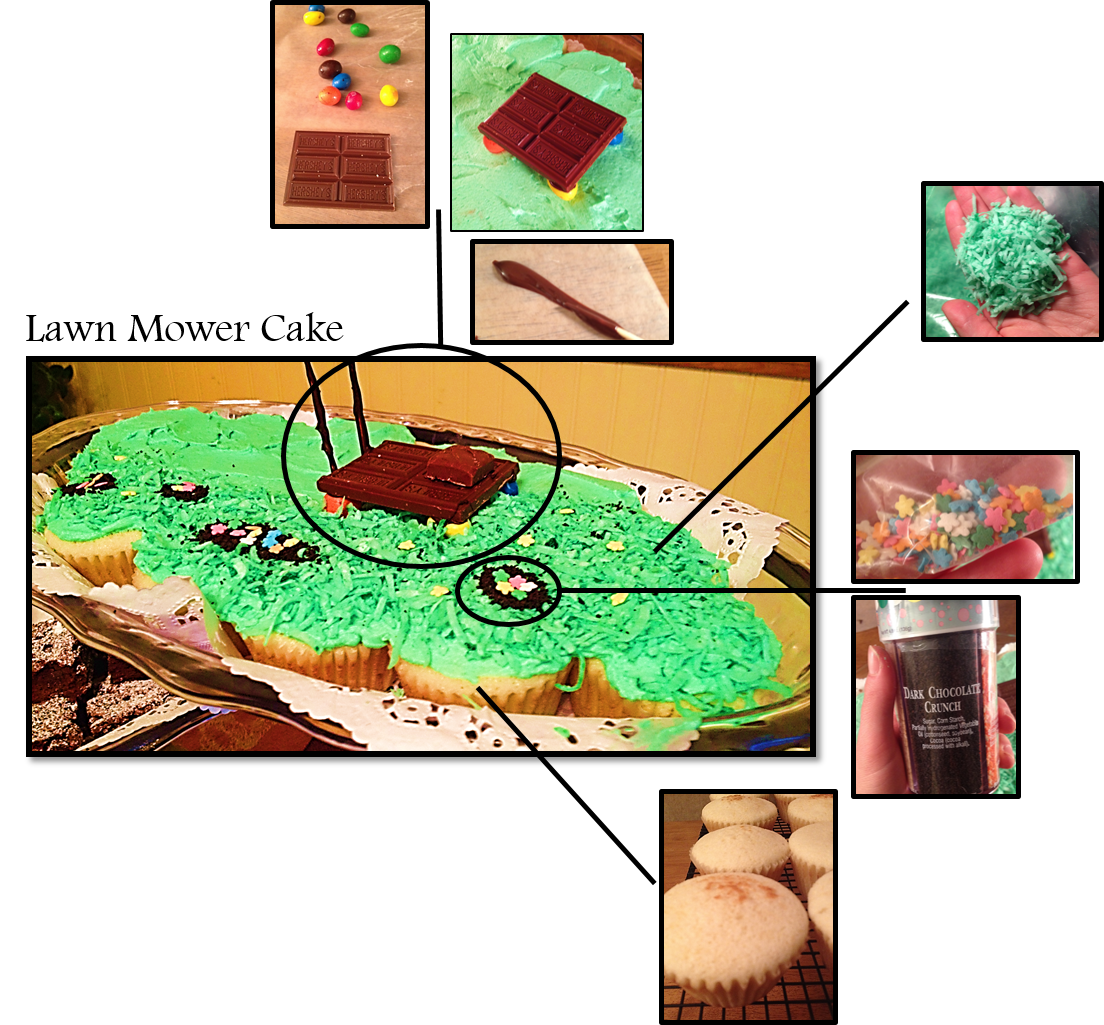
Each step, and every creative touch is well worth it for this cake! The average cupcake is practically a blank canvas just waiting to be poshed! Still wondering exactly what 'posh' is? Well, in this case, it's the extra effort put into making this cake special. It's taking the time to really put yourself into the dish, as well. It's having fun and being creative! (Never forget the flavor, though. Make your posh match the wonderful flavor in each dish!) And I have to say, every ounce of effort was well worth it for my daddy. For all the things he does for me, this was the least I could do to show him how much I love him! This one's for you, Daddy!

With love (for food),
Ellen
--A dash of posh can make all the difference in your next dish!--

Tuesday, June 3, 2014

Lemon Angel Food Cake - Artistic Fun in the Kitchen

Lemon Angel Food Cake (with Candied Lemon Peel, of course!)

I've never really been a huge fan of arts and crafts, or the patience required of them. Yet, for some reason...when it comes to making and decorating cakes, cookies, or treats - I'm there! I love it! Sometimes nothing beats taking the time to put some artistic flair on an average cake, plus the anticipation of presenting it for dessert! So last week, I decided to do just that and made a lemon angel food cake!
Using a recipe from Taste of Home, found here for Lemon Angel Food Supreme, I made the cake part as the recipe directed, while also adding about 2 teaspoons of freshly grated lemon zest (for extra lemony flavor). This was my first 'from scratch' angel food cake, so I followed the directions very carefully! It wasn't as hard, or complicated, as it may seem. The biggest "trick" is making sure you've whipped the batter enough, and have the proper peaks. Of course, another important part of making angel food cake is the pan... which I didn't realize we didn't own until after I decided to make this, so I improvised! Since I didn't have a tube pan, I used 2 spring form (or cheesecake) pans with half pint jars placed in the center. (Angel food cake actually climbs this center tube as it bakes.) Plus, then I'd have a layered cake to decorate - more possibilities! 
They seemed to work great, too! (The house smelled so good by this point, just saying.) As soon as they were done (dry on top, sprung back when tapped), I flipped them over to cool. This, too, is important for it keeps the cakes from collapsing. 
Next, (after what seemed like forever) they were cool enough to remove from the pans and frost! Since the pans were not greased or oiled (another important rule in making angel food cake), it was a bit of an adventure getting the cakes free... Using a knife, I separated the sides and carefully pulled the jars from the centers. (And once the cakes were free, the hardest part was over!) Then, I got to whip up (literally) the frosting. For the recipe, see here. To this Sweetened Whipped Cream, I added 1 teaspoon of lemon zest, about 1 teaspoon of lemon juice, and a few drops of yellow food coloring (then it even looked like lemon!) I also made two batches to cover my two-layered cake.
Decorating: This was my favorite part! As a tip, line your cake stand with waxed paper before frosting the cake, so any drips/messes can be easily removed. This leaves you with a beautiful cake and clean stand! I also added some fresh blueberries for even more color and flair (plus taste! I mean lemon and blueberries? How much more refreshing can this dessert get!?) Decorating is the part where no recipe can direct you - where true 'posh' is really shown! There are millions of ways to decorated a cake, go crazy! 
Candied Lemon Peel: So what's all this about the candied lemon peel, you may ask? Although a bit time consuming (not too much, though, I did this all while letting the cakes bake and cool), it's so worth it! It may seem like a lot of steps (like boiling it four times...), but it leaves you with soft, chewy, sugary lemon candy! And these make great, edible decorations, or you can cut them into larger pieces or shapes and serve them as candies!

Tube Pans: As you can see, this cake was quite an adventure! Between having never made angel food cake from scratch, not having a tube pan, and trying to give it a new spin with extra 'posh,' making it was an exciting afternoon activity! And of course, the next day my parents and I stopped by a second hand store (I love thrift stores - they have the neatest stuff!). There, I found not one, but TWO tube pans! And both were in excellent condition! So we bought them...both. (below) These can be rather difficult to find nowadays, so I recommend trying thrift stores. Look for pans with feet on the top, (so the cakes can cool upside down), and removable bottoms (remember, don't grease/oil the pans). And they shouldn't be too expensive at thrift store prices. (I got these two pans, a book, an elephant key chain, and mom got 2 plates for a grand total of $4...not too shabby at all!)
I hope you enjoy this cake! It was perfect for dessert, so airy and lemony! Even the leftovers stayed light and fresh! And it was so much fun to make and decorate! How would you decorate it? Everybody's 'posh' is unique and beautiful - just have fun!

With love (for food),
Ellen
--A dash of posh can make all the difference in your next dish!--