Showing posts with label chocolate. Show all posts

Friday, April 3, 2015

Giant Monster Cookies

Monster Cookies

Full of peanut butter, oats, chocolate chips - and no flour!

Let me start off by saying, these are absolutely MONSTER cookies! Toss aside that cookie scoop and grab a measuring cup because cookie-making time just got serious.

These Giant Monster Cookies (recipe here) will definetly become a favorite! And that's no mistake in the title. There is no flour in this recipe! Instead, you get an oat-packed, peanut butter-loaded, chocolate delight, good for any time of the day! Whether you're making them to refill the cookie jar or you're craving warm, fresh-out-of-the-oven oats, peanut butter, and chocolate - these cookies are a winner! Not to mention, they freeze well and make excellent gifts! (Of course, if you freeze them, I suggest popping them in the microwave right before devouring, so the chocolate can get all melty and warm...)

I followed this recipe as instructed, merely using mini m&ms and an entire bag of dark chocolate chips... who can blame me? And trust me, this recipe makes a LOT! And they're HUGE! Feel free to make them as big or as small as you'd like (mini monsters!). Oh! I also pressed mine slightly before baking (or rather, before staring into the oven, waiting for them to be finished...).  Now, posh these up however you like! (Coconut, walnuts, Reese's Pieces, chocolate chunks, chocolate peanut butter - the posh is endless!)
For a quick, easy recipe full of the stuff you love and sure to squash any hunger - here you are! Thank you again Taste of Home, for making the house smell great and the family happy with another terrific recipe! 

With love (for food),
Ellen

-- A dash of posh can make all the difference in your next dish! --

http://www.tasteofhome.com/recipes/giant-monster-cookies


Saturday, August 9, 2014

Crisp Chocolate Chip Cookies

A Posh Cuisine Update & Cookie Jar Favorite

UPDATE: First, I have to say I'm so sorry for not posting a lot! This past week has been super busy and while I know that's no excuse, you need to know how much I think of you, my readers! And I'd love to show you what I've been doing...


This was my first wedding cake attempt because...my uncle is getting married on Saturday! And I'm making the cake!! (Eeeep! Are you as excited as me!?) I know I should have told you sooner, but with all the baking and recipe testing going on this summer, it's been crazy!  I've been doing so much research towards making a wedding cake, in addition to finding the pans and equipment (there's a lot to it!). And since I was going to a family BBQ today, I thought it'd be a great time to put my research to the test and make a smaller version of the cake. (With a theme to match this summer party, of course!)

Wedding Cake #1
It was such a huge hit! I don't even know where to begin! The flavor, texture, frosting - everything! This is no cardboard cake with frosting. If Posh Cuisine is going to make a cake, it's gotta be pretty and delicious! (That's how true posh is measured.) And this cake has got some posh, let me tell you!

But now, let's get back on topic. What's this about a "cookie jar favorite" in the title?
Click here for the recipe!
Want a chocolate chip cookie which melts in your mouth? Doesn't get hard-as-a-rock in the cookie jar? Holds up to freezer storage and still tastes fresh? Then look no further! The recipe I am about to share is a favorite of mine (and I'm pretty picky when it comes to cookies). It's always a huge hit with the family, at parties, as gifts, with my friends at school - you name it! So thank you again Taste of Home, because this recipe for Crisp Chocolate Chip Cookies is fantastic! And I must warn you - not only will these cookies remain airy and melt in your mouth, they're addicting, too!

I follow the recipe on this one, yet I always use crisp rice cereal (never cornflakes) and quick-cooking oats (never regular). I also always use Hershey's Special Dark chocolate chips in nearly all my cookie recipes. They're wonderful chips for both melting and baking (and snacking...). As seen in the image above, I always flatten these cookies just a tad before baking for a smoother-topped cookie. The recipe yields about 6 dozen (using a large cookie scoop), so I highly recommend freezing some!


I actually prefer them frozen...they're just wonderful! Store them in plastic freezer bags for months - they'll stay tasting fresh and delicious! This is the only chocolate chip cookie recipe I like to make now, and trust me, I've made it a lot! For some reason, they just don't last long in my house (or at school with my friends). This recipe is amazing and I just know you'll love them! Click here or visit www.tasteofhome.com/recipes/crisp-chocolate-chip-cookies for the recipe. And keep it posh, people!

With love (for food),
Ellen
-A dash of posh can make all the difference in your next dish!--

Sunday, July 13, 2014

Peanut Butter Banana (Chocolate Chip) Muffins

Muffins - Bakery Style (and healthy!)

I was in the mood for muffins...but not just any muffins! You see, I love muffins and muffin-shaped foods - I could eat muffins every day and love it! Yet, sometimes my muffin recipes end up with flat tops, or they're too heavy, and it breaks my heart. So, I've been doing some research...

In searching for how bakeries get that big, puffy, delicious muffin top, I began to notice how some recipes called for a baking temperature of 425 degrees, before lowering it to 350 degrees to continue baking. Intrigued, I had to try it. And viola! This recipe, from Sally's Baking Addiction, tested just that and was a huge success!


Almost full 
I found the recipe on Pinterest (where else?) and within minutes I was in the kitchen. And my grandmother's "Ellen is baking something" sensation must have been tingling because she stopped by the house just in time to try one! (And may I say, they totally passed inspection.)

Baking the muffins at 425 degrees for the first 5 minutes made such a difference, for it gave them a chance to puff up on the top, then continue baking after lowering the oven to 350 degrees. I also followed the instructions when filling the muffin pan, and put the batter nearly to the top of each liner (this recipe made 12 wonderful sized muffins.)
Now, for the taste - delicious! The chocolate chips are optional, but something about peanut butter, honey, and chocolate just makes a girl happy. I added a handful of mini dark chocolate chips into the batter, and sprinkled some on top before baking. (That's what I call posh!) Not to mention, these muffins are healthy! Healthy with everyday items! I'm all for good-for-you meals/snacks and these were perfect! Made with whole wheat flour, Greek yogurt, no butter, no oil - it's a muffin good enough for breakfast or a mid-day snack! (or both...and maybe lunch, too) I know you'll just love them! So, click here for the recipe, preheat your ovens to 425, get your ingredients out, and let your posh shine!

With love (for food),
Ellen

--A dash of posh can make all the difference in your next dish!--

Friday, June 20, 2014

Cupcake 'Cake' Father's Day Style

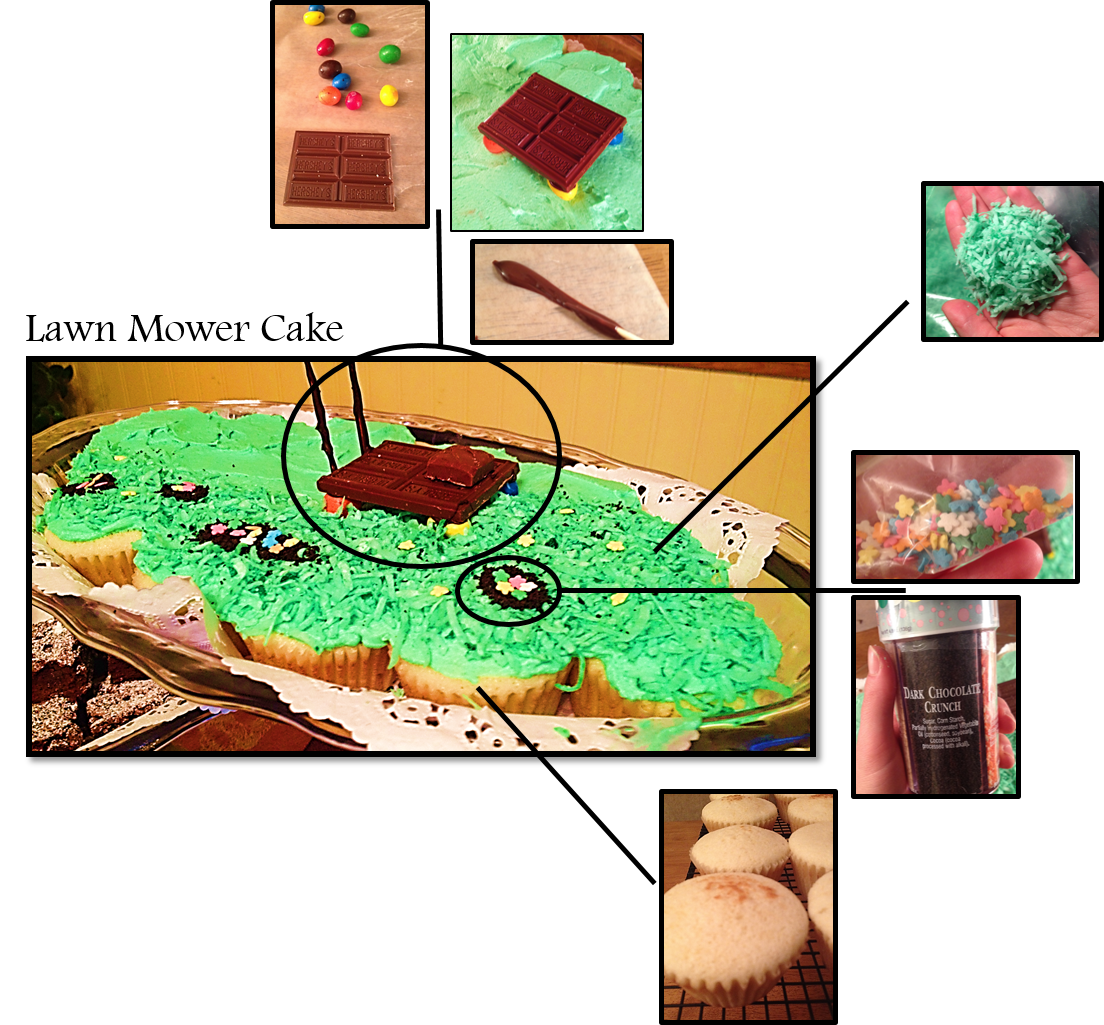
Lawn Mower Cupcake 'Cake'

Let me start by saying, I absolutely LOVE my dad! ("Daddy" to me.) So, what better way to show my love and appreciation for him than a cupcake CAKE with tons of posh on Father's Day!? I had so much fun making this cake, and it was the perfect occasion! Now, I can't wait to show you how I did it!
For starters, this was my first creation in my new 'office!' I transformed part of our basement into a posh work station and this 'cake' was baked, frosted, and poshed in cool comfort. Now, there are so many things you can do with cupcakes - and so much posh potential! Of course, this cake only represents one method. I'll go through this cake step-by-step, but I encourage you to try your own flavors and designs! Also, this 'cake' is a great (and much easier) way to serve cupcakes! (Just saying...)

Cupcake Making
STEP 1: You may be thinking "make the cupcakes, duh," but I recommend starting with a plan. What flavor cupcakes will you make? (Remember, it has to taste just as good as it looks!) What kind of frosting? How will you decorate it? Plan it! This cake was inspired by our yard. My dad was mowing the lawn just that morning, and removed our "dandelion farm" (as my mom calls the pretty yellow weeds). Thus, I knew I had to go with this theme!

STEP 2: Now that you have a plan, you can make the cupcakes! My dad likes yellow cake, and in my refusal to make a boxed cake mix for this occasion, I used a Taste of Home Yellow Layer Cake  recipe. It's a fantastic recipe, too! The cupcakes are so moist, and packed with flavor. This recipe makes 24 normal sized cupcakes (and my 'cake' only needed 15, so viola!) Plus, they baked up in 10 minutes using my Baby Cakes Cupcake Maker (more about this device in my Salad & Cupcakes post).


STEP 3: Once the cupcakes are baked and cooled, it's time to make the frosting and prepare the posh! I made up a simple vanilla butter cream frosting recipe and dyed it green (although you could use whatever frosting recipe you like!) Then, in my serving tray, I packed in the cupcakes so they were nice and snug, and frosted it like one big cake.

Get the cupcakes nice and snug!
STEP 4: The green frosting base represents the "cut grass." Next, I assembled the lawnmower. All I needed was half a chocolate bar, 4 M&Ms, 2 tooth picks, a mini candy bar, and melted chocolate. (Keep in mind, there are many ways to build this with candy, so be creative!) For this method, start by attaching the 'wheels' (M&Ms) to the bottom of the chocolate bar with a little melted chocolate. Once the chocolate has set, place the structure on the cake and attach your 'engine' (mini candy bar) with more melted chocolate to hold it in place. Finally, dip the toothpicks in chocolate and make them the handles. (It's pretty easy, don't worry!)

STEP 5: Next - and my mom had fun with this part - put shredded coconut and green food coloring together in a Ziploc bag, and shake like crazy! Coat the coconut with as much coloring as needed until it reaches a nice 'grass' color. And if you're my mom, keep shaking it and shaking it, try hitting it on the counter a few times, and don't forget to laugh the entire time... Finally, once the coconut is green, dizzy and definitely dead, sprinkle it on half of the cake to represent the uncut grass. 

STEP 6: Using dark chocolate crumbs and flower sprinkles, I made small flower beds in the uncut grass, and sprinkled the yellow flowers as dandelions. That's all there is to it! See it broken down, below.

Each step, and every creative touch is well worth it for this cake! The average cupcake is practically a blank canvas just waiting to be poshed! Still wondering exactly what 'posh' is? Well, in this case, it's the extra effort put into making this cake special. It's taking the time to really put yourself into the dish, as well. It's having fun and being creative! (Never forget the flavor, though. Make your posh match the wonderful flavor in each dish!) And I have to say, every ounce of effort was well worth it for my daddy. For all the things he does for me, this was the least I could do to show him how much I love him! This one's for you, Daddy!

With love (for food),
Ellen
--A dash of posh can make all the difference in your next dish!--

Saturday, June 14, 2014

Peanut Butter Cup Ice Cream...Yum!

Happy Birthday, Brother! Now, my brother LOVES peanut butter - except "love" doesn't even come close! Speaking with him last week, he told me his breakfast usually consists of a bowl of vegetables and a spoonful of peanut butter (but not together, don't worry). So, for his birthday - what better gift than peanut butter cup ice cream!? I used homemade peanut butter ice cream as the base, then added in peanut butter cup pieces and a chocolate-peanut butter fudge swirl. How was it, you may ask? In my brother's words, it was "exquisite!" (Which actually translates to "Wonderful! Best ever! Loved every bite! You're the best little sister in the whole world!" - Although the latter part sometimes gets jumbled in translation.) All the same, I was touched. So, happy birthday big brother! (Not that he reads this...his girlfriend usually gives him the "highlights")

Making it was a blast - my first ice cream in my ice cream maker! Plus, it was pretty easy. I started by finding a recipe for peanut butter ice cream (on Pinterest, of course), found here. In this recipe, I used regular sugar, 1/2 cup of creamy peanut butter (can you really have too much peanut butter in peanut butter ice cream?), and regular heavy cream. See my ingredients below. Also, can we take a moment to appreciate the Market Basket theme here?? I love Market Basket... I could spend hours in there! (And I have...)


Then, I cooked it! (kinda sorta) I started by combining everything in a pot on the stove except the eggs. (In the words of Bill Cosby, "you have to be careful with eggs...") After letting the sugar dissolve over low heat, I added a little of the warmed mixture to the egg yolks, then added the egg yolks to the mixture. (This way I wouldn't have scrambled egg-peanut butter ice cream, yummy.) I chilled this mixture overnight in the fridge and poured it in the ice cream maker the next morning.

When it was almost done in the ice cream maker (about 20 minutes later), I added some chopped up peanut butter cups and folded in the chocolate peanut butter swirl. To make this swirl, combine about 1 tablespoon of unsweetened cocoa powder with about 1/4 - 1/3 cup of creamy peanut butter. Microwave for about 30 seconds, or until it's warm and melty. Then, fold it into the ice cream to create a nice swirl effect. Once completed, I stored it in a clean yogurt container wrapped up nicely, and hid it in the freezer! That evening, (after a delicious BBQ turkey dinner), I surprised him with the container, plus 2 peanut butter cups for his presentation (posh), and a new bowl! He was responsible for sending me a picture of the finished product (below).

(I'm digging his posh!) And I'm so glad he enjoyed it! (The spoonful I had scraped from the bottom of the ice cream maker bowl was pretty dang good, too! Very smooth and creamy). Try it for yourself with whatever add-ins, or swirls, or posh you like! And for all you peanut butter lovers out there, (yes, you have some competition once you meet my brother), go crazy! And have fun! :) 
With love (for food),
Ellen
--A dash of posh can make all the difference in your next dish!--

Thursday, May 22, 2014

Cupcake Berry Trifles

I'm all for making simple, yummy dishes (and desserts) in fun and creative ways. Even the most basic recipe can be dressed up with some 'posh!' These trifles are just one example...

If you'll recall, I made chocolate cupcakes earlier this week, and didn't end up stuffing them all with ice cream. I also had leftover berries from the salad (if you're totally lost, be sure to visit my Sunday Dinner post to see where I got these ingredients!) One trip to the store for instant pudding mix (plus stuff for dinner) later, and I was ready to make this fun, light dessert!

There are so many different types of trifles, ways to layer them, methods to serve them - this is just one way! I encourage you to try it with whatever flavors you like, or with any leftover sweets you may have on hand!

I wanted to make small individual servings as a light, refreshing end to our taco dinner, while also using up some of the leftover 'supplies.' Plus, why not have some fun in the kitchen?? Hence, I began! I started by preparing my ingredients (and taking lots of pictures).

Once the pudding was made (well, whisked for 2 minutes and left to set) and the berries and cupcakes were ready, it was time to assemble! I started with cupcake chunks on the bottom (although I'm sure you could start with whichever layer you like), then used a small cookie scoop to add the pudding into the jars. Next, I sprinkled in a couple berries, and repeated layers until I reached the top! (I used small, half pint jars from our canning supply and they worked great!)
With some room still left in the jars, I spread more pudding on top and sealed them up - and in the fridge they went until dessert! To serve, I spread the tops with cool whip and mini chocolate chips (totally optional, but if you knew me, you'd realize I can't leave any dessert undecorated!) They were the perfect end to dinner, so light and refreshing! (plus, the white chocolate pudding paired really well with the juicy berries and chocolate cake - a huge hit!)
I really encourage you take simple, everyday (and maybe leftover) ingredients, and give them a new spin! Let your true posh shine! --See below for the recipe--


With love (for food),
Ellen
--A dash of posh can make all the difference in your next dish!--

Monday, May 19, 2014

Sunday Dinner - Salad and Cupcakes

This was not your "traditional" Sunday dinner.. Tonight's dinner was my family's twist on tradition. Celebrating the end of finals (for both my brother and myself), Mother's Day (missed because of finals), and my grandmother's return to NH for the summer, we had the family gathered around a smoked beef brisket, smoked beans, grilled vegetables, warm rolls, summer salad, and ice cream filled cupcakes. These latter two were my department - I mean, what better way to kick off the summer (and summer break!) than fresh greens topped with berries and treats, and finish with a cool, indulgent dessert? Allow me to share...

Let's start with the salad!
While Daddy was tending to the smoker and the juicy, tender brisket being gently cooked by maple infused smoke, I was in the kitchen with Mom, beginning to create..
This salad is very basic, and has many variations! I was introduced to the 'simple salad' concept at my grandmother's house when she tossed lettuce, pears, and some nuts together as a side with dinner. The fruit made it wonderful and to a vinaigrette-lover like myself, it needed none! The fresh pears gave it the perfect amount of sweetness and juice. Ever since then, I have been creating simple side salads with seasonal fruits, arranged atop beds of freshly torn lettuce. For this salad, below, if you still like a little bit of extra 'tang' and dressing, I recommend Ken's Light Option Raspberry Walnut vinaigrette - it pairs very well!

Now for the cupcakes... A few extra steps are totally worth this decadent kick on the average ice cream & cake!

Straight from my book
First, let's begin with the chocolate cupcake part. I'm sure you could use a box mix.. but something about homemade chocolate cupcakes (made with real buttermilk) is so much more fun! I used a Taste of Home recipe from my "Bakeshop Favorites" cookbook (I LOVE Taste of Home - and I highly recommend their recipes, website, books, cooking shows, everything! You'll be seeing many more of their recipes here....) I made this recipe through the first step, and rather than heat up the oven and wait 12-15 minutes per batch, I used my Babycakes Cupcake maker. It makes a dozen regular sized cupcakes (and muffins) right on your counter top in about 10 minutes!  

I just plugged it in while I was making the batter - and it was ready to go!This recipe made 19 cupcakes (all with nice, puffed up tops - no wimpy flat cakes here). Of course, another fun part of this recipe is tasting the batter... 

Me: (takes beaters out, dripping with cake batter) Mom, I have a very important question for you...
Mom: YES! YES! Please!
Me: Is that your answer!? I didn't even ask!
Mom: (takes beater) Yumm...

Is it me or have the roles been reversed here..? Mom gets the beater (and the bowl) now!?
Even so, I can't blame her! This batter is delicious! Within 10 minutes, after putting the first dozen in the cupcake maker, the house smelled like a chocolate-infused dream! 


Once cooled, it was time to core them (using the little green thingy in the center of the picture below) and fill them with ice cream. I used plain vanilla ice cream (what we had in the freezer - feel free to use whatever flavor you'd like! I think a vanilla with chocolate swirl or small brownie bits would be awesome, too) I microwaved the carton for about 30 seconds, then whipped it up with a spoon so it'd be easier to scoop into the cupcakes. (Note: Once you start to fill them, be sure to act fast so the ice cream doesn't melt everywhere!)
*I left a couple cupcakes whole and saved the insides to use for mini chocolate cake trifles later this week.* Next, I stuck them in the freezer and waited until dessert...and waited... and I kept waiting....And after a great meal, it was time! This is where true 'posh' arrives. I started by chopping up two squares of dark chocolate and sliced a few leftover strawberries from the salad earlier as my 'decoration.' After arranging the frozen solid cupcakes on a cake platter, I went a little crazy with the whipped cream... and then gently sprinkled the chocolate bits all over them! As a final touch, I wedged a strawberry slice into the whipped cream on each one - and served! 
Let's just say, they were a huge hit and a great finish to our Sunday Dinner! (My brother was still talking about them the next day..) I hope you enjoy these recipes as much as my family and I did! And add your own creative twists! Find fruits you like for the salad, or use our favorite ice cream and cupcake flavors in the dessert! Also, whereas this is my first 'food' post, comment and let me know what you think, any ideas/changes you may have, or anything! I'd love to hear from you! 

With love (for food),
Ellen
--A dash of posh can make all the difference in your next dish!--