Showing posts with label dinner. Show all posts

Thursday, March 19, 2015

Homemade Ravioli

Homemade Ravioli

~ Lasagna Style ~


For those of you who may know me personally...you'll know I love anything Italian - the culture, language, people, food - you name it and I'm there! So, naturally, I love making pasta and I've been dying to make homemade ravioli!!
So, I planned a Grammy-Granddaughter day and that's exactly what we did. With Grammy as my sous chef (keeping the kitchen nice and clean as I constantly produced a mess), we made homemade ravioli! And the best part (besides eating it)? It was so easy!!

Now, there are tons of recipes in this internet-world of ours for homemade pasta dough, cheese fillings, sauces - I say just find one you like and go for it! I used a Taste of Home recipe, found here (or at the bottom of this post), for the dough part. That being said, 6 cups of flour, 6 eggs, 3/4 cups of water, 2 teaspoons of olive oil, and 8-10 minutes of kneading later, (and quite a work-out, let me tell you!) and we had perfect dough! I realize some dough recipes can be kneaded in the mixer, or made and rolled through special attachments/devices. I, however, wanted to get right to the roots of this Italian dish and do it by hand! (But you, my dears, can choose whichever method you prefer.)

Making the dough

Working with this dough was so nice!! As a note, I cut the dough into eighths before rolling it, so I could get nice, thin sheets to cut with my ravioli cutter. (Yes, I used a pastry/ravioli cutter and not a stamp or press. I feared dough sticking to a press and wanted to break out my new cutter.)

As for my filling, I did not follow a recipe. Instead, I let the 'Posh' be my guide, as I combined part-skim ricotta cheese with spinach, a handful of shredded mozzarella cheese, a few shakes of grated Parmesan, and a whole mess of Italian seasonings (plus garlic salt and pepper). A few taste tests later and it was ready to go!


So, onto a lightly dampened square of dough goes a heaping teaspoonful of filling, before being sandwiched by another damp square. Press the edges of the two squares together and viola! 

Ravioli!
Okay, I know I'm making it seem way too easy here...This is where it's nice to have a second pair of hands (thank you Grammy!) because this recipe makes a lot of ravioli. (I want to say we ended up with 46...) And it is a bit messy. You see, I have a slight tendency to overfill things, and when it comes to sealing the edges... let's just say perfection is for machines! I like the look of cheesy goodness oozing from the sides - it means there's actually more to the ravioli than just pasta with a little dollop of cheese! (At least that's my reason and I'm sticking to it.)

So, 46 ravioli and another mess in the kitchen later, and they were ready for boiling! I boiled about 6 at a time for two minutes (or until they floated to the top of the water) and it couldn't have been any easier! Even the few which may not have been sealed the best because of an excess of filling (hehe) boiled perfectly, totally keeping their shape! Now, you can stop here and serve with sauce, bake/fry them, devour as is - the choice is yours! Seeing as this Grammy-Granddaughter day should end with a nice, complete dinner, I layered the ravioli into a 13x9 pan and made them into ravioli - lasagna style!
If you think making lasagna is easy (and even if you don't and think it's the most time consuming thing in the world) - ravioli lasagna is WICKED EASY! I'm not even kidding! There's no sticky lasagna noodles, no smearing of the ricotta mixture, no forgetting a layer, and serving is a breeze! Being 3 layers deep, each serving held 3 perfect ravioli! (Leaving plenty of room for seconds and thirds, of course.)


Also, each ravioli fit across the pan perfectly, and as for the sauce - the recipes are endless. There is a recipe for sauce, located here, or you can use your own. Perhaps you want to keep it easy and buy a jar of sauce? Do whatever works for you! I made my own sauce, again letting the 'Posh' be my guide, as I guessed on the measurements and seasonings, and it came out great! Unless you're my mom and want the recipe...

Mom:   "Wow! This is the best sauce I've ever had! You have to give me your recipe!"
Me:       "Uh...my recipe... about a handful of this, a scoop of that... maybe some more of this..."
Mom:   "Yeah. Thanks."


Needless to say, the ravioli was a big hit! (No one leaves this house hungry, that's for sure!) Served with a fresh green salad and homemade rolls, our Italian dinner, and a fantastic Grammy-Granddaughter day, was complete! 

So, if you have the time, because this recipe does take a bit of time, or you want to try your hand at homemade pasta - this is a great place to start! The recipe for this dreamy, easy to work-with dough can be found again here, and poshed in so many ways! Next, I'd like to try a butternut squash filling in a creamy white sauce, or serve the ravioli baked, with marinara sauce on the side! 

Or, perhaps you'd like to try this 'ravioli lasagna-style' with your favorite fresh/frozen ravioli from the store, some sauce and cheese. It makes for an easy, Italian dish I'm sure you'll love! Keep it posh, my friends! 

With love (for food),
Ellen
-- A dash of posh can make all the difference in your next dish! --

http://www.tasteofhome.com/recipes/homemade-ravioli?keycode=ZPIN0314

Friday, August 1, 2014

Cobb Salad

Cobb (Posh) Salad

Not Your Ordinary Salad!


I'm a salad girl. I confess! As much as I'd love to tell you I'm your solid, meat-and-potatoes girl with a heart for cheesy side dishes, my heart yearns for that fresh crunch of lettuce under a sweet vinaigrette. Don't get me wrong though! I love a good chicken pot pie or fall-off-the-bone ribs. Yet, every now and then, I want a meal to freshen up my palate, as I step back from all the heavy cooking. So, I give you this Cobb Salad, with tons of posh and so many ways you can make it your own! In fact, I'm calling it Cobb (Posh) Salad. Give it a chance! (You might just like this whole 'salad' thing!)

There are so many ways you can make Cobb Salad (or most salads, for that matter). This is how I did it. You do it the way you want! I customized each plate for each person (all three of us - Mom, Dad, and me!) Extra tomatoes on one, bacon on two, avocado on all three, you get the idea! But talk about fun to make! It's like an entire plate of posh! How you arrange the veggies, what type of dressing, chilling the plates, serving the eggs warm, grilling the corn etc etc etc! We should really just omit the "Cobb" and call it "Posh Salad."

Each topping can be poshed as well. For example, the corn (the only thing not individually pictured below, of course) was from a partial bag of frozen corn. I defrosted it in the microwave, and threw it in a cast iron skillet. Then, cook until it browns, season with garlic powder and pepper, and viola! Perfectly poshed corn to top this Cobb (Posh) Salad. Think of all the creative ways you can posh the other toppings!


The dressing is another very important salad component. I love this brand called Annie's. (Check out annies.com to see all the great products!) It's natural, organic, and delicious! This was the the first time I tried the Annie's brand salad dressing and it was amazing! A good Cobb (Posh) Salad needs a dressing which will allow the flavors of the toppings to really shine, just like this Fat Free Raspberry Balsamic Vinaigrette. It wasn't too sweet and had just enough tang to lightly flavor the entire dish.

So what are you waiting for!? Posh up some fun in the kitchen and impress your dinner guests with customized Cobb (Posh) Salads! 
With love (for food),
Ellen
--A dash of posh can make all the difference in your next dish!--


Wednesday, July 2, 2014

Italian Sage Meatloaf

Home Style Meatloaf

Ready to add some 'posh' to that average meatloaf recipe? Well, I've been working on this recipe for homemade meatloaf for years! It's become a family favorite, a classic even! And it's often requested by hungry parents and relatives alike. So, after measuring and tweaking and testing (and eating lots of meatloaf), I'm ready to share a real Posh Cuisine creation! (And did I mention this doubles as a great meatball recipe?)

I'm not even kidding when I say meatloaf makes the list of ultimate comfort foods. A plate of mashed potatoes with a slice of meatloaf on top - my mouth is already watering... PLUS leftover meatloaf makes terrific sandwiches, additions to soup, or cut up and used as makeshift meatballs! The possibilities are endless with this Italian Sage Meatloaf recipe!


Also, this recipe is super easy! Once it's all mixed up and in the oven, you have plenty of time to go about the rest of your business. (Like making the mashed potatoes and drooling over the wonderful smell in your kitchen.) It all starts with soaking some bread (leftover biscuits, sliced bread - all works fine!) while you get the rest of the ingredients in the bowl. Next, just mix it all together! I find the best way, honestly, is to dig your paws right in and mix it by hand. This way all the spices and goodies are well incorporated. Then, pop it in an ungreased loaf pan and you're well on your way to a wonderful meal! 


As a note, meatloaf can take a while to bake depending on the size of the loaf pan (and I used a pretty small loaf pan so mine took extra time, which, of course, required more excruciating patience on my end). After about 45 minutes in the oven (less if you're making mini meatloaves), it's time to add the sauce! I find it's great with ketchup or a favorite BBQ sauce - and served with extra on the side.
Be sure to let it bake until the internal temperature reaches 160 degrees, then take it out of the oven and let it rest for about 10 minutes - this makes it much easier to slice and enjoy! And trust me, you will enjoy it!

And, as always, feel free to posh it up as you please! Try your favorite sauce on top, throw in some fresh sage, or make mini loaves just for fun! Find a printable recipe for this Posh Cuisine creation here and start cooking! 

With love (for food),
Ellen
--A dash of posh can make all the difference in your next dish!--

Tuesday, June 24, 2014

Campfire Baked Potato

Posh Cuisine: Outdoor Style!

Mid-70s during the day, in the '40s at night - now that's good camping weather! Yes, I was a little chilly at times... (it can be in the '80s and I'll be cold.) However, with a roaring campfire, and these campfire baked potatoes (and a bag of marshmallows, of course), my Daddy-Daughter camping trip this past weekend was wonderful! Not only did I learn some valuable camping skills, manage to keep my feet dry as I crossed flowing rivers and brooks, and catch up on some valuable bonding time with my favorite Daddy - I was also able to bring the posh outdoors! And with some planning ahead, you too can put the posh in campfire cooking!

Now, when it comes to outdoor cooking, my Daddy is a pro. If you can make it indoors, he can make it outdoors. (Needless to say, I ate very well during this camping trip.) And we were really roughing it, too. I made pancakes with no spatula for Saturday's breakfast and ate my dinner that night right out of the pan! (Tough times, I'll tell ya.)

Now, let me tell you about these potatoes! We used Yukon Gold potatoes (they have an awesome buttery taste and make delicious mashed potatoes). We also planned and prepared our meals in advance (a great suggestion for you future campers) and stored everything in a cooler. And, by making this dish in the foil so it was all ready to go, dinner was one less thing to worry about as we hiked, gathered wood, and enjoyed the fresh mountain air.

Now, where's the posh? Adding posh is no challenge when planning ahead. Below you'll see how we set up this potato dish and ways to incorporate your own special posh before heading into the wilderness.

This is where the dish can become whatever you want! We kept it simple by adding a dash of Tuscan seasoning mix, and wrapped it up. *Note: Wrap it in foil twice! The outer foil can get charred and blackened during the baking process, while the potato and first layer of foil stay clean and wonderful!


Once it's all 'poshed' up to your liking and you're ready to eat, it's time to make the fire! That means gathering firewood... When you think you have enough wood - go get more. THEN it should be enough. Next, (carefully) make the fire and once it's going strong, just tuck the foiled potatoes onto the side of the flame. You don't want them directly in the fire (unless you want burned-to-a-crisp baked potato). The potatoes should be perfectly cooked after about 40 minutes (we left ours in a little longer and they were so soft and delicious). Now, what if you didn't pack any tongs/pickups!? How will you ever get them out of the fire!? This is where handmade tongs made out of a tree branch become very useful (bottom center picture). Now that's posh!

See? With some simple planning ahead and preparation, you too can bring the posh outdoors! And may I say, it is delicious and such a comfort at the end of a busy, camping-packed day! What would you add to your campfire baked potato dish?? How would you 'posh' it up???

With love (for food),
Ellen
--A dash of posh can make all the difference in your next dish!--

Wednesday, June 18, 2014

Thai Salad - As Seen on TV!

Ty's Thai Salad

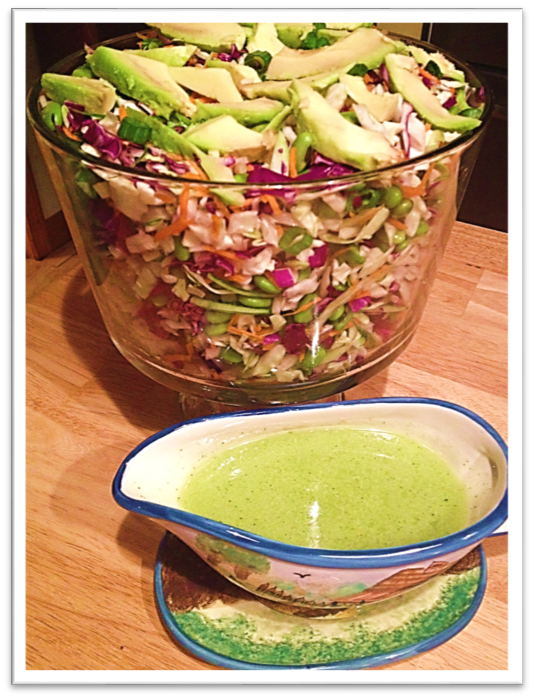
This salad, an original from "Trisha's Southern Cooking" show on Food Network, is amazing! I made it for dinner the other night, and it was such a hit - I had to share! Now, this recipe makes a huge batch! (I even cut it in half and we're still eating leftovers!) That being said, it would make a great addition to a BBQ this summer, or even a potluck. (Or dinner with plenty of leftovers for the week.) The crunch of the cabbage and edamame, plus the sweet lime-cilantro dressing make this salad like no other!
Ty's Thai Salad (With Posh!)
Plus, you can posh it up however you like! I piled plenty of avocado on top, along with some chives. This salad would also look beautiful layered, or with a sliced lime garnish. Whichever way you choose, it will be delicious, zesty, and refreshing. (Don't be surprised if you find yourself making this dressing for other salads, too - it's that good!) People will just eat it up (literally!) once they experience the sweet lime flavor with this crunchy, fresh salad. So thank you Trisha Yearwood! (Find the recipe here.) Enjoy!
With love (for food),
Ellen
--A dash of posh can make all the difference in your next dish!--

Tuesday, June 10, 2014

(Make Your Own) Pasta Salad


Pasta Salad - YOUR way!

It's finally hot outside! (and humid...let's not forget that.) All the same, I'm loving every warm, sunny day! Now, during a hard (hot) day of baking and yard work, I was in the mood for a colorful, cold pasta salad - but oh what kind do I make!? How much dressing? How many veggies? How much pasta!? Well, lucky for you, I have already fretted over these questions, and after much estimating (and Pinterest pasta salad recipe searching), I've got a great base recipe for pasta salad! I'll show you how I made my pasta salad, with what was in my "fridge-of-goodies," and explain how you can transform this to make your own pasta salad!


First thing's first - you must assess your ingredients! Use whatever veggies you have on hand, any pasta you find in the pantry - even dare to make it a twist on leftovers! (Plus, there's no need to go out and buy an entire pack of bell peppers if you're only going to use 1/2 cup, or a zucchini if you only need half. See what's hiding in that vegetable drawer, first!) Below are the ingredients I had on hand, cut up and ready to go!

With pasta salad, practically anything goes! It's a canvas for true creativity and posh. For example, you could go vegetarian and substitute beans or eggs for the tuna. Perhaps you have leftover ham or turkey in the fridge? Chop it up and toss it in! You could even try adding fresh dill and cucumbers! (My mind is racing with ideas before my fingers can type now...) If you find your salad is too dry, whip up some more dressing or simply drizzle the salad with a bit more olive oil, garlic salt, and pepper. *I usually use garlic salt in cooking because it tends to add a great hint of flavor. Of course, this does not apply to baking (Yum.. garlic-y chocolate chip cookies - no thanks!)


*As a tip, do not rinse the pasta with cold water to 'chill' it faster for the salad. Doing so could prevent the dressing from properly sticking to the pasta. (No one wants slippery, unflavored pasta, right?) I'd recommend making this salad in advance and keeping it in the fridge until serving (overnight would be ideal, plus then the flavors have time to become better acquainted...) Of course, making it up for that day's lunch may require some quick 'freezing' an hour or so beforehand.


Can we also take a moment to appreciate how colorful and healthy this pasta salad is? Full of veggies, grains, a small bit of healthy fats (from the dressing), those beautiful herbs... (and all topped with a bit of 'posh!' - what more could you possibly ask of a simple salad like this!?) So, next time it's hot and humid, and you're in the mood for a refreshing lunch (or even a side dish to dinner), see what you have for leftovers and create! Make your own pasta salad, and don't forget the posh!
With love (for food),
Ellen
--A dash of posh can make all the difference in your next dish!--

Thursday, June 5, 2014

Chicken Cordon Bleu

It's a weeknight....who knows what's for dinner? (or do you say 'supper?') Something full of flavor and fun to make would be nice, right? (Well duh!) Here's where chicken cordon bleu, with its many variations and endless possibilities, comes to the rescue!

This is a very simple recipe, leaving you plenty of room to be creative and add your own flair! Plus, once it's prepared, it just bakes in the oven while you go about the rest of your weeknight business! (Unless you're me, who didn't want to leave the kitchen and practically sat in front of the oven, waiting for it to be done.) 

Part 1: Now, onto making it! I broke the recipe into two parts, to keep it simple. In this first part, I prepared the ingredients, and made up the cordon bleu rolls. It started with pounding the chicken (to death!). As a tip, covering the chicken with plastic wrap before pounding it, will keep the meat from tearing (and it's a bit more sanitary). Start in the center and work your way out for the best results. Once flattened, top with cheese and ham, and roll it up! Also, you can use any type of ham, such as deli slices, leftovers, etc. This ham, below, is leftover from a ham bone we did on the grill earlier in the week. Once all the rolls are made, you're ready for part 2!

Part 2: Not too difficult, right? Next, we make the topping! Seasoned breadcrumbs would do the trick, but where's the fun in that? Be creative here and add whatever seasonings (fresh or dried) you have on hand! Then, after brushing each roll with the egg wash, pat the crumb topping all over the chicken, and top with a tasty garnish (like fresh rosemary leaves).


Bake at 350 degrees for about an hour, or until the inside of the chicken has reached 165 degrees (mine took a little over an hour). Remember, chicken is not one of those meats where "medium" or "medium-rare" will do. It must be cooked all the way! Another way to ensure chicken is fully cooked is by cutting into the thickest part with a sharp knife. If the juices run clear and there is no pink, it's all set!


These made pretty large cordon bleu rolls - 2 were perfect for my family of 3! Also, if you happen to have leftovers...mine made an excellent chicken (cordon bleu) salad when mixed with cranberries, celery, almonds, red onion, a little mayo, and a homemade Greek yogurt dressing. What would you do with your leftovers? What type of bread crumb mixture would you make? Feel free to 'posh' up this recipe as much as your heart desires! It's a great base recipe, with room for creative flair - just go for it!
With love (for food),
Ellen
--A dash of posh can make all the difference in your next dish!--

Thursday, May 29, 2014

Homemade Fettuccine - Pasta from Scratch!

What began as a heap of flour, eggs, and oil soon became a wonderful homemade fettuccine dish! Pasta entirely from scratch! Don't be scared now, it was so easy! And much tastier than that boxed pasta we all know (and love perhaps a little too much).

It's been a couple of days since I made this for dinner, and my parents are still raving about it! I can already tell I'm going to be making it again very soon.. it was that good! Unlike dried pasta, this fresh dough had so much more flavor, each noodle had great texture, and after 2 minutes in boiling water, it was perfect! (But we'll get to that part.)

"Making Homemade Pasta" This can be a scary, almost intimidating phrase to anyone. Immediately, you may be thinking "I don't have time for that," "I need some sort of machine," or "Why not just buy it?" To that I say... no excuses!! I've wanted to make homemade pasta for so long and while reading through my latest Taste of Home magazine, I found the perfect recipe for fettuccine. No fancy machines required! So here, I'd like to walk you through making this homemade pasta step by step, with help from the Taste of Home recipe. It is totally worth each and every (simple) step!
First, we need to make the dough. There's only 8 ingredients! We start by whisking together 2 eggs, 1 egg yolk, 1/4 cup water, 1 tablespoon olive oil, salt and pepper (number 1, above). Next, I put my 1-1/2 cups of flour and 1/2 cup of semolina flour on the counter. (I found semolina flour at Hannaford in the baking aisle. The package was completely vacuum-sealed - wicked cool!) I mixed together the flour right on the counter, made a well in the center, and poured in the egg mixture. This is where things got messy... so I HIGHLY RECOMMEND adding a little egg mixture at a time to the flour, and mixing it with your fingers until it is all incorporated. This will ensure the egg does not ooze beyond the flour and across the counter as you frantically try to catch it with your arms and keep it from diving off the edge.. (not that this happened to me, of course.. I just want to make you aware of what could happen.)

Once the dough is formed, shape it into a ball and place it on a lightly floured surface, seen in number 3. *To keep the counters clean and the dough from sticking as much, I recommend using a towel dusted with flour when working with any breads or dough. It makes forming them into a ball (and cleaning up later) a breeze! Next, cut the dough into 6 wedges, and roll each into a cute little ball. Then, cover with plastic wrap (I hate plastic wrap by the way.. I made this on the same day as my strawberry lemon cake batter frozen yogurt and my plastic wrap mishap, which is a whole different story!) After letting these rest for about 30 minutes, it's time to form the pasta!

Using a well floured rolling pin, form each ball into an 8" x 10" 'shape', and roll into a tube (jelly-roll style). Cut into 1/4" strips and unroll the spirals for fettuccine! *This is the most time-consuming part of the recipe. It took me (and my mom) forever to unroll each piece! So, in a moment of genius, I decided to skip these last two steps, and cut the strips out of the flattened 8" x 10" shape. Of course, this "aha!" moment only came when rolling out the second to last ball of dough.. Just have patience when cutting the long strips to ensure they are even. Now, the final step is to cook the pasta. (Then, we smother it in sauce!)
I added about 1 tablespoon of olive oil to the water and boiled the pasta for 2 minutes, drained it, and stirred it into the sauce. That's all there is to it! Now, for the sauce... it wasn't anything too fancy. Since the star of this dish was the pasta, I had no objections to using prepared alfredo sauce - jazzed up with some personal posh, of course! With no precise measurements (let the smell and taste be your guide), I added some Parmesan cheese, milk, and spices to a jar of 3 cheese sauce. I also added some veggies, as seen below. 

Simmer the asparagus in the sauce for about 5 minutes, or until it's fork tender. Then, add the squash and zucchini, (when you julienne them, keep the skins, and don't include the seeds) and keep the mixture hot on the stove until the pasta is cooked and drained. Stir, plate, posh it up (I used some fresh basil from my newly planted herb garden), and enjoy your homemade pasta dish!

It's INCREDIBLE! The pasta has great flavor and texture, it soaks up the sauce, and makes a wonderful, hearty dinner! You have to try it! Don't be afraid to try something new, and get a little messy in the kitchen! This pasta has endless possibilities! What kind of sauce would you pair with it? How would you cut it to make fettuccine? Spaghetti, perhaps? And what kind of posh would you add?! 


With love (for food),
Ellen
--A dash of posh can make all the difference in your next dish!--