Showing posts with label dessert. Show all posts

Friday, April 3, 2015

Giant Monster Cookies

Monster Cookies

Full of peanut butter, oats, chocolate chips - and no flour!

Let me start off by saying, these are absolutely MONSTER cookies! Toss aside that cookie scoop and grab a measuring cup because cookie-making time just got serious.

These Giant Monster Cookies (recipe here) will definetly become a favorite! And that's no mistake in the title. There is no flour in this recipe! Instead, you get an oat-packed, peanut butter-loaded, chocolate delight, good for any time of the day! Whether you're making them to refill the cookie jar or you're craving warm, fresh-out-of-the-oven oats, peanut butter, and chocolate - these cookies are a winner! Not to mention, they freeze well and make excellent gifts! (Of course, if you freeze them, I suggest popping them in the microwave right before devouring, so the chocolate can get all melty and warm...)

I followed this recipe as instructed, merely using mini m&ms and an entire bag of dark chocolate chips... who can blame me? And trust me, this recipe makes a LOT! And they're HUGE! Feel free to make them as big or as small as you'd like (mini monsters!). Oh! I also pressed mine slightly before baking (or rather, before staring into the oven, waiting for them to be finished...).  Now, posh these up however you like! (Coconut, walnuts, Reese's Pieces, chocolate chunks, chocolate peanut butter - the posh is endless!)
For a quick, easy recipe full of the stuff you love and sure to squash any hunger - here you are! Thank you again Taste of Home, for making the house smell great and the family happy with another terrific recipe! 

With love (for food),
Ellen

-- A dash of posh can make all the difference in your next dish! --

http://www.tasteofhome.com/recipes/giant-monster-cookies


Wednesday, January 7, 2015

Meringue Kisses

I can't believe my last post was in October...That's so last year! And let me tell you, quite a lot has happened. Sometimes life catches up with you and before you know it, it's already 2015! Rest assured, school is going well and, being the nerd I am, I loved my classes this past semester! But I won't bore you with details. Let me just say I absolutely missed you all and I apologize for not posting in such a long time!!

Now, onto far more important things - let's get to the food! And the posh! To start off, I have a fantastic recipe for light, melt-in-your-mouth Meringue Kisses. Find the original recipe I used here. Each bite literally melts in your mouth, leaving behind the fresh, crisp taste of almond. It's one of those "can't have just one" type of treats - which is fine because once you see what's in them (or not in them), you won't mind eating the entire batch! I certainly didn't mind...


Egg whites. Sugar. Cream of tarter. Flavoring. Food coloring (optional). Can you get any more guilt free!? I found this recipe on Pinterest (where else?) and was immediately intrigued. I made my first batch as the meringue trees with sugar sprinkled on top, yet finding it only made one tray and some were left a little chewy -despite the four hours in the oven -I opted to try making mini kisses - I had a winner.

Really, you can make any shape/size/color/flavor you like. I just happen to love food in cute, mini form... hence these kisses were born! And don't be intimidated by the long time in the oven. They're really super easy to make! (Plus you get to lick the bowl when you're done...totally worth it if you ask me!) As a note, making them as small as I did filled three trays - so it makes plenty! Which is perfect because they don't last long in my house...

The recipe, again found here, calls for gel food coloring and certain sprinkles. Honestly, use what you have! I added a few drops of liquid food coloring and used decorative sugar crystals - so make them your own! (Isn't there a word for 'making something special and adding your own unique twist?' I think it starts with a "P...")

Finally, don't just take my word on these little bites of pure bliss. They were such a huge it at Christmas - I don't even know how many batches I've made since! The almond flavor is exquisite and perfect for the holidays. But once you try them with lemon extract and yellow food coloring... just trust me and try it. It's amazing.

With only a couple ingredients and an oven with no plans, these delectable and not-so-guilty treats can be melting in your mouth in no time! (Okay, at least four hours, but you get the point.) So what are you waiting for!? You have to try these Meringue Kisses!!

With love (for food),
Ellen
-- A dash of posh can make all the difference in your next dish! --

Friday, October 10, 2014

Apple Pumpkin Bundt Cake


Apples + Pumpkin + Cake

(Can you say delicious!?) 


It's been far too long since I last posted and I apologize! Who knew college would get this busy so quickly!? And no, I don't mean busy with naps, television, and the occasional exam or two. (Although a couple of naps have found their way into my schedule...). I'm the type of person who enjoys having plans and events. Yet, I was able to squeak in a weekend home for a very special occassion (and this very special cake!)  In searching for the perfect dessert for my grandmother's birthday, I found this recipe for Apple Pumpkin Bundt Cake and I had to make it! It was love at first site when I read the recipe...and love at first bite when I made it! Find the recipe here to try it for yourself: http://juliasalbum.com/2013/11/apple-pumpkin-bundt-cake/

Look at all that hot caramel poured on top!!
Words can't even begin to describe how moist and delicious this cake was, and making it was so easy! Plus, using only one cup of pumpkin puree gives the cake a settle orange color, while the apple and cinnamon flavors can still really shine. Drizzle some hot caramel on top and you've practically got yourself a caramel-dipped apple in cake form! (Not to mention you've got one poshed-up, delectable cake ready for any fall occasion!)

You can even see the chunks of delicious baked apples!
And fortunately, it was a huge hit for my grandmother's birthday!! Served next to a scoop of vanilla frozen yogurt... it was hard to resist licking the plate and going back for more! (I mean, we have seconds during dinner...why not dessert?)

I just had to share this recipe with you all and let you know I'm still here! I'm always thinking of Posh Cuisine...dreaming of the kitchen...my apron, rubber spatula, and measuring cups at the ready. College is going well, though, and I'm thoroughly enjoying my classes. (I won't bore you with the details, but rest assured I'm keeping it posh here at school, too!)

So, this season (my favorite season), don't be afraid to experiment with fall flavors and make them your own! Bring on the apples, pumpkins, squash, and seasonings! Sprinkle a little cinnamon sugar on your pumpkin pie, or cook up some homemade applesauce. Add a little posh to every dish! And try this cake!! (You'll LOVE it!!)

With love (for food),
Ellen
--A dash of posh can make all the difference in your next dish!--

Tuesday, September 2, 2014

Blueberry Crumb Bars

Blueberry Crumb Bars

For those freshly picked berries just waiting to be poshed!

Can you think of a better way to end summer vacation than with a family BBQ, complete with smoked brisket, ribs, beans, homemade sides, and delectable blueberry crumb bars? My cousin was nice enough to surprise us with pounds (and I mean pounds) of freshly picked blueberries. I realize there's a ton of recipes one can make with blueberries (and trust me, we have enough berries to try plenty!), yet something about classic blueberry crumb bars...I couldn't resist!

Recipe from Brown Eyed Baker

Juicy blueberries, layered between flaky, buttery dough... it's no wonder they were such a hit! I found the recipe on Pinterest (big surprise, right?) and you can find it by clicking here or visiting www.browneyedbaker.com/blueberry-crumb-bars-recipe/. The ingredients are simple, no-fuss required! And combined, they make this wonderful dessert! (or snack, or breakfast? There's berries in them, after all!)

The recipe was also wicked easy.  As a note, I lined my 13x9" pan with parchment paper. This way, the entire batch could easily slide out of the pan and be cut. Parchment paper works great for baking any type of bars, fudge, cookies, you name it! (That's my pitch for parchment paper, by the way.) 
Line the pan with parchment paper for easy removal
How could this recipe be poshed? (Although the recipe on it's own is pretty dang delicious!) But if you feel like being creative, try using a raspberry filling, or spread a can of lemon pie filling on the bottom layer of dough before topping it with the blueberries and crumb. Another option: make the bottom dough thicker by using all the batter, then sprinkle an oat-crumb topping over the blueberries. You could even make individual crumb pies! Let the kitchen move you, and your taste be your guide. I'm sure it will be delicious!

Posh Update:

Now, you may have noticed my little 'blurb' under the "Posh Cuisine" logo. I am back at school, getting ready for another exciting year! I will keep posting, for I have lots to share! Plus, I care about helping you find and develop your posh in the kitchen (while having some fun!) Posh is not something one just 'perfects' in a summer. It takes time, practice, and dedication (plus a stocked pantry and big appetite never hurt). It may take more time in between posts and recipes, that's all! 

Try out this recipe (as I highly recommend you do), or browse through the many I've posted this summer. And keep checking in for updates, posts, and more! 
With love (for food),
Ellen
--A dash of posh can make all the difference in your next dish!--

Monday, August 18, 2014

Wedding Cake

I am so pleased to announce Posh Cuisine's first wedding cake was a success! After months of planning, weeks of preparation, last weekend's trial run (well worth the effort), and crunch-time decorating, this wedding cake was a huge hit at my uncle's wedding!


This cake was no easy feat, let me tell you. But I just love weddings!! Everything about them! I really wanted this cake to be special, so I made sure to do my research. There's a lot to making a wedding cake! I held my breath up until it was not only delivered, but sitting on the table in the reception hall. I was so nervous!

All this work was totally worth it. Both the ceremony and the reception were beautiful - wonderfully done! And I'm so happy to welcome my new aunt and cousins into the family! So, with this cake as my gift to my uncle and (new) aunt, may your marriage be filled with happiness and love. And let there be cake!

With love (for food),
Ellen
--A dash of posh can make all the difference in your next dish!--

Saturday, August 9, 2014

Crisp Chocolate Chip Cookies

A Posh Cuisine Update & Cookie Jar Favorite

UPDATE: First, I have to say I'm so sorry for not posting a lot! This past week has been super busy and while I know that's no excuse, you need to know how much I think of you, my readers! And I'd love to show you what I've been doing...


This was my first wedding cake attempt because...my uncle is getting married on Saturday! And I'm making the cake!! (Eeeep! Are you as excited as me!?) I know I should have told you sooner, but with all the baking and recipe testing going on this summer, it's been crazy!  I've been doing so much research towards making a wedding cake, in addition to finding the pans and equipment (there's a lot to it!). And since I was going to a family BBQ today, I thought it'd be a great time to put my research to the test and make a smaller version of the cake. (With a theme to match this summer party, of course!)

Wedding Cake #1
It was such a huge hit! I don't even know where to begin! The flavor, texture, frosting - everything! This is no cardboard cake with frosting. If Posh Cuisine is going to make a cake, it's gotta be pretty and delicious! (That's how true posh is measured.) And this cake has got some posh, let me tell you!

But now, let's get back on topic. What's this about a "cookie jar favorite" in the title?
Click here for the recipe!
Want a chocolate chip cookie which melts in your mouth? Doesn't get hard-as-a-rock in the cookie jar? Holds up to freezer storage and still tastes fresh? Then look no further! The recipe I am about to share is a favorite of mine (and I'm pretty picky when it comes to cookies). It's always a huge hit with the family, at parties, as gifts, with my friends at school - you name it! So thank you again Taste of Home, because this recipe for Crisp Chocolate Chip Cookies is fantastic! And I must warn you - not only will these cookies remain airy and melt in your mouth, they're addicting, too!

I follow the recipe on this one, yet I always use crisp rice cereal (never cornflakes) and quick-cooking oats (never regular). I also always use Hershey's Special Dark chocolate chips in nearly all my cookie recipes. They're wonderful chips for both melting and baking (and snacking...). As seen in the image above, I always flatten these cookies just a tad before baking for a smoother-topped cookie. The recipe yields about 6 dozen (using a large cookie scoop), so I highly recommend freezing some!


I actually prefer them frozen...they're just wonderful! Store them in plastic freezer bags for months - they'll stay tasting fresh and delicious! This is the only chocolate chip cookie recipe I like to make now, and trust me, I've made it a lot! For some reason, they just don't last long in my house (or at school with my friends). This recipe is amazing and I just know you'll love them! Click here or visit www.tasteofhome.com/recipes/crisp-chocolate-chip-cookies for the recipe. And keep it posh, people!

With love (for food),
Ellen
-A dash of posh can make all the difference in your next dish!--

Tuesday, July 29, 2014

Lemon Blueberry Bread

Great recipe alert!! 

Prepare yourself for the flavors of the season with this Lemon Blueberry Bread!


After picking a couple pints of fresh blueberries, some just had to be made into lemon blueberry bread! (But not just any lemon blueberry bread. This recipe, found here, is fantastic!)


The bread took less than 30 minutes to whip together (Just don't really whip it! It's very important to gently fold the dry ingredients into the wet and use great care when adding the blueberries. This way the bread stays light and airy.) Also, since the recipe only calls for a little lemon, I'd recommend adding some extra zest and freshly squeezed juice for that burst of lemon flavor! (Don't be afraid to add a bit of posh right into the batter!)

The recipe also calls for a glaze, yet I found with some extra blueberries and a sprinkle of sugar on top (more posh!) it was just enough! (The extra lemon juice in the batter really helps, too.)

So, if you're up for a quick and easy bread, with fresh summer flavors - this is the one! It stays moist, light, and delicious. It's great for brunch or even dessert! (Or both...like with whipped cream and extra blueberries on the side...) And you can add the icing, or sprinkle your own posh on top. Maybe you want to try it with raspberries in place of the blueberries? This bread would be excellent paired with a cream cheese filling or frosting, too. There are so many ways you can make this your own! Grab your apron and try it for yourself!

'Posh' is Spreading...

Also, quick update! Last night my dad was in charge of dinner, and since I wasn't allowed to snoop around the kitchen or guess what he was making, I was left only with the beautiful aroma drifting through the house of this homemade beef stroganoff. With its white wine and fresh mushrooms, topped with nonfat Greek yogurt (no, not sour cream!) and dried parsley flakes, each plate was a masterpiece and tasted delicious! He really put the 'posh' on this dish and it was amazing! So well done, Dad!


With love (for food),
Ellen
--A dash of posh can make all the difference in your next dish!--

Tuesday, July 8, 2014

Best Sugar Cookie Recipe EVER!

World's Best Sugar Cookies

(And I mean the "best")

I have found the most amazing recipe for sugar cookies WITH royal icing! Look no further for a sugar cookie which melts in your mouth, yet stands the test of rolling, cutting, and being iced. Even without the icing, and merely baked up as a drop cookie - these. are. the. best. They're not too sweet. They have just enough lemon flavor. And they're wonderful. So thank you to Butter, with a Side of Bread for this amazing recipe and step by step instructions!

These cookies were such a big hit, my family is still raving about them! To quote my dear grandmother (who doesn't really eat sugar cookies as rule), these were "absolutely the best I've ever had." Along with that, I heard her say they were "so light!" and "the world's best sugar cookies!" (Now you know they're good!) I was touched. It was such an honor! I really put myself into these cookies, and took the time to roll, cut, bake, frost, and decorate each one. And trust me, these cookies certainly took time, but were totally worth every sweet, lemony bite. 

Plus, this recipe was super easy to follow. I made the cookies up one day (the hottest and most humid day of the week, of course). The next day I made the royal icing (a great recipe, too - I used the meringue powder version) and put it into small squeeze bottles with caps. This site does a great job explaining how to frost the cookies, and above I showed my step-by-step process. (As a note, don't be afraid to add a little water to the icing if it becomes too thick. Adding a couple drops at a time and stirring well can make a huge difference.) 


In total, I spent about 4 hours frosting, and there were a lot of cookies! So, this would be a great recipe to make with friends or family. Click here to see the recipe (and visit an awesome site). Plus, there's so many ways you can make this recipe your own by adding some posh! Choose your colors, shapes, decorations, perhaps a theme, or roll the cookies into balls, dip in sugar, and bake as classic sugar cookies. Whatever you choose, they will be delicious - I just know it. And your family, too, will fall in love with these light, soft, hint-of-lemon sugar cookies! (Mine did!)
With love (for food),
Ellen
--A dash of posh can make all the difference in your next dish!--

Friday, June 20, 2014

Cupcake 'Cake' Father's Day Style

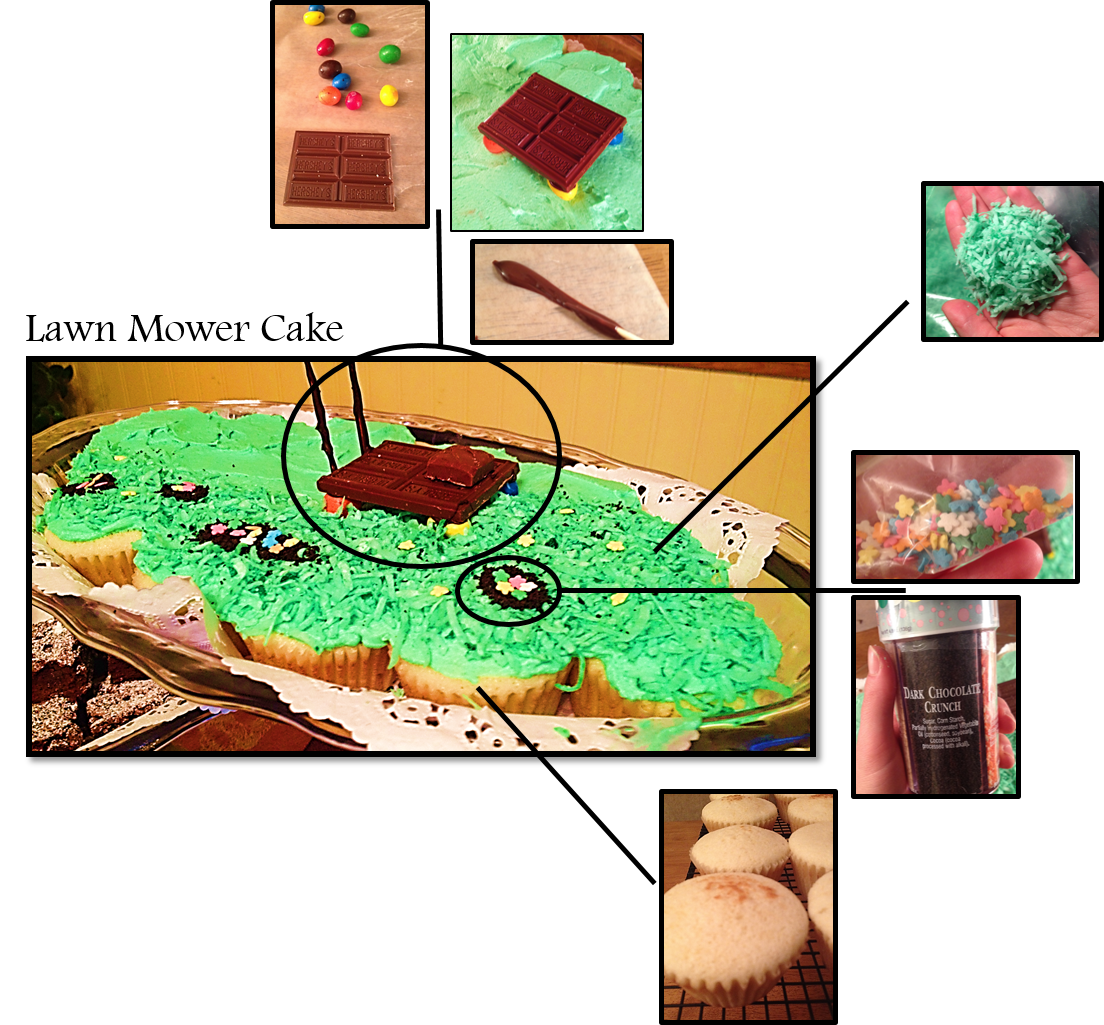
Lawn Mower Cupcake 'Cake'

Let me start by saying, I absolutely LOVE my dad! ("Daddy" to me.) So, what better way to show my love and appreciation for him than a cupcake CAKE with tons of posh on Father's Day!? I had so much fun making this cake, and it was the perfect occasion! Now, I can't wait to show you how I did it!
For starters, this was my first creation in my new 'office!' I transformed part of our basement into a posh work station and this 'cake' was baked, frosted, and poshed in cool comfort. Now, there are so many things you can do with cupcakes - and so much posh potential! Of course, this cake only represents one method. I'll go through this cake step-by-step, but I encourage you to try your own flavors and designs! Also, this 'cake' is a great (and much easier) way to serve cupcakes! (Just saying...)

Cupcake Making
STEP 1: You may be thinking "make the cupcakes, duh," but I recommend starting with a plan. What flavor cupcakes will you make? (Remember, it has to taste just as good as it looks!) What kind of frosting? How will you decorate it? Plan it! This cake was inspired by our yard. My dad was mowing the lawn just that morning, and removed our "dandelion farm" (as my mom calls the pretty yellow weeds). Thus, I knew I had to go with this theme!

STEP 2: Now that you have a plan, you can make the cupcakes! My dad likes yellow cake, and in my refusal to make a boxed cake mix for this occasion, I used a Taste of Home Yellow Layer Cake  recipe. It's a fantastic recipe, too! The cupcakes are so moist, and packed with flavor. This recipe makes 24 normal sized cupcakes (and my 'cake' only needed 15, so viola!) Plus, they baked up in 10 minutes using my Baby Cakes Cupcake Maker (more about this device in my Salad & Cupcakes post).


STEP 3: Once the cupcakes are baked and cooled, it's time to make the frosting and prepare the posh! I made up a simple vanilla butter cream frosting recipe and dyed it green (although you could use whatever frosting recipe you like!) Then, in my serving tray, I packed in the cupcakes so they were nice and snug, and frosted it like one big cake.

Get the cupcakes nice and snug!
STEP 4: The green frosting base represents the "cut grass." Next, I assembled the lawnmower. All I needed was half a chocolate bar, 4 M&Ms, 2 tooth picks, a mini candy bar, and melted chocolate. (Keep in mind, there are many ways to build this with candy, so be creative!) For this method, start by attaching the 'wheels' (M&Ms) to the bottom of the chocolate bar with a little melted chocolate. Once the chocolate has set, place the structure on the cake and attach your 'engine' (mini candy bar) with more melted chocolate to hold it in place. Finally, dip the toothpicks in chocolate and make them the handles. (It's pretty easy, don't worry!)

STEP 5: Next - and my mom had fun with this part - put shredded coconut and green food coloring together in a Ziploc bag, and shake like crazy! Coat the coconut with as much coloring as needed until it reaches a nice 'grass' color. And if you're my mom, keep shaking it and shaking it, try hitting it on the counter a few times, and don't forget to laugh the entire time... Finally, once the coconut is green, dizzy and definitely dead, sprinkle it on half of the cake to represent the uncut grass. 

STEP 6: Using dark chocolate crumbs and flower sprinkles, I made small flower beds in the uncut grass, and sprinkled the yellow flowers as dandelions. That's all there is to it! See it broken down, below.

Each step, and every creative touch is well worth it for this cake! The average cupcake is practically a blank canvas just waiting to be poshed! Still wondering exactly what 'posh' is? Well, in this case, it's the extra effort put into making this cake special. It's taking the time to really put yourself into the dish, as well. It's having fun and being creative! (Never forget the flavor, though. Make your posh match the wonderful flavor in each dish!) And I have to say, every ounce of effort was well worth it for my daddy. For all the things he does for me, this was the least I could do to show him how much I love him! This one's for you, Daddy!

With love (for food),
Ellen
--A dash of posh can make all the difference in your next dish!--

Tuesday, June 3, 2014

Lemon Angel Food Cake - Artistic Fun in the Kitchen

Lemon Angel Food Cake (with Candied Lemon Peel, of course!)

I've never really been a huge fan of arts and crafts, or the patience required of them. Yet, for some reason...when it comes to making and decorating cakes, cookies, or treats - I'm there! I love it! Sometimes nothing beats taking the time to put some artistic flair on an average cake, plus the anticipation of presenting it for dessert! So last week, I decided to do just that and made a lemon angel food cake!
Using a recipe from Taste of Home, found here for Lemon Angel Food Supreme, I made the cake part as the recipe directed, while also adding about 2 teaspoons of freshly grated lemon zest (for extra lemony flavor). This was my first 'from scratch' angel food cake, so I followed the directions very carefully! It wasn't as hard, or complicated, as it may seem. The biggest "trick" is making sure you've whipped the batter enough, and have the proper peaks. Of course, another important part of making angel food cake is the pan... which I didn't realize we didn't own until after I decided to make this, so I improvised! Since I didn't have a tube pan, I used 2 spring form (or cheesecake) pans with half pint jars placed in the center. (Angel food cake actually climbs this center tube as it bakes.) Plus, then I'd have a layered cake to decorate - more possibilities! 
They seemed to work great, too! (The house smelled so good by this point, just saying.) As soon as they were done (dry on top, sprung back when tapped), I flipped them over to cool. This, too, is important for it keeps the cakes from collapsing. 
Next, (after what seemed like forever) they were cool enough to remove from the pans and frost! Since the pans were not greased or oiled (another important rule in making angel food cake), it was a bit of an adventure getting the cakes free... Using a knife, I separated the sides and carefully pulled the jars from the centers. (And once the cakes were free, the hardest part was over!) Then, I got to whip up (literally) the frosting. For the recipe, see here. To this Sweetened Whipped Cream, I added 1 teaspoon of lemon zest, about 1 teaspoon of lemon juice, and a few drops of yellow food coloring (then it even looked like lemon!) I also made two batches to cover my two-layered cake.
Decorating: This was my favorite part! As a tip, line your cake stand with waxed paper before frosting the cake, so any drips/messes can be easily removed. This leaves you with a beautiful cake and clean stand! I also added some fresh blueberries for even more color and flair (plus taste! I mean lemon and blueberries? How much more refreshing can this dessert get!?) Decorating is the part where no recipe can direct you - where true 'posh' is really shown! There are millions of ways to decorated a cake, go crazy! 
Candied Lemon Peel: So what's all this about the candied lemon peel, you may ask? Although a bit time consuming (not too much, though, I did this all while letting the cakes bake and cool), it's so worth it! It may seem like a lot of steps (like boiling it four times...), but it leaves you with soft, chewy, sugary lemon candy! And these make great, edible decorations, or you can cut them into larger pieces or shapes and serve them as candies!

Tube Pans: As you can see, this cake was quite an adventure! Between having never made angel food cake from scratch, not having a tube pan, and trying to give it a new spin with extra 'posh,' making it was an exciting afternoon activity! And of course, the next day my parents and I stopped by a second hand store (I love thrift stores - they have the neatest stuff!). There, I found not one, but TWO tube pans! And both were in excellent condition! So we bought them...both. (below) These can be rather difficult to find nowadays, so I recommend trying thrift stores. Look for pans with feet on the top, (so the cakes can cool upside down), and removable bottoms (remember, don't grease/oil the pans). And they shouldn't be too expensive at thrift store prices. (I got these two pans, a book, an elephant key chain, and mom got 2 plates for a grand total of $4...not too shabby at all!)
I hope you enjoy this cake! It was perfect for dessert, so airy and lemony! Even the leftovers stayed light and fresh! And it was so much fun to make and decorate! How would you decorate it? Everybody's 'posh' is unique and beautiful - just have fun!

With love (for food),
Ellen
--A dash of posh can make all the difference in your next dish!--


Tuesday, May 27, 2014

First Ice Cream Maker Creation!

Strawberry Lemon Cake Batter Frozen Yogurt

I FINALLY got to use my new ice cream maker!! (You may be wondering: the first thing I make is frozen yogurt..?) That's right! After browsing on Pinterest, (a favorite site of mine!) I found a recipe for Strawberry Lemon Cake Batter Frozen Yogurt - and I had to make it! I love light, refreshing desserts, and lemon-anything is always a big hit in my family! (Don't get me wrong though, I'm always in the mood for warm brownies or a hot fudge sundae, too! Pile on the whipped cream!) At the same time, this frozen yogurt was the perfect finish to a busy day of gardening and yard work! Find the recipe here (at iheartnaptime.net). With 3 simple ingredients and a bit of patience, it was fantastic!! 
3 Simple Ingredients
After whisking these together, I covered the bowl with plastic wrap and put it in the fridge to chill, so I could get the ice cream maker all set. Of course before that could happen, I managed to get into a fight with the plastic wrap box...and I lost.

A nurse's work is never done
Me vs. Plastic Wrap: All day I had been thinking to myself how miserable plastic wrap was, and how much I despised it.. all day! And then it attacks me!? I just wanted one piece to cover the batter, and it had to be the difficult piece. So, after the bleeding stopped and my mom (thank goodness she's a nurse!) bandaged me up, I continued with dessert!

The ice cream maker was SO EASY. I inserted the frozen bowl, poured in the batter, slid in the paddle, covered it, and viola! (Well, I plugged it in too, that helps). Within 30 minutes, I had beautiful, pink soft-serve frozen yogurt!


Fortunately, I made this up before dinner, rather than during - so I had enough time to put it in the freezer and let it get to a more 'scoop-able' consistency. (As a note, I think next time I'll make it up in the morning, so it has more time to 'chill out' (aha, get it?) in the freezer.) By dessert, it had reached a semi-soft-serve state, and was easy to serve!
For some added "posh," I sprinkled extra lemon cake batter mix over the top, and placed a fanned strawberry on each. (Mini chocolate chips were added later, amazing!) *To fan a strawberry, carefully slice towards the top, stopping about 1/4 inch from the green cap. Spread, or "fan," out the layers and it's done!*

A little posh on top!
Wasn't this recipe super easy!? I have so many ideas/plans for my ice cream maker this summer! At some point I will make traditional ice cream, yet for now I'm loving this yogurt lifestyle! There are tons of recipes out there, and I aim to find them! (And then add my own splash of 'posh!') Pinterest, here I come! And thank you Jamielyn at "i heart nap time" for this recipe!

With love (for food),
Ellen
--A dash of posh can make all the difference in your next dish!--

Sunday, May 25, 2014

Oatmeal "Whoopie!" Pie Cookies

I was totally shouting "whoopie!!" today after I got an ICE CREAM MAKER!!! How exciting is that!? I've wanted one for so long! Yet, I had to wait until finals and everything had settled down - longest. wait. ever. But I got one today! And on the way home, naturally, I picked up the supplies to make frozen yogurt, got home, read the instructions...and the freezer bowl has to be completely frozen before starting.. :/ what. the. heck. So frozen yogurt will be coming soon! In the meantime, I had my eye on an oatmeal whoopie pie cookie recipe from an Amish cookbook my mom bought not too long ago.. so what better occasion to whip them up than when depressed about having to wait YET AGAIN to make a frozen dessert!? So, let's all shout "whoopie!" for these whoopie pie cookies, instead!


Let me start by saying "yum!" The flavor was great, and these cookies were super quick to whip up, bake, and fill! Below is the recipe book (expect more from here, there's a sugar cookie and a pie recipe which look awfully good...) The recipe can also be found here (at amish365.com).


This recipe was a bit different than traditional cookie recipes I've made. For example, I creamed the butter, sugar, AND eggs at the same time! Then I added all the dry ingredients, then the oatmeal and cinnamon, then mixed boiling water with baking soda...and stirred that in last. A process totally worth it!

*As a note, I highly recommend investing in rounded cookie scoops - they're perfect for making each cookie the same size!
Perfect size, every time!
Although the recipe said to bake them for 10-15 minutes, mine were done in 8! Also, I suggest 9 cookies per tray because they spread quite a bit.. I was surprised, too, because of the baking soda and baking powder in the batter! Then again, I did improvise a little by substituting half of the quick cooking oats for regular...(I ran out of quick cooking oats! Dang those lazy breakfasts when I didn't feel like cooking up regular oatmeal!) But either way, they turned out delicious!

While they were cooling, it was time to make the filling! Different from the thick, frosting-like chocolate whoopie pie filling I'm used to making, this filling was rather thin and kept only soft peaks. Yet, for these large, soft and chewy oatmeal cookies - it was perfect! Using a smaller scoop, I plopped a little filling onto the bottoms of half the cookies, and played matchmaker!


Super cute, right!? The filling's sweetness really helped bring the entire cookie together - I'm thinking these cookies may also make great ice cream sandwiches! (using ice cream from my ice cream maker, of course) This recipe made about 20 pies - plenty for dessert! With plenty leftover for snacking! Each bite of this sugary sweet pie, with its sweet creme filling, was pure delight! 


So where's the 'posh,' you may ask? The posh is everywhere! It's the extra care used when finding each cookie its perfect match, or setting them up nicely on a plate for dessert. Posh is putting yourself in the dish! And these cookies, from a terrific Amish recipe, have plenty of posh - as well as flavor! Just see for yourself! 
With love (for food),
Ellen
--A dash of posh can make all the difference in your next dish!--