Friday, June 27, 2014

Rhubarb-Lemon Coffee Cake

Coffee cake just got even more delicious!

It's rhubarb season!! This beautiful green and red stalk with a mix of sweet and bitter makes for delectable dishes, such as in pies, jams, sauces, and this coffee cake. This cake, a recipe by Taste of Home, is fantastic!! (I'm just gonna go ahead and say it's the best coffee cake I've ever had. Period.)

It was perfect for a mid-morning brunch on our porch, as we enjoyed the beautiful weather and time with family. Making it was also a breeze! Honestly, the most time consuming part was peeling and chopping the rhubarb nice and small (peeling it isn't necessary, but it will ensure the rhubarb becomes soft and tender as the cake bakes).

Variation Ideas: 
Don't have any rhubarb? No worries! The lemon coffee cake itself, even without the filling was so moist and wonderful! Plus, I'm sure it'd be great filled with lemon pie filling, or any fruit of your choice. Just layer it in where the rhubarb would go!

As another variation - using your favorite crumb topping (say, with oats or granola) would also be delicious! There are many ways you can make this delicious coffee cake your own!


Good News:
Wanna know the best part (besides the taste)? It's healthy! (What!?) I know, that "H" word really packs a lot in today's society - but it's true! I got this recipe from my healthy cookbook by Taste of Home. Now, that doesn't mean you should just devour the entire cake, (although that's what we did...) but you can rest easy knowing your serving is not loaded with a ton of fat and bad calories. (Phew!)


You. Need. To. Try. It! What more can I say?! Even the leftovers (if there are any, that is) stay wonderful - I definitely know I'll be making it again soon! (Maybe even in individual cupcake or mini-loaf pans, just for fun...)

I'm serious. You will love the refreshing lemon and sweet rhubarb flavor in every bite - it's like summer in cake form! And there's so many ways you can posh this! Mix up the filling, use an oat or granola topping, maybe sprinkle extra lemon zest on top, or whatever! Find the recipe here and make it yours.


With love (for food),
Ellen

 --A dash of posh can make all the difference in your next dish!--


Tuesday, June 24, 2014

Campfire Baked Potato

Posh Cuisine: Outdoor Style!

Mid-70s during the day, in the '40s at night - now that's good camping weather! Yes, I was a little chilly at times... (it can be in the '80s and I'll be cold.) However, with a roaring campfire, and these campfire baked potatoes (and a bag of marshmallows, of course), my Daddy-Daughter camping trip this past weekend was wonderful! Not only did I learn some valuable camping skills, manage to keep my feet dry as I crossed flowing rivers and brooks, and catch up on some valuable bonding time with my favorite Daddy - I was also able to bring the posh outdoors! And with some planning ahead, you too can put the posh in campfire cooking!

Now, when it comes to outdoor cooking, my Daddy is a pro. If you can make it indoors, he can make it outdoors. (Needless to say, I ate very well during this camping trip.) And we were really roughing it, too. I made pancakes with no spatula for Saturday's breakfast and ate my dinner that night right out of the pan! (Tough times, I'll tell ya.)

Now, let me tell you about these potatoes! We used Yukon Gold potatoes (they have an awesome buttery taste and make delicious mashed potatoes). We also planned and prepared our meals in advance (a great suggestion for you future campers) and stored everything in a cooler. And, by making this dish in the foil so it was all ready to go, dinner was one less thing to worry about as we hiked, gathered wood, and enjoyed the fresh mountain air.

Now, where's the posh? Adding posh is no challenge when planning ahead. Below you'll see how we set up this potato dish and ways to incorporate your own special posh before heading into the wilderness.

This is where the dish can become whatever you want! We kept it simple by adding a dash of Tuscan seasoning mix, and wrapped it up. *Note: Wrap it in foil twice! The outer foil can get charred and blackened during the baking process, while the potato and first layer of foil stay clean and wonderful!


Once it's all 'poshed' up to your liking and you're ready to eat, it's time to make the fire! That means gathering firewood... When you think you have enough wood - go get more. THEN it should be enough. Next, (carefully) make the fire and once it's going strong, just tuck the foiled potatoes onto the side of the flame. You don't want them directly in the fire (unless you want burned-to-a-crisp baked potato). The potatoes should be perfectly cooked after about 40 minutes (we left ours in a little longer and they were so soft and delicious). Now, what if you didn't pack any tongs/pickups!? How will you ever get them out of the fire!? This is where handmade tongs made out of a tree branch become very useful (bottom center picture). Now that's posh!

See? With some simple planning ahead and preparation, you too can bring the posh outdoors! And may I say, it is delicious and such a comfort at the end of a busy, camping-packed day! What would you add to your campfire baked potato dish?? How would you 'posh' it up???

With love (for food),
Ellen
--A dash of posh can make all the difference in your next dish!--

Friday, June 20, 2014

Cupcake 'Cake' Father's Day Style

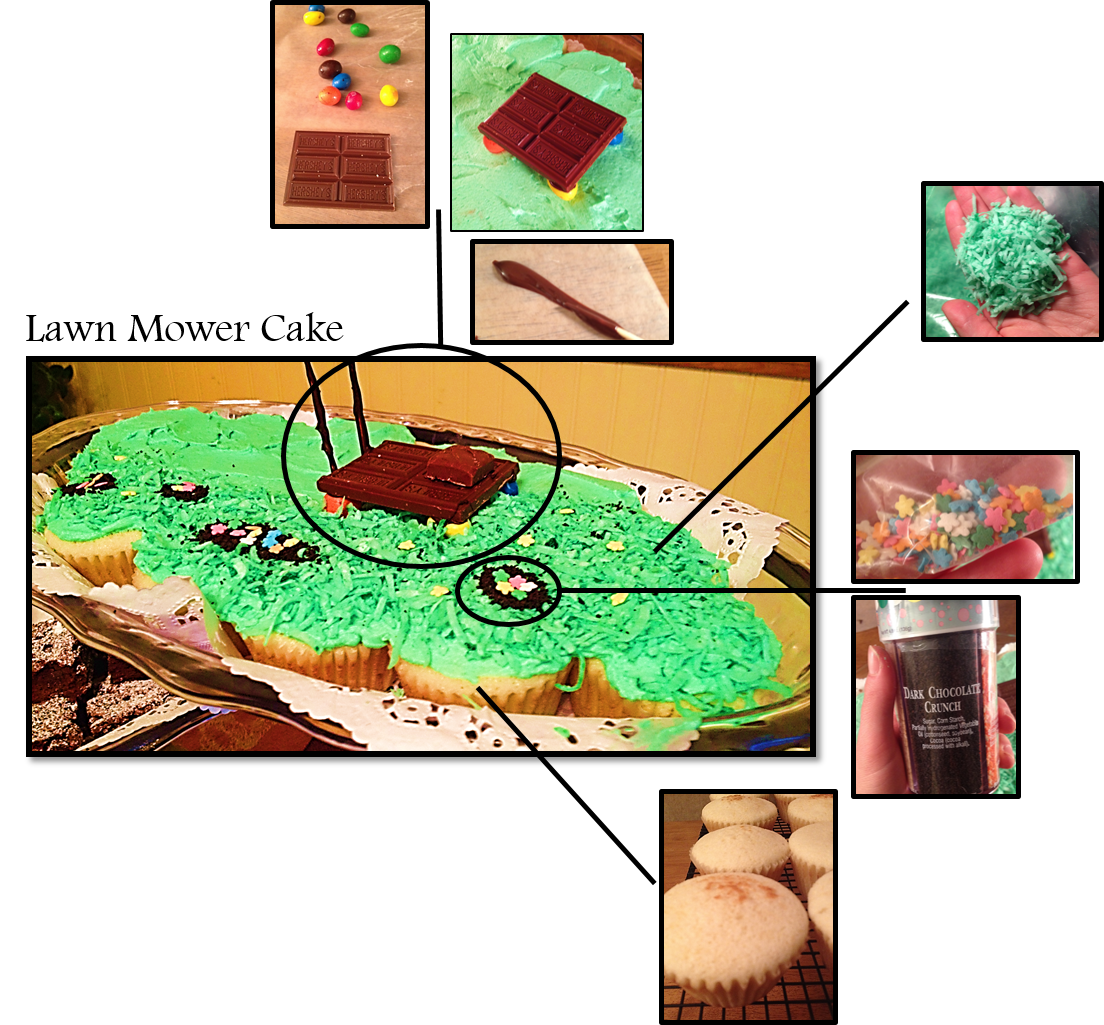
Lawn Mower Cupcake 'Cake'

Let me start by saying, I absolutely LOVE my dad! ("Daddy" to me.) So, what better way to show my love and appreciation for him than a cupcake CAKE with tons of posh on Father's Day!? I had so much fun making this cake, and it was the perfect occasion! Now, I can't wait to show you how I did it!
For starters, this was my first creation in my new 'office!' I transformed part of our basement into a posh work station and this 'cake' was baked, frosted, and poshed in cool comfort. Now, there are so many things you can do with cupcakes - and so much posh potential! Of course, this cake only represents one method. I'll go through this cake step-by-step, but I encourage you to try your own flavors and designs! Also, this 'cake' is a great (and much easier) way to serve cupcakes! (Just saying...)

Cupcake Making
STEP 1: You may be thinking "make the cupcakes, duh," but I recommend starting with a plan. What flavor cupcakes will you make? (Remember, it has to taste just as good as it looks!) What kind of frosting? How will you decorate it? Plan it! This cake was inspired by our yard. My dad was mowing the lawn just that morning, and removed our "dandelion farm" (as my mom calls the pretty yellow weeds). Thus, I knew I had to go with this theme!

STEP 2: Now that you have a plan, you can make the cupcakes! My dad likes yellow cake, and in my refusal to make a boxed cake mix for this occasion, I used a Taste of Home Yellow Layer Cake  recipe. It's a fantastic recipe, too! The cupcakes are so moist, and packed with flavor. This recipe makes 24 normal sized cupcakes (and my 'cake' only needed 15, so viola!) Plus, they baked up in 10 minutes using my Baby Cakes Cupcake Maker (more about this device in my Salad & Cupcakes post).


STEP 3: Once the cupcakes are baked and cooled, it's time to make the frosting and prepare the posh! I made up a simple vanilla butter cream frosting recipe and dyed it green (although you could use whatever frosting recipe you like!) Then, in my serving tray, I packed in the cupcakes so they were nice and snug, and frosted it like one big cake.

Get the cupcakes nice and snug!
STEP 4: The green frosting base represents the "cut grass." Next, I assembled the lawnmower. All I needed was half a chocolate bar, 4 M&Ms, 2 tooth picks, a mini candy bar, and melted chocolate. (Keep in mind, there are many ways to build this with candy, so be creative!) For this method, start by attaching the 'wheels' (M&Ms) to the bottom of the chocolate bar with a little melted chocolate. Once the chocolate has set, place the structure on the cake and attach your 'engine' (mini candy bar) with more melted chocolate to hold it in place. Finally, dip the toothpicks in chocolate and make them the handles. (It's pretty easy, don't worry!)

STEP 5: Next - and my mom had fun with this part - put shredded coconut and green food coloring together in a Ziploc bag, and shake like crazy! Coat the coconut with as much coloring as needed until it reaches a nice 'grass' color. And if you're my mom, keep shaking it and shaking it, try hitting it on the counter a few times, and don't forget to laugh the entire time... Finally, once the coconut is green, dizzy and definitely dead, sprinkle it on half of the cake to represent the uncut grass. 

STEP 6: Using dark chocolate crumbs and flower sprinkles, I made small flower beds in the uncut grass, and sprinkled the yellow flowers as dandelions. That's all there is to it! See it broken down, below.

Each step, and every creative touch is well worth it for this cake! The average cupcake is practically a blank canvas just waiting to be poshed! Still wondering exactly what 'posh' is? Well, in this case, it's the extra effort put into making this cake special. It's taking the time to really put yourself into the dish, as well. It's having fun and being creative! (Never forget the flavor, though. Make your posh match the wonderful flavor in each dish!) And I have to say, every ounce of effort was well worth it for my daddy. For all the things he does for me, this was the least I could do to show him how much I love him! This one's for you, Daddy!

With love (for food),
Ellen
--A dash of posh can make all the difference in your next dish!--

Wednesday, June 18, 2014

Thai Salad - As Seen on TV!

Ty's Thai Salad

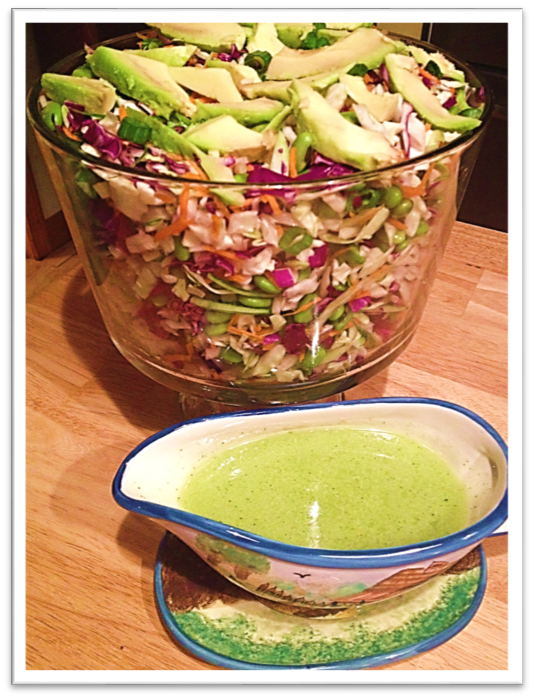
This salad, an original from "Trisha's Southern Cooking" show on Food Network, is amazing! I made it for dinner the other night, and it was such a hit - I had to share! Now, this recipe makes a huge batch! (I even cut it in half and we're still eating leftovers!) That being said, it would make a great addition to a BBQ this summer, or even a potluck. (Or dinner with plenty of leftovers for the week.) The crunch of the cabbage and edamame, plus the sweet lime-cilantro dressing make this salad like no other!
Ty's Thai Salad (With Posh!)
Plus, you can posh it up however you like! I piled plenty of avocado on top, along with some chives. This salad would also look beautiful layered, or with a sliced lime garnish. Whichever way you choose, it will be delicious, zesty, and refreshing. (Don't be surprised if you find yourself making this dressing for other salads, too - it's that good!) People will just eat it up (literally!) once they experience the sweet lime flavor with this crunchy, fresh salad. So thank you Trisha Yearwood! (Find the recipe here.) Enjoy!
With love (for food),
Ellen
--A dash of posh can make all the difference in your next dish!--

Saturday, June 14, 2014

Peanut Butter Cup Ice Cream...Yum!

Happy Birthday, Brother! Now, my brother LOVES peanut butter - except "love" doesn't even come close! Speaking with him last week, he told me his breakfast usually consists of a bowl of vegetables and a spoonful of peanut butter (but not together, don't worry). So, for his birthday - what better gift than peanut butter cup ice cream!? I used homemade peanut butter ice cream as the base, then added in peanut butter cup pieces and a chocolate-peanut butter fudge swirl. How was it, you may ask? In my brother's words, it was "exquisite!" (Which actually translates to "Wonderful! Best ever! Loved every bite! You're the best little sister in the whole world!" - Although the latter part sometimes gets jumbled in translation.) All the same, I was touched. So, happy birthday big brother! (Not that he reads this...his girlfriend usually gives him the "highlights")

Making it was a blast - my first ice cream in my ice cream maker! Plus, it was pretty easy. I started by finding a recipe for peanut butter ice cream (on Pinterest, of course), found here. In this recipe, I used regular sugar, 1/2 cup of creamy peanut butter (can you really have too much peanut butter in peanut butter ice cream?), and regular heavy cream. See my ingredients below. Also, can we take a moment to appreciate the Market Basket theme here?? I love Market Basket... I could spend hours in there! (And I have...)


Then, I cooked it! (kinda sorta) I started by combining everything in a pot on the stove except the eggs. (In the words of Bill Cosby, "you have to be careful with eggs...") After letting the sugar dissolve over low heat, I added a little of the warmed mixture to the egg yolks, then added the egg yolks to the mixture. (This way I wouldn't have scrambled egg-peanut butter ice cream, yummy.) I chilled this mixture overnight in the fridge and poured it in the ice cream maker the next morning.

When it was almost done in the ice cream maker (about 20 minutes later), I added some chopped up peanut butter cups and folded in the chocolate peanut butter swirl. To make this swirl, combine about 1 tablespoon of unsweetened cocoa powder with about 1/4 - 1/3 cup of creamy peanut butter. Microwave for about 30 seconds, or until it's warm and melty. Then, fold it into the ice cream to create a nice swirl effect. Once completed, I stored it in a clean yogurt container wrapped up nicely, and hid it in the freezer! That evening, (after a delicious BBQ turkey dinner), I surprised him with the container, plus 2 peanut butter cups for his presentation (posh), and a new bowl! He was responsible for sending me a picture of the finished product (below).

(I'm digging his posh!) And I'm so glad he enjoyed it! (The spoonful I had scraped from the bottom of the ice cream maker bowl was pretty dang good, too! Very smooth and creamy). Try it for yourself with whatever add-ins, or swirls, or posh you like! And for all you peanut butter lovers out there, (yes, you have some competition once you meet my brother), go crazy! And have fun! :) 
With love (for food),
Ellen
--A dash of posh can make all the difference in your next dish!--

Tuesday, June 10, 2014

(Make Your Own) Pasta Salad


Pasta Salad - YOUR way!

It's finally hot outside! (and humid...let's not forget that.) All the same, I'm loving every warm, sunny day! Now, during a hard (hot) day of baking and yard work, I was in the mood for a colorful, cold pasta salad - but oh what kind do I make!? How much dressing? How many veggies? How much pasta!? Well, lucky for you, I have already fretted over these questions, and after much estimating (and Pinterest pasta salad recipe searching), I've got a great base recipe for pasta salad! I'll show you how I made my pasta salad, with what was in my "fridge-of-goodies," and explain how you can transform this to make your own pasta salad!


First thing's first - you must assess your ingredients! Use whatever veggies you have on hand, any pasta you find in the pantry - even dare to make it a twist on leftovers! (Plus, there's no need to go out and buy an entire pack of bell peppers if you're only going to use 1/2 cup, or a zucchini if you only need half. See what's hiding in that vegetable drawer, first!) Below are the ingredients I had on hand, cut up and ready to go!

With pasta salad, practically anything goes! It's a canvas for true creativity and posh. For example, you could go vegetarian and substitute beans or eggs for the tuna. Perhaps you have leftover ham or turkey in the fridge? Chop it up and toss it in! You could even try adding fresh dill and cucumbers! (My mind is racing with ideas before my fingers can type now...) If you find your salad is too dry, whip up some more dressing or simply drizzle the salad with a bit more olive oil, garlic salt, and pepper. *I usually use garlic salt in cooking because it tends to add a great hint of flavor. Of course, this does not apply to baking (Yum.. garlic-y chocolate chip cookies - no thanks!)


*As a tip, do not rinse the pasta with cold water to 'chill' it faster for the salad. Doing so could prevent the dressing from properly sticking to the pasta. (No one wants slippery, unflavored pasta, right?) I'd recommend making this salad in advance and keeping it in the fridge until serving (overnight would be ideal, plus then the flavors have time to become better acquainted...) Of course, making it up for that day's lunch may require some quick 'freezing' an hour or so beforehand.


Can we also take a moment to appreciate how colorful and healthy this pasta salad is? Full of veggies, grains, a small bit of healthy fats (from the dressing), those beautiful herbs... (and all topped with a bit of 'posh!' - what more could you possibly ask of a simple salad like this!?) So, next time it's hot and humid, and you're in the mood for a refreshing lunch (or even a side dish to dinner), see what you have for leftovers and create! Make your own pasta salad, and don't forget the posh!
With love (for food),
Ellen
--A dash of posh can make all the difference in your next dish!--

Thursday, June 5, 2014

Chicken Cordon Bleu

It's a weeknight....who knows what's for dinner? (or do you say 'supper?') Something full of flavor and fun to make would be nice, right? (Well duh!) Here's where chicken cordon bleu, with its many variations and endless possibilities, comes to the rescue!

This is a very simple recipe, leaving you plenty of room to be creative and add your own flair! Plus, once it's prepared, it just bakes in the oven while you go about the rest of your weeknight business! (Unless you're me, who didn't want to leave the kitchen and practically sat in front of the oven, waiting for it to be done.) 

Part 1: Now, onto making it! I broke the recipe into two parts, to keep it simple. In this first part, I prepared the ingredients, and made up the cordon bleu rolls. It started with pounding the chicken (to death!). As a tip, covering the chicken with plastic wrap before pounding it, will keep the meat from tearing (and it's a bit more sanitary). Start in the center and work your way out for the best results. Once flattened, top with cheese and ham, and roll it up! Also, you can use any type of ham, such as deli slices, leftovers, etc. This ham, below, is leftover from a ham bone we did on the grill earlier in the week. Once all the rolls are made, you're ready for part 2!

Part 2: Not too difficult, right? Next, we make the topping! Seasoned breadcrumbs would do the trick, but where's the fun in that? Be creative here and add whatever seasonings (fresh or dried) you have on hand! Then, after brushing each roll with the egg wash, pat the crumb topping all over the chicken, and top with a tasty garnish (like fresh rosemary leaves).


Bake at 350 degrees for about an hour, or until the inside of the chicken has reached 165 degrees (mine took a little over an hour). Remember, chicken is not one of those meats where "medium" or "medium-rare" will do. It must be cooked all the way! Another way to ensure chicken is fully cooked is by cutting into the thickest part with a sharp knife. If the juices run clear and there is no pink, it's all set!


These made pretty large cordon bleu rolls - 2 were perfect for my family of 3! Also, if you happen to have leftovers...mine made an excellent chicken (cordon bleu) salad when mixed with cranberries, celery, almonds, red onion, a little mayo, and a homemade Greek yogurt dressing. What would you do with your leftovers? What type of bread crumb mixture would you make? Feel free to 'posh' up this recipe as much as your heart desires! It's a great base recipe, with room for creative flair - just go for it!
With love (for food),
Ellen
--A dash of posh can make all the difference in your next dish!--

Tuesday, June 3, 2014

Lemon Angel Food Cake - Artistic Fun in the Kitchen

Lemon Angel Food Cake (with Candied Lemon Peel, of course!)

I've never really been a huge fan of arts and crafts, or the patience required of them. Yet, for some reason...when it comes to making and decorating cakes, cookies, or treats - I'm there! I love it! Sometimes nothing beats taking the time to put some artistic flair on an average cake, plus the anticipation of presenting it for dessert! So last week, I decided to do just that and made a lemon angel food cake!
Using a recipe from Taste of Home, found here for Lemon Angel Food Supreme, I made the cake part as the recipe directed, while also adding about 2 teaspoons of freshly grated lemon zest (for extra lemony flavor). This was my first 'from scratch' angel food cake, so I followed the directions very carefully! It wasn't as hard, or complicated, as it may seem. The biggest "trick" is making sure you've whipped the batter enough, and have the proper peaks. Of course, another important part of making angel food cake is the pan... which I didn't realize we didn't own until after I decided to make this, so I improvised! Since I didn't have a tube pan, I used 2 spring form (or cheesecake) pans with half pint jars placed in the center. (Angel food cake actually climbs this center tube as it bakes.) Plus, then I'd have a layered cake to decorate - more possibilities! 
They seemed to work great, too! (The house smelled so good by this point, just saying.) As soon as they were done (dry on top, sprung back when tapped), I flipped them over to cool. This, too, is important for it keeps the cakes from collapsing. 
Next, (after what seemed like forever) they were cool enough to remove from the pans and frost! Since the pans were not greased or oiled (another important rule in making angel food cake), it was a bit of an adventure getting the cakes free... Using a knife, I separated the sides and carefully pulled the jars from the centers. (And once the cakes were free, the hardest part was over!) Then, I got to whip up (literally) the frosting. For the recipe, see here. To this Sweetened Whipped Cream, I added 1 teaspoon of lemon zest, about 1 teaspoon of lemon juice, and a few drops of yellow food coloring (then it even looked like lemon!) I also made two batches to cover my two-layered cake.
Decorating: This was my favorite part! As a tip, line your cake stand with waxed paper before frosting the cake, so any drips/messes can be easily removed. This leaves you with a beautiful cake and clean stand! I also added some fresh blueberries for even more color and flair (plus taste! I mean lemon and blueberries? How much more refreshing can this dessert get!?) Decorating is the part where no recipe can direct you - where true 'posh' is really shown! There are millions of ways to decorated a cake, go crazy! 
Candied Lemon Peel: So what's all this about the candied lemon peel, you may ask? Although a bit time consuming (not too much, though, I did this all while letting the cakes bake and cool), it's so worth it! It may seem like a lot of steps (like boiling it four times...), but it leaves you with soft, chewy, sugary lemon candy! And these make great, edible decorations, or you can cut them into larger pieces or shapes and serve them as candies!

Tube Pans: As you can see, this cake was quite an adventure! Between having never made angel food cake from scratch, not having a tube pan, and trying to give it a new spin with extra 'posh,' making it was an exciting afternoon activity! And of course, the next day my parents and I stopped by a second hand store (I love thrift stores - they have the neatest stuff!). There, I found not one, but TWO tube pans! And both were in excellent condition! So we bought them...both. (below) These can be rather difficult to find nowadays, so I recommend trying thrift stores. Look for pans with feet on the top, (so the cakes can cool upside down), and removable bottoms (remember, don't grease/oil the pans). And they shouldn't be too expensive at thrift store prices. (I got these two pans, a book, an elephant key chain, and mom got 2 plates for a grand total of $4...not too shabby at all!)
I hope you enjoy this cake! It was perfect for dessert, so airy and lemony! Even the leftovers stayed light and fresh! And it was so much fun to make and decorate! How would you decorate it? Everybody's 'posh' is unique and beautiful - just have fun!

With love (for food),
Ellen
--A dash of posh can make all the difference in your next dish!--


Sunday, June 1, 2014

AMAZING Whole Wheat Banana Bread

BANANA BREAD - Whole Wheat & Wonderful!

There are SO MANY recipes out there for banana bread...trust me. I've looked! And then I found this one...You see, these browning bananas in my kitchen have been watching me for a couple days, and I knew I just had to take care of them. No banana looks at me that way and doesn't get made into a recipe! Meanwhile, I had been looking for a banana bread recipe which could be considered a "bread"  (meaning we could slice it, toast it, peanut butter it up, etc) rather than a cake or 'treat.' PLUS I wanted it to be made with whole wheat flour and act as a good, solid foundation for breakfast. This bread, below, this one simple recipe - made all these wishes come true. (But be careful what you wish for... or else you, too, could end up with 2 loaves of absolutely delicious banana bread and no self control to eat just one slice for breakfast.)
By searching on Pinterest (and after gawking at all the mouthwatering pictures), I found several recipes, most of which called for applesauce, or honey, or didn't lend themselves to becoming whole wheat. First, we didn't have any applesauce (so I planned on using plain nonfat Greek Yogurt, instead). Second, my honey stash was running low. Thirdly, I wanted this to be a breakfast type of bread, so the 'healthier,' the better. Finally, I settled upon the recipe found here, with a couple modifications of my own... 


This recipe was so easy, too! Mix the wet, add the dry, pour into the prepared pans, and bake! (Then stare at it until it cools enough to eat it.)

And finally, slice it up and eat it!! Its amazing!! It totally keeps it's "bread" shape (not too crumbly or cake-like), it's fantastic with peanut butter (and the extra crunchy honey peanut butter my daddy picked up...great find!), and toasted... words can't even describe it.  
So, search for that perfect whole wheat banana bread goodness no longer - and try this one! Eat it for breakfast, make it a snack, do it up sandwich-style, anything goes! (And then let me know how you like it!) And see how you can make it your own. Add that 'posh' and see what happens :)

With love (for food),
Ellen
--A dash of posh can make all the difference in your next dish!--